Apple iCloud Flaws you can use to your Advantage or Disadvantage

Few years ago or so, it was debated that smartphones be built with Kill-switch, a feature that will give every smartphones users the ability to kill or otherwise destroy the phone remotely in cases that it is lost or stolen and with it; vital information you cannot afford to let in a wrong hand.
visit iOS Solutions on ArykTECH

In response to that debate, Apple introduced iCloud; Find My iPhone to be precised.
Find My iPhone is a feature built-in with most Apple devices. This feature can be accessed using an Apple ID which is setup with the phone mostly, at the first-time use.

Since the Apple A4 devices, Apple has being consistently strengthening the security of the iCloud Find My Phone feature and indeed, it is secured however; this Apple Find My iPhone feature has some flaws which could be referred to as weaknesses.

Wonder what the weaknesses are? Yes. Here they are.

1. GPS/ Location Service: the aim of the Apple Find My iPhone feature is to help you remotely access and control your Apple device in case it is lost or stolen but this feature will not be fully active except GPS/Location service is turned-on on that particular Apple device.

In essence, it is impossible to remotely control an Apple device whose Location service is turned off -this is a weakness! However, it should be noted that you can instruct Apple to Erase or Lock the Apple Device in question whenever it is found thus; when the location service is turned on.

ProTIP:
- It is a good practice to always have your location service turned-on. Doing so will give you more control and confidence over your Apple Device.
- If you are security conscious and DO NOT want unwanted apps have access to your movements, you may turn-off your location service but USE strong lock-password instead.

Recommended:
- When you Lost your Apple Device: What to Do

2. Voice Recognition System: from personal experience, more than half of those who bring Apple Devices to ArykTECH for iCloud Removal or Unlock service are legitimate owner(s) of the device(s).  Why does this happen?
Most people setup iCloud on Apple devices not knowing the implications or the functions of the services.
In fact, majority don't use more than the picture, music and few other backup and sync services on their Apple devices.

However, when a new update arrives and the device is updated, they come to realize the number one reason for setting up an Apple device with Apple ID; because the device cannot be setup except the correct username and password used to setup the device in the first place are supplied. Worst still, no Voice Recognition system built with the Apple Device to identify the original owner.

ProTIP:

  • Setup Apple ID on your device using publicly available email services such as Gmail, Yahoo etcetera rather than Apple iCloud ID such yourname@iCloud.com.
  • Setup a strong but relevant password for your Apple Device.

Recommended:
- How to Setup Better Password for your Apple ID

3. Fingerprint System: although, this system cannot be incorporated in all Apple devices because of the hardware, but, starting from Apple iPhone 5s, this system should work. If this is done successfully; if not all original users that have lost access to their Apple device can regain access to it, future deficiency can be prevented using the fingerprint System.

Advertisement

Similar Tutorials


Lost your Apple Device? What to Do Next

Either that it is misplaced, stolen or lost; mobile phones often carry lots of vital information, both personal and financial information stored on smartphones are often put to risks when such phone is lost especially; when it falls on a wrong hand.

In the event that you misplaced, lost or that your Apple Device is stolen, what should you do to minimize your risk? Here, we discuss what you should do in order to minimize your risks or that may eventually help you recover your iPhone or iPad.

1. Put your Apple Device in Lost Mode: the moment you realized that you have misplaced or lost your iPhone or iPad, visit www.iCloud.com and from there, put the Apple Device in Lost Mode. This Mode will immediately lock the iPhone or iPad so that the bearer will have to enter your iCloud details (Userrname and Password) before he/she can have access to the phone.

You don't know how to put your iPhone or iPad in Lost Mode from iCloud.com? See this page: How to Put your iPhone or iPad in Lost Mode.


2. Call your Line: if you have successfully safeguarded your vital information on the Apple Device by putting the iPhone or iPad in Lost Mode, you should now call the line.
In Lost Mode, calls can still be received on the phone. If luck has it, your phone might still be in  tender hands, the bearer picks up the call and instructs you how to retrieve your phone.

3. Erase the iPhone or iPad Remotely: if after the first 3 days that you have put the iPhone or iPad in Lost Mode, you are still unable to reach the bearer of the iPhone or iPad, visit www.iCloud.com once again and erase the device.
By erasing the device, you can no longer monitor it and Lost Mode will seize to work but at least, the bearer will no longer have access to any content of the phone whatsoever.

ProTIP:
- It is a good practice to leave an appealing message on the Apple Device via www.iCloud.com when you erase the device. The message should contain your contact. You never can tell, the bearer may one day decide to call you.

NOTE:
The procedure for Erasing your Apple Device is similar to the one used when you put it in Lost Mode.

Advertisement

Similar Tutorials


How to Setup Secured yet Friedly Apple ID Password

Sometimes, your fight against something may turn out to be against you. Such is the case with wrongly formatted Apple ID passwords. When you create an Apple ID password so strong that no one can easily guess it and forgot to make it friendly to yourself, you might eventually find yourself battling to recollect the password you have created by yourself.

Worst still, Apple does not respond to your plea to recover the forgotten Apple ID password. If you could not use the Forgotten Password link to recover your Apple ID Password, that might be the end of it.

Here, I would be discussing how to create a strong yet friendly password for your Apple ID so that you likely won't find yourself feeling like an idiot trying to remember the password you have created by yourself.

1. Desist from Using Common Names: researches show that common names such as "micheal", "Kelvin" combined with numeric are commonly used as password and so, hackers design programs that automatically injects these passwords in your account.

Good Practices:

  • To use names as your password, use "Micheal (with Capital M) instead of micheal".
  • Attach a punctuation mark to your name so that it will be "Micheal_" or "Micheal-".
  • In most cases, not writing the name completely straight usually make the password more friendly to you yet harder to guess. Something like "Michealine_" is better.

2. Use of Birth Date: if it is used properly, the use of your birth date is likely the strongest password you may never forget.

Good Practices for using Birth Date as Passwords

  • Attach punctuations to your birth date. Something like 12-12-1970 for someone whose birth date is December 12, 1970.
  • Make it alpha-numeric e.g dec12th1970.
  • Attach Special special signs/character. E.g @dec-12th-1970
  • Make it alpha-numeric then, capitalize it. E.g Dec12Th1970

3. Desist from Using Common Phrases. Phrases like Iloveyou, letmein are usually used as passwords. Of course, hackers are aware of these phrases and they use them well to gain access to several accounts.

4. Be Mobile! Always use the same email you use as your Apple ID Recovery Email on your Apple Devices. This will really help you a long way if you ever forgot your Apple ID password. However, do always lock your Apple Devices with strong but friend passwords.

Advertisement

Similar Tutorials


Solution to "Device Offline" in Command Prompt for Android Devices

Often times, command prompt displays "Device Offline" when you try to work on some android device in command prompt especially, when you have just flashed Custom ROM on the phone. Either that you want to flash certain Disc Image file such as recovery.img, boot.img or any other similar files. Or, that you simply want to carry-out any other command-line related operations on the android device, such operation will not be possible since command prompt could not detect your phone.

To solve this simple yet complicated issue, you can trust MTK Droid Tools.

MTK Droid Tools is a common Windows Tool for re-working android devices especially, MTK Android devices such as Tecno, Infinix, Gowin, Gionee and others.

Solving "Device Offline" Issues In Command Prompt
1. Download MTK Droid Tools from Here and then, setup MTK Droid Tools on your PC. See here: How to Setup MTK Droid Tools on Windows PC.

2. Lunch MTK Droid Tools on your PC.

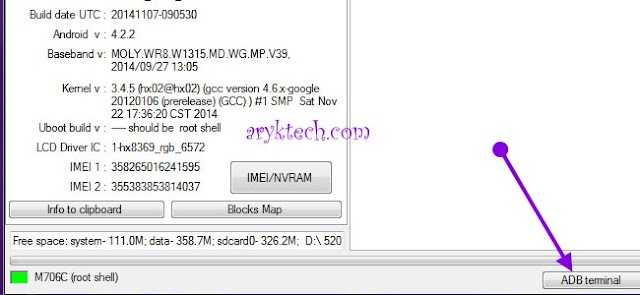
3. Wait few seconds until MTK Droid Tools detects the phone and displays the phone information on the screen.
NOTE: 1) USB Debugging must be set to "ON, enabled" on the phone. 2) The Drivers must be installed.

4. Click "ADB Terminal" on MTK Droid Tools.

5. On the new Command Prompt Window that opens, you can begin initiating any ADB/Fastboot command-line you wish to use for the phone.
Advertisement

Similar Tutorials


Infinix Hot Not Signing in After Reset or Data Wipe? Solution is Here

Recent android 5.1.X Lollipop now have a feature similar to Apple Find My iPhone and BlackBerry Anti-theft features. This feature prevents, protects and secures your phone in case it is lost or stolen. Thus, whoever have to use the phone must sign-in your primary Google Account linked and in sync with the android device as at the time it is lost.

However, as recently experienced on Infinix Hot 2, X510, the phone was brought to my office for repairs and was eventually factory-reset but could not get pass the setup stage even after entering the correct password and username of the Google account that was linked with the phone before it was factory reset.

What the phone does is that, after entering the correct Username and Password, it keeps asking for the Username and Password again and again. Even after flashing the phone using SP Flash Tool, the problem persists.

I noticed that lots of Infinix Users are already experiencing this kind of error which I refer to as "BUG". If you are one of them, here, I narrate how to simply get pass the setup stage.

NOTE: this process will help you flash the phone in such a way that it would not request for Username or Password again.

1. Download USB VCOM Drivers from here, SP Driver Auto-installer from here and SP Flash from here. Install the 2 drivers and setup SP Flash Tool on your PC.

2. Download Stock MTK Backup for your Infinix phone, e.g Infinix Hot 2. Download all MTK Android Stock ROM and Firmware from here.

3. Lunch SP Flash Tool on your PC.

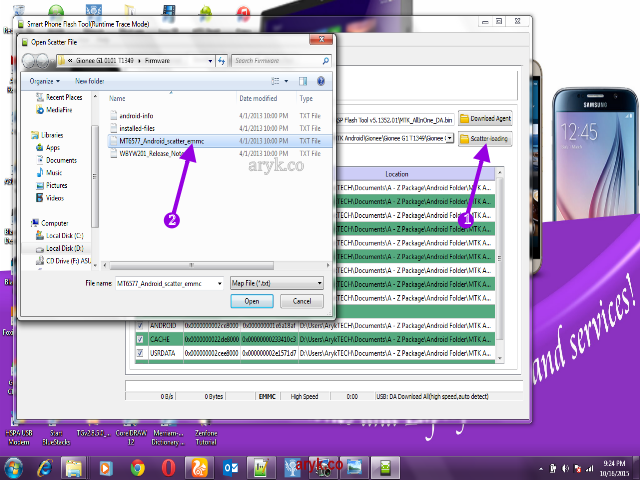
4. Click on Scatter File and then, navigate to the folder wherein you have downloaded/extracted the Stock ROM for the phone in question. Select the Scatter File as seen in the image below.

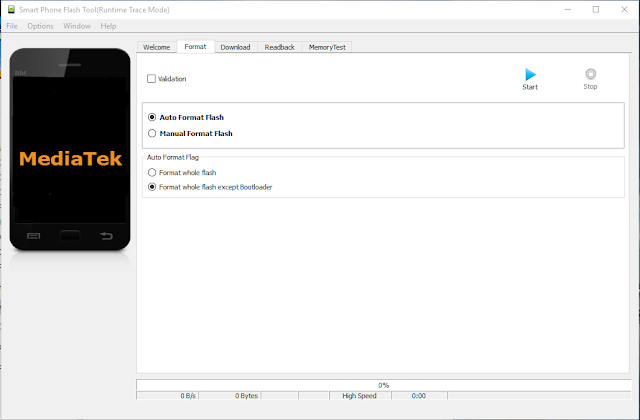
5. Click on "Format" tab on SP Flash Tool.

6.Setup the tab as seen in the image below.

7. Click "Start".

8. Now, Switch off your phone and/remove the battery, re-insert the battery and connect it to the PC. Wait few seconds for SP Flash to detect the phone and commence the formatting operation.

NOTE: this process will format all the partitions on your android device except the bootloader/preloader therefore, your phone will remain "DEAD" until you re-flash the Stock ROM back on it following the normal procedure for flashing stock MTK Backup on Infinix android devices.

For info on how to flash Stock ROM on your Infinix android device, see: Pro Guide for Flashing Stock ROM On MTK Android or the specific guide on how to flash Infinix MTK Android device here.
Advertisement

Similar Tutorials


Want to Bypass your iCloud Lockscreen? 5 Tips that Might Help

Either that you have an iCloud-Locked iPhone, iPad or iPod that originally belongs to you or that you have someone whose iCloud account is locked and you want to unlock it for that person, these tips might help you get the details for the iCloud account and get pass the iCloud lockscreen on the iPhone or iPad.

iCloud is a security feature on iPhone, iPad and iPod that adds an extra layer protection for users documents. It adds extra layer protection to your documents because it makes it possible for you to remotely access your iDevices and erase (if you want) the phone remotely. If the phone is successfully wiped, the bearer would have to know your iCloud Account credential before the phone can become useable again.

Because iCloud details usually, the Username and Password are not required only when your iDevice is wiped, you need to input the details when you perform actions such as upgrading the phone or resetting it. This means, even you; the original owner of the iPhone, iPod or iPad may be locked out; making the iDevice unusable by you if you have forgotten your password.

In case you are a victim of either of the circumstances narrated above, here are few tips that may get you pass the iCloud Lockscreen.

1. Visit iCloud.com on your PC to use Forgot Password link on the page to recover your iCloud Account credentials. Typically, you will be asked to enter your Apple ID then, choose either to recover the account by using your recovery email or providing your security questions.

If you have opted for the recovery email method, a link would be sent to your email address. Just login your email address, locate the link and click it. You will be returned to Apple Page wherein you canset a new password for the iCloud/Apple account.

2. Having difficulties in retrieving the recovery email from Apple? Sometimes, the email to reset your iCloud account password may not be delivered to your primary email address. The most likely reason for this to happen is that you have set an email address different from your iCloud Username (email).

Try to make a list of all the email addresses you have used (and still using). Check all of them to be sure.

3. If you have opted for the Security Questions method, be sure that you know the Birthdate you use provided while you were registering the iCloud account. If you are not sure of this, do not attempt the Security Questions method to recover your iCloud account.

4. If you get pass the Birthdate, your chance is high. Now, you should be able to provide answers to your Security Questions meanwhile, bear it in mind that the answers are not case sensitive.

5. If having done all these, you could still not get back your iCloud Account, see the page here: iOS Solutions. We can help you recover the phone at a cost.

Advertisement


Similar Tutorials


How to Flash iTel Android Devices Using SPD Flash Tool

Just like the MTK android devices, there are several android devices powered by SpreadTRUM of which iTel android devices are the commonest SpreadTRUM android device in Nigeria. As common with every gadgets, there are times when these devices would develop faults, either software or hardware.
Of course, you would need to service it. -that's exactly why this tutorial is here.

This tutorial is made specifically for those who have purchased the A B C Package. A B C Package is a special phone software repair package prepared for every individual who wish to learn solutions to various phone software problems and perhaps, start practicing mobile phone software repairs hence; earning living in the cause. Details about A B C Package is here.

WHAT IS FLASHING?
Flashing is the process of reverting your iTel android device to its factory defaults by means of flashing STOCK iTel firmware on it. Or, by means of flashing Custom ROM/Firmware on it.
Flashing is done to correct any software malfunctions experienced on any iTel android devices. Even those that seem persistence after performing a Factory-Reset would be corrected by flashing the iTel android device.

Unlike the MTK android devices, the procedures for flashing SpreadTRUM android devices is straight therefore, I would dive straight to the flashing exercise.
Now, shall we proceed?

1: DEFINITIONS OF TERMS USED
Before we begin the flashing exercise, let us do a bit of introduction by introducing ourselves to the terms to be identified while flashing iTel android.

  • OS VERSION: this refers to the version of the firmware for which you have and that that you are going to use to flash the iTel android device.


  • MODEL VARIANTS: usually, there are different variant(s) of some iTel android devices as in the case of iTel 1351E and 1351.

HOW CAN YOU KNOW THE DIFFERENT VARIANTS OF iTel ANDROID DEVICE?
For iTel android device, it's simple. By simply checking the label behind the battery seat on the phone or by navigating to Settings >> About >> section of the phone, you can see detailed information about the phone right there.


  • FIRMWARE: iTel firmware is usually compressed and packed in a compressed file known as .PAC. This file, when flashed on iTel android devices, contains all the images, GUI and the entire files necessary to run android OS on your iTel android device and other SpreadTRUM android devices parked in similar format.

Flashing can upgrade or downgrade your iTel android device. It all depends on the versions of the firmware you used while flashing the phone.
WHERE CAN YOU DOWNLOAD ITEL FIRMWARE?
You may download Firmware for most iTel android devices on ArykTECH.com here.

HOW TO FLASH iTEL ANDROID DEVICE USING SpreadTRUM FLASH TOOL


1: Download the specific firmware for the iTEL android device from the link above.

2: Download SpreadTRUM Flash Tool from here and then, download Android Drivers for SpreadTRUM android device from here.

3: Open the SpreadTRUM Flash Tool you downloaded from the link above. It is compressed in a zip file, simply extract it onto a folder on your PC, open the folder to locate the SpreadTRUM Upgrade Tool application and then; double-click it to lunch the program.
See the image below:

NOTE: Remember to install the SpreadTRUM Android Drivers following the normal Windows Drivers installation procedures.

4: Switch off your iTel android device and then, connect it to your PC.

5: Now, select the specific STOCK FIRMWARE you downloaded for your iTel android device by clicking on the Select Pack icon. See the image below.

6: As soon as the file is loaded successfully, click on "Download Button" to commence the flashing operation.

NOTE: During the flashing operation, your phone may reboot once or twice. Just leave it and do not interrupt the operation.

7: Once the flashing operation is successfully completed, you will see "Previous Passed" message displayed in green on the SpreadTRUM Flash Tool.

CONGRATULATIONS! You have now successfully flashed your iTel android device.
Advertisement

Similar Tutorials