Determine light level, Sensor.TYPE_LIGHT.

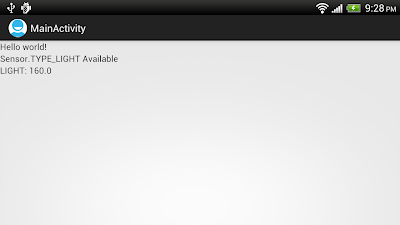
Example to determine light level using Android light sensor:

Determine light level, Sensor.TYPE_LIGHT.


package com.example.androidsensor;

import android.hardware.Sensor;
import android.hardware.SensorEvent;
import android.hardware.SensorEventListener;
import android.hardware.SensorManager;
import android.os.Bundle;
import android.app.Activity;
import android.widget.TextView;

public class MainActivity extends Activity {

TextView textLIGHT_available, textLIGHT_reading;

@Override
public void onCreate(Bundle savedInstanceState) {
super.onCreate(savedInstanceState);
setContentView(R.layout.activity_main);

textLIGHT_available
= (TextView)findViewById(R.id.LIGHT_available);
textLIGHT_reading
= (TextView)findViewById(R.id.LIGHT_reading);

SensorManager mySensorManager = (SensorManager)getSystemService(SENSOR_SERVICE);

Sensor LightSensor = mySensorManager.getDefaultSensor(Sensor.TYPE_LIGHT);
if(LightSensor != null){
textLIGHT_available.setText("Sensor.TYPE_LIGHT Available");
mySensorManager.registerListener(
LightSensorListener,
LightSensor,
SensorManager.SENSOR_DELAY_NORMAL);

}else{
textLIGHT_available.setText("Sensor.TYPE_LIGHT NOT Available");
}
}

private final SensorEventListener LightSensorListener
= new SensorEventListener(){

@Override
public void onAccuracyChanged(Sensor sensor, int accuracy) {
// TODO Auto-generated method stub

}

@Override
public void onSensorChanged(SensorEvent event) {
if(event.sensor.getType() == Sensor.TYPE_LIGHT){
textLIGHT_reading.setText("LIGHT: " + event.values[0]);
}
}

};

}


<LinearLayout xmlns:android="http://schemas.android.com/apk/res/android"
xmlns:tools="http://schemas.android.com/tools"
android:layout_width="match_parent"
android:layout_height="match_parent"
android:orientation="vertical">

<TextView
android:layout_width="wrap_content"
android:layout_height="wrap_content"
android:text="@string/hello_world"
tools:context=".MainActivity" />

<TextView
android:id="@+id/LIGHT_available"
android:layout_width="fill_parent"
android:layout_height="wrap_content" />
<TextView
android:id="@+id/LIGHT_reading"
android:layout_width="fill_parent"
android:layout_height="wrap_content" />

</LinearLayout>


Related:
- Access temperature sensor, TYPE_TEMPERATURE and TYPE_AMBIENT_TEMPERATURE.
Access temperature sensor, TYPE_TEMPERATURE and TYPE_AMBIENT_TEMPERATURE.

The temperature sensors (Sensor.TYPE_TEMPERATURE/Sensor.TYPE_AMBIENT_TEMPERATURE) are used to determine temperature of the phone, for internal hardware. They are not available on all device. (It's not available on my HTC One X and HTC Flyer!)

Sensor.TYPE_TEMPERATURE is deprecated, use Sensor.TYPE_AMBIENT_TEMPERATURE instead.

Example:
package com.example.androidsensor;

import android.hardware.Sensor;
import android.hardware.SensorEvent;
import android.hardware.SensorEventListener;
import android.hardware.SensorManager;
import android.os.Bundle;
import android.app.Activity;
import android.widget.TextView;

public class MainActivity extends Activity {

TextView textTEMPERATURE_available, textTEMPERATURE_reading;
TextView textAMBIENT_TEMPERATURE_available, textAMBIENT_TEMPERATURE_reading;

@Override
public void onCreate(Bundle savedInstanceState) {
super.onCreate(savedInstanceState);
setContentView(R.layout.activity_main);

textTEMPERATURE_available
= (TextView)findViewById(R.id.TEMPERATURE_available);
textTEMPERATURE_reading
= (TextView)findViewById(R.id.TEMPERATURE_reading);
textAMBIENT_TEMPERATURE_available
= (TextView)findViewById(R.id.AMBIENT_TEMPERATURE_available);
textAMBIENT_TEMPERATURE_reading
= (TextView)findViewById(R.id.AMBIENT_TEMPERATURE_reading);

SensorManager mySensorManager = (SensorManager)getSystemService(SENSOR_SERVICE);

Sensor TemperatureSensor = mySensorManager.getDefaultSensor(Sensor.TYPE_TEMPERATURE);
if(TemperatureSensor != null){
textTEMPERATURE_available.setText("Sensor.TYPE_TEMPERATURE Available");
mySensorManager.registerListener(
TemperatureSensorListener,
TemperatureSensor,
SensorManager.SENSOR_DELAY_NORMAL);

}else{
textTEMPERATURE_available.setText("Sensor.TYPE_TEMPERATURE NOT Available");
}

Sensor AmbientTemperatureSensor
= mySensorManager.getDefaultSensor(Sensor.TYPE_AMBIENT_TEMPERATURE);
if(AmbientTemperatureSensor != null){
textAMBIENT_TEMPERATURE_available.setText("Sensor.TYPE_AMBIENT_TEMPERATURE Available");
mySensorManager.registerListener(
AmbientTemperatureSensorListener,
AmbientTemperatureSensor,
SensorManager.SENSOR_DELAY_NORMAL);
}else{
textAMBIENT_TEMPERATURE_available.setText("Sensor.TYPE_AMBIENT_TEMPERATURE NOT Available");
}
}

private final SensorEventListener TemperatureSensorListener
= new SensorEventListener(){

@Override
public void onAccuracyChanged(Sensor sensor, int accuracy) {
// TODO Auto-generated method stub

}

@Override
public void onSensorChanged(SensorEvent event) {
if(event.sensor.getType() == Sensor.TYPE_TEMPERATURE){
textTEMPERATURE_reading.setText("TEMPERATURE: " + event.values[0]);
}
}

};

private final SensorEventListener AmbientTemperatureSensorListener
= new SensorEventListener(){

@Override
public void onAccuracyChanged(Sensor sensor, int accuracy) {
// TODO Auto-generated method stub

}

@Override
public void onSensorChanged(SensorEvent event) {
if(event.sensor.getType() == Sensor.TYPE_AMBIENT_TEMPERATURE){
textAMBIENT_TEMPERATURE_reading.setText("AMBIENT TEMPERATURE: " + event.values[0]);
}
}

};

}


<LinearLayout xmlns:android="http://schemas.android.com/apk/res/android"
xmlns:tools="http://schemas.android.com/tools"
android:layout_width="match_parent"
android:layout_height="match_parent"
android:orientation="vertical">

<TextView
android:layout_width="wrap_content"
android:layout_height="wrap_content"
android:text="@string/hello_world"
tools:context=".MainActivity" />

<TextView
android:id="@+id/TEMPERATURE_available"
android:layout_width="fill_parent"
android:layout_height="wrap_content" />
<TextView
android:id="@+id/TEMPERATURE_reading"
android:layout_width="fill_parent"
android:layout_height="wrap_content" />
<TextView
android:id="@+id/AMBIENT_TEMPERATURE_available"
android:layout_width="fill_parent"
android:layout_height="wrap_content" />
<TextView
android:id="@+id/AMBIENT_TEMPERATURE_reading"
android:layout_width="fill_parent"
android:layout_height="wrap_content" />

</LinearLayout>


Related:
- Determine light level, Sensor.TYPE_LIGHT.

Read Aperture, Exposure Time, and ISO from Exif

The post "Read EXIF of JPG file" demonstrate how to read Exif from JPG file using ExifInterface. Start from API Level 11, Exif tag of TAG_APERTURE, TAG_EXPOSURE_TIME and TAG_ISO was added in the android.media.ExifInterface class. You can simple modify the code in "Read EXIF of JPG file" to read Aperture, Exposure Time, and ISO from Exif.

Samsung Pays $1B to Apple with 30 Truck Loads of 5 Cent Coins? It's NOT TRUE.

A funny story is sweeping the internet. Samsung paid $1.05 billion to Apple by sending 30 trucks containing five-cent coins.

According to PaperBlog, the trucks were sent to Apple's main office in California this morning. Initially, the security of the company prevented the intrusion. However, Apple CEO Tim Cook received a call from the chief executive of Samsung that they have sent the payment for the fine ruled by the jury in the recently concluded patent battle of the two tech giants.

The funny thing is, the story originated from a meme of the popular website 9Gag.com. Thus, the news report is a hoax.

Details: http://au.ibtimes.com/articles/378402/20120829/samsung-pay-apple-1-billion-coins-five.htm

Modificando a LockScreen com o Widget Locker - Tutorial


Bom dia,boa tarde ou boa noite. ^^

Uma das coisas que mais fico perplexo no Android é o "poder ilimitado" de customização. Já postei antes um tema que deixá seu "droid" com a cara do Windows 7.  Másss hoje vou explicar como modificar a sua LockScreen com o aplicativo WidgetLocker.  
Mas atenção, o nível da modificação que vamos fazer não é tão simples quanto apenas instalar um mero e simples aplicativos (dependendo de alguns pode ser molezaaa)

Ok, quando eu informei que não é tão simples (Láaa em cima ^ rs') é porque necessita de root pelo método que eu  usar. ^^ 

(ALGUMAS LOCK SCREEN'S) ^^
Sobre a modificação que vamos fazer, ela a partir desse momento fica simples. Vamos entrar no aplicativo (apk) e modificar as imagens dos slides para desbloquear a tela. Simples né?


Root Explorer & WIDGET LOCKER.
Esse é o jeito que acho mais simples, e o que eu usei mesmo. Atenção para não fazer nada errado. Como você estará mexendo com arquivos do sistema "DROID", favor não mexer nos arquivos que não estiverem descritos aqui abaixo.

Mãos a obra!
  1. Copie a pasta Mods (que você baixou lá em cima) para algum lugar simples do seu PC (como o desktop).
  2. Abra o Root Explorer (no celular), vá até /data/app.
  3. Encontre com.teslacoilsw.widgetlocker-1.apk.
  4. Copie-o para seu SD Card (deixa apertado, copy, aperta Menu, bookmarks, sd card, e paste).
  5. Monte seu aparelho no PC para ver o SD Card.
  6. Abra o apk no seu PC (com o 7Zip, ou Winrar, ou Ark se for linux, ou qualquer coisa que você saiba usar).
  7. Vá até a pasta Mods, e copie as duas imagens que você quer colocar no WidgetLocker na pasta /res/drawable-hdpi . As imagens normalmente vem em pares se forem para mudar o iPhone Slider, apenas uma para o HTC, e por aí vai.
  8. Monte o cartão no aparelho de novo, e navegue até o sd card pelo Root Explorer.
  9. Copie o apk modificado para dentro de /data/app. Ele vai perguntar se você quer sobrescrever, só dizer que sim.
  10. Deixe apertado no apk e aperte em permissões. Deixe do seguinte jeito:
  11. Reinicie o aparelho e veja a modificação. Lembrando que se você mudou a imagem do iphone_slider, você tem que por o slider do iPhone para ver a modificação, da HTC a mesma coisa, e por aí vai.
DOWNLOAD'S ARQUIVOS:
                 

ROOT EXPLORER (4 SHARED)


WIDGET LOCKER (4SHARED)


MOD'S WIDGET (DROPbox)


How Apple Jury Reached a Verdict

Apple Jury Foreman: Here's How We Reached a Verdict

Aug. 27 (Bloomberg) -- The Apple Vs. Samsung Jury Foreman Vel Hogan discusses his experience throughout the billion dollar patent case. He speaks with Emily Chang on Bloomberg Television's "Bloomberg West." (Source: Bloomberg)


CONHECIMENTOS BÁSICOS SOBRE O ANDROID

ANDROID:

  • Um sistema operacional aberto (open source) para telefones móveis baseados em Linux kernel e middleware.
  • Middleware - cuida da comunicação entre diferentes tipos de software (vários fabricantes, as plataformas)
  • Para começar, o Google Android não é, mas a empresa Android Inc.. Fundada (Andy Rubin, Rich Miner, Nick Sears e Chris White) Mais tarde, foi comprado pelo Google, que agora é de um dos principais motores do desenvolvimento em conjunto com a Open Handset Alliance (OHA) (cerca de mais 30 empresas).


Firmware (FW)

  • Parte do software do telefone móvel, controlar todas as suas funções. Sem ela, o telefone seria apenas um pedaço de plástico e uma pilha de componentes eletrônicos.
  • Atualização de firmware normalmente fornece reparar erros críticos (segurança, congelamento do sistema, os aplicativos da queda. Etc) e traz muitas melhorias e novas funcionalidades (suporte, Etc novas aplicações, mudanças nas configurações.).
Kernel ( Núcleo)
  • O núcleo do sistema operacional que controla a actividade de gestão de processos de memória e drivers. Na verdade, supervisiona o telefone funcionando.
  • Temos várias versões modificadas, que enriquecem as funções do kernel novo (como clock do processador), ou melhorar a estabilidade.
Lançador

  • Telefone Ambiente de Trabalho (gráfico sobre o edifício ).
  • Exatamente o que você vê quando você iniciar o telefone, área, widgets, ícones gaveta.
  • Gaveta - aplicações oferecem
  • Widgets - aplicações rodando no seu desktop (relógio, tempo .....)
  • Existem muitos tipos de lançador, cabe a você no que você vai se divertir tanto ADW launcher Launcher, para, Go EX lançador.

Multi-Touch

  • Uma tecnologia que permite ambiente de controle de telefone por dois ou mais dedos sobre o personagem.

Hard reset - Trojhmat

  • Retornando o telefone para as configurações de fábrica.

Root

  • Basta colocar, obter acesso completo ao sistema (os direitos do sistema radicular).
  • Para melhor compreensão é como uma conta de administrador no Windows.


Custom Recovery

  • Modo depois de ligar o telefone móvel utilizado para intervir no sistema.
  • As principais vantagens para piscar Roma, Roma backup atual (NAND) e outros ajustes.


Nandroid - Nandroid backup

  • Backup completo de Roma (Configurações, datas, contatos, tudo é feito o backup).
  • Memória cartão arquivos sobre ele e não fizer backup.
  • Então, cuidado, se a notícia ou qualquer outra coisa armazenada no cartão de modo que você não pode encontrá-lo nenaformátovali e que após restaurar o backup é nandroid você tem aí!


Modo de emergência

  • "O modo de recuperação" ou modo de reflash, flash firmware / ROM, ou para reviver o telefone.

Conceitos básicos sobre o regime do Android:

Flash
  • Atualizando, atualização, carregar update, - firmware, atualização do sistema, fazendo upload de um recurso ou pacote de modificação, Roma .....
  • Ou "upload" sistema "pacote" (geralmente no formato *. Zip *. KDZ) para o telefone.

Reflash
  • O mesmo como Flash, apenas piscando uma mesma versão de qualquer coisa de novo (Re - Flash parcela = recorrente).
  • Exemplo: Eu tenho a versão do firmware versão 10 e 10 re-flash a Ou eu deveria Roma Arc xp v1.0 e flash-lo novamente com a versão 1.0. Isto é chamado reflash.
  • Se usarmos o reflash que você tenha a última versão do firmware que não inclui a língua checa, de modo reflashneme FW (mesma versão) com apenas o apoio da língua checa. Ou quando ocorre um erro na Roma piscando, FW, patch, correção, e assim por diante.

Patch e Fix,

  • Eles podem ser descritas como um "patch" erros a necessidade do sistema ou aplicação.
  • Ou corrigir erros, defeitos.
  • A diferença entre eles é geralmente que o patch adiciona coisas novas (modifica o código fonte, mas não consegue nenhum erro), enquanto a correção "apenas" corrige os erros. Mas isto não pode ser assim.
Tweak 
  • Melhorias (tratamento) do sistema para otimizar o desempenho, definir escondido ou permitir sistema.
  • Exemplos: menor consumo de bateria, melhor trabalhar com a memória RAM, cartão SD mais rápido, ativar a aceleração de hardware, e muitas outras opções.
Expressões comuns apresentadas nas propriedades de 
melhores rom:

Zipalign 

Uma ferramenta que optimiza aplicações (* Apk.), A fim de minimizar o uso de carneiro em uso

JIT

  • Otimiza o sistema de código que é usado com mais freqüência, ou é mais exigente e é posteriormente carregado mais rapidamente.
  • Claro, isso resultou no telefone resposta mais rápida.

ODEX, Deodex

  • ODEX - Aplicação (*. apk) arquivo contendo ODEX otimizado, o que é usado para economia de espaço e mais rápido sistema start-up.
  • Apenas uma falha é a beleza e aplicativos de edição. Como otimizar o arquivo ODEX agora tem o código-fonte em vários lugares e alguns dos "ilegível". Portanto, a funcionalidade e posterior tratamento possível é geralmente tudo custome deodex Roma (-ed).
  • Deodex - Todo o código-fonte estão juntos e pronto para edição. Por exemplo. Para criar um esquema (tema).
  • Contras: aplicações maiores, inicialização mais lento (se eles já perceberam a diferença).

Menu Advanced Power 

  • Adiciona novas opções (por exemplo, reboot, reboot em recuperação personalizado) fora do menu.

Implement ListView NOT extends ListActivity

Example to implement ListView NOT extends ListActivity:

Create /res/layout/row.xml to define the layout of rows in ListView.
<?xml version="1.0" encoding="utf-8"?>
<TextView xmlns:android="http://schemas.android.com/apk/res/android"
android:layout_width="fill_parent"
android:layout_height="wrap_content"
android:textSize="25sp" />


Modify the layout to add a ListView.
<LinearLayout xmlns:android="http://schemas.android.com/apk/res/android"
xmlns:tools="http://schemas.android.com/tools"
android:layout_width="match_parent"
android:layout_height="match_parent"
android:orientation="vertical">

<TextView
android:layout_width="wrap_content"
android:layout_height="wrap_content"
android:text="@string/hello_world"
tools:context=".MainActivity" />
<ListView
android:id="@+id/mylist"
android:layout_width="match_parent"
android:layout_height="wrap_content"/>

</LinearLayout>


package com.example.androidlistview;

import android.os.Bundle;
import android.app.Activity;
import android.view.View;
import android.widget.AdapterView;
import android.widget.AdapterView.OnItemClickListener;
import android.widget.ArrayAdapter;
import android.widget.ListAdapter;
import android.widget.ListView;
import android.widget.Toast;

public class MainActivity extends Activity {

String[] month ={
"January",
"February",
"March",
"April",
"May",
"June",
"July",
"August",
"September",
"October",
"November",
"December"};

@Override
public void onCreate(Bundle savedInstanceState) {
super.onCreate(savedInstanceState);
setContentView(R.layout.activity_main);

ListView myListView = (ListView)findViewById(R.id.mylist);
ListAdapter myListAdapter = new ArrayAdapter<String>(
getApplicationContext(),
R.layout.row,
month);
myListView.setAdapter(myListAdapter);
myListView.setOnItemClickListener(new OnItemClickListener(){

@Override
public void onItemClick(AdapterView<?> parent, View view, int position,
long id) {
Toast.makeText(getApplicationContext(),
parent.getItemAtPosition(position).toString(),
Toast.LENGTH_LONG).show();
}
});
}

}


Implement ListView NOT extends ListActivity

Usando internet do computador via USB usando Easy Tether

                                  Tutorial sem imagens

Bom nesse tutorial estarei ensinando a você conectar-se na internet do seu micro via USB para seu Android,bom para isso siga os  passos abaixo corretamente tutorial fácil e simples.

1º Passo:Baixe o Easy Tether,aqui tem dois links:(Atenção a versão Lite tem limite de velocidade não especificado e bloqueio em alguns sites)

Servidor MediaFire(versão Lite):http://www.mediafire.com/?8rao8vtm5hctrvr

2º Passo:Baixe o programa para seu micro agora nesse link aqui:http://mobile-stream.com/easytether/drivers.html

3º Passo:Instale o aplicativo no seu Android e programa no seu micro

4º Passo:Vá em configurações>Aplicações>desenvolvimento>e marque a opção depuração de USB

5º Passo:Agora é só conectar a USB e ligar o mode de armazenamento USB e curti a internet no seu celular.

New permission for Android 4.1, API Level: 16.

Android 4.1 add the following new permissions:
  • READ_EXTERNAL_STORAGE
    Provides protected read access to external storage. In Android 4.1 by default all applications still have read access. This will be changed in a future release to require that applications explicitly request read access using this permission. If your application already requests write access, it will automatically get read access as well. There is a new developer option to turn on read access restriction, for developers to test their applications against how Android will behave in the future.
  • READ_USER_DICTIONARY
    Allows an application to read the user dictionary. This should only be required by an IME, or a dictionary editor like the Settings app.
  • READ_CALL_LOG
    Allows an application to read the system's call log that contains information about incoming and outgoing calls.
  • WRITE_CALL_LOG
    Allows an application to modify the system's call log stored on your phone
  • WRITE_USER_DICTIONARY
    Allows an application to write to the user's word dictionary.

Details: Android 4.1 APIs | Android Developers : Permissions

Decompiling Android


Decompiling Android looks at the the reason why Android apps can be decompiled to recover their source code, what it means to Android developers and how you can protect your code from prying eyes. This is also a good way to see how good and bad Android apps are constructed and how to learn from them in building your own apps.

This is becoming an increasingly important topic as the Android marketplace grows and developers are unwittingly releasing the apps with lots of back doors allowing people to potentially obtain credit card information and database logins to back-end systems, as they don’t realize how easy it is to decompile their Android code.       
  • In depth examination of the Java and Android class file structures
  • Tools and techniques for decompiling Android apps
  • Tools and techniques for protecting your Android apps

What you’ll learn

  • How to download an Android app and decompile it into its original Java source and HTML5 and CSS code
  • How to protect your Android apps so that others cannot decompile it
  • To identify potential security threats that currently exist and how to avoid them  
  • What tools are available to decompile and protect Android apps
  • The structure of a Java Classfile and an Android classfile
  • How the standard JVM and the Dalvik JVM differ
  • How to create your own Android decompiler and obfuscator

Who this book is for

This book is for Android developers and their managers. It's also for hackers and hobbyist types who wish to see how Android apps are constructed as a means of learning how to build Android apps.

Table of Contents

  1. Laying the Groundwork
  2. Ghost in the Machine 
  3. Inside the DEX File
  4. Tools of the Trade
  5. Decompiler Design
  6. Decompiler Implementation
  7. Case Studies


EditText keep no change after orientation changed

As mentioned in the post "Activity will be re-started when screen orientation changed", onCreate() method will be called when orientation changed, to re-layout the screen. But in case of some views, such as EditText, the Android life-cycle mechanism will restore the states.

orientation changed


Here is a example, there are two EditText in the layout. The first one is assigned with a ID, it will update the TextView once text changed. The second one have no ID assigned. You can notice that the text in the first EditText (with ID) will keep no change after orientation changed, and onTextChanged() method of the TextChangedListener will be called also, to update the TextView.

On the other hand, the second EditText (without ID assigned) will clear to empty when orientation changed.

Layout
<LinearLayout xmlns:android="http://schemas.android.com/apk/res/android"
xmlns:tools="http://schemas.android.com/tools"
android:layout_width="match_parent"
android:layout_height="match_parent"
android:orientation="vertical">

<TextView
android:layout_width="wrap_content"
android:layout_height="wrap_content"
android:text="@string/hello_world"
tools:context=".MainActivity" />
<TextView
android:id="@+id/lasttext"
android:layout_width="wrap_content"
android:layout_height="wrap_content"
tools:context=".MainActivity" />
<EditText
android:id="@+id/intext"
android:layout_width="match_parent"
android:layout_height="wrap_content"
tools:context=".MainActivity" />
<EditText
android:layout_width="match_parent"
android:layout_height="wrap_content"
tools:context=".MainActivity" />

</LinearLayout>


package com.example.androidorientationchange;

import android.os.Bundle;
import android.app.Activity;
import android.text.Editable;
import android.text.TextWatcher;
import android.widget.EditText;
import android.widget.TextView;
import android.widget.Toast;

public class MainActivity extends Activity {

TextView lastText;
EditText inText;

@Override
public void onCreate(Bundle savedInstanceState) {
super.onCreate(savedInstanceState);
setContentView(R.layout.activity_main);

lastText = (TextView)findViewById(R.id.lasttext);

inText = (EditText)findViewById(R.id.intext);
inText.addTextChangedListener(new TextWatcher(){

@Override
public void afterTextChanged(Editable s) {
// TODO Auto-generated method stub

}

@Override
public void beforeTextChanged(CharSequence s, int start, int count,
int after) {
// TODO Auto-generated method stub

}

@Override
public void onTextChanged(CharSequence s, int start, int before,
int count) {
// TODO Auto-generated method stub


lastText.setText(s);

Toast.makeText(MainActivity.this,
"onTextChanged: " + s, Toast.LENGTH_SHORT).show();
}});

Toast.makeText(MainActivity.this,
"onCreate", Toast.LENGTH_LONG).show();
}

}


Next:
- Retrieve old activity state for configuration change by overriding onRetainNonConfigurationInstance() method

Android Programming with App Inventor


Here is a great introduction of the re-released MIT App Inventor.

Related Link:
- MIT App Inventor


Zello Walkie Talkie v1.35

Aplicativo Incrivel Que Permite Ter Conversas Por Radio Através Da Rede 3G e o Que é Melhor De Graça!!!!
Descrição (Google Play)
Zello - walkie talkie rápido real multi-plataforma
Desligue o telefone ou tablet em um walkie-talkie com este raio push-to-talkrápido e gratuito (PTT) app, que funciona entre o Android, iPhone, Blackberry,PC e dispositivos Windows Mobile. Converse com seus contatos privada ou participar de canais públicos para se engajar em um debate quente.


Zello características:
- Real-time streaming, voz de alta qualidade
- Disponibilidade de contatos e status de texto
- Canais públicos e privados para até 100 usuários
- Opção de hardware mapa botão PTT
- Apoio fone de ouvido Bluetooth (telefones selecionados)
- Histórico de Voz
- O push-to-talk Android  app, que também está disponível no iPhone,BlackBerry e PC

Esta é uma versão beta por isso, esperar alguns bugs e atualizações frequentes.

Download4shared

Instalação: 
1- Baixe,Mova Para o Sd e Instale
2- Abra o Aplicativo (Necessario Conexão Com a Internet)
3- Faça Um Pequeno Cadastro e Logue
4- Pronto Agora Add Outras Pessoas e Fale a Vontade!!!!!!!!

Testado: LG Optimus Me P350
Android: 1.5+

Preview build of ADT 21 and of the SDK Tools, r21 released


Preview 1 is mostly a bugfix release. It contains a number of bug fixes in various areas that were new in ADT 20, such as the new template infrastructure. Whereas 20.0.1, 20.0.2 and the upcoming 20.0.3 contained a small number of absolutely critical fixes, ADT 21 contains a much larger number of general bug fixes and infrastructure improvements.

Details: http://tools.android.com/download/adt-21-preview

iKamasutra Lite Sex Positions


iKamasutra Lite Sex Positions Apk (Completo)

Descrição:
Há uma posição para tudo.
Descubra por que mais de 14 milhões de amantes estão com um sorriso no rosto.
Cuidadosamente escrito e ilustrado exclusivamente para este app de Android, o iKamasutra traz milhares de anos de experiências do Kama Sutra para um app incrivelmente divertido e sensual. Veja mais de cem posições sexuais em 9 categorias, cada uma desenhada e explicada com bom gosto, e divirta-se acompanhando o seu progresso de Iniciante a Grão-Mestre do Kama Sutra utilizando o guia mundial definitivo sobre sexo. O iKamasutra é o app mais recomendado do gênero com uma interface agradável e um belo design. Você nunca mais conseguirá parar de olhar para o seu telefone!

*** Atenção Mestres do Kama Sutra! Você é um verdadeiro profissional das posições sexuais ou está apenas procurando prazeres mais exóticos? Faça o upgrade do app iKamasutra completo com 110 posições mais a possibilidade de baixar posições extras diretamente da Love Store no próprio app quando desejar.
Há uma posição para tudo.
· 30 posições populares inclusas nesta versão Lite grátis.
· Fácil de seguir, as descrições profissionais mostram a maneira mais rápida e fácil para praticar a posição.
· Nove categorias para organizar os seus desejos - tudo desde a posição da Vaqueira às posições mais Exóticas.
· Música suave de cítara para criar o clima certo (opcional).
· Proteção do app por senha para manter a sua privacidade.

Passo-a-passo de como instalar:
1)Mova o arquivo .apk para seu Sd:/
2)Instale o Apk
3)Inicie o aplicativo...
4)Divirta-se!

APK: 
http://www.4shared.com/android/iqwKIm4V/iKamasutra-Sex-Positions-v203-.html?

Create device artwork easily with Device Art Generator

Device artwork generated with Device Art Generator
With Dalvik Debug Monitor Server (DDMS) in Android SDK Tools (or the new screen capture feature on Android 4), it's easy to capture your current screen. How to...if you want create device artwork like the one in right?


With Device Art Generator, you can create device artwork with your own screen easily. The device art generator allows you to quickly wrap your app screenshots in real device artwork. This provides better visual context for your app screenshots on your web site or in other promotional materials.

Simple steps to generate device artwork using Device Art Generator:
  • Drag a screenshot from your desktop onto a device shown in screen.
  • Customize the generated image and drag the generated image to your desktop to save.


Official Android Blog launched

Google launched Official Android Blog(http://officialandroid.blogspot.com/) to post news and notes from the Android team.
Android official blog

Google Play Developer Program Policy (“Content Policy”) Updated


The Google Play Developer Program Policy (“Content Policy”) updated. Improvements include the addition of clarifying language for existing policies, support for new Google Play features and content, as well as the introduction of a new section addressing ad behavior in apps.

Visit and familiarize yourself with the above policies. If you find any existing applications in your catalog to be in non-compliance, Google ask you to remedy and republish the application within 30 calendar days of this notification. After this time period, applications discovered to be in violation may be subject to removal from Google Play. Any newly published applications must adhere to the latest version of the Content Policy for Google Play.

Source: Google Play for Developers - Google Play Developer Program Policy (“Content Policy”) Update.