Most iTel androids give nightmare when trying to put them in recovery mode making hard-resetting or formatting most iTel android devices difficult.
Because iTel androids are SpreadTRUM androids, they have slightly different methods compare to other android devices like HTC, Sansung, Tecno amongst others which have specific key combo for booting into recovery.
But the truth is, iTel android also have specific key combo for booting into recovery mode which is mostly needed whenever we need to factory reset or hard reset the phone.
Here, I would discuss how to put your iTel 1505 android devices in recovery mode for factory reset, soft format or for enabling USB Debugging on the iTel android phone even when the pattern is locked or password restricted.
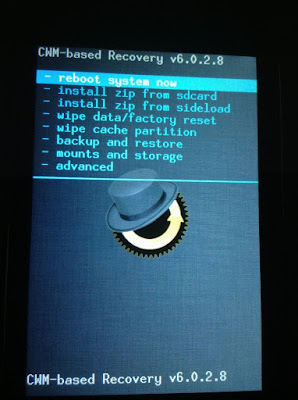
Booting iTel 1505 to Recovery Mode
NOTE: this method has only been used for iTel it1505, ii. I believe the same method should work with all iTel android devices thus; for booting all of them to recovery mode.
Now, let's proceed to the guides.
Steps for Booting iTel 1505 to Recovery Mode
1- Power Off your iTel 1505: either by removing the battery from the phone or by powering it off normally, the first thing you need to do is just power off the phone.
2- Press And Hold the Power Button for about 3 Seconds.
NOTE: Some iTel androids such as the iTel it1502 volume button should be pressed for up to 15 seconds at this stage.
3- While Still Holding the Power Button, press and hold Volume Down (Volume -) Buttion for about 3 Seconds.
I.E Now, you should be pressing both Volume Down + Power Buttons together.
4- Now, release both buttons i.e Power Button and Volume Down button at once.
5- Shortly after releasing both buttons, an android icon shhould appear on your iTel 1505 screen. Now, press the Volume Up (Volume +) button.
Pronto! Your iTel 1505 should now boot into recovery mode.
NOTE:
Use the Volume-up to navigate up.
Use the Volume-down to navigate down.
The Power button to select.
Putting iTel Android in USB Debugging Mode While Screen Locked
If you prefer to put your iTel android in USB Debugging mode while the screen is locked or password protected, you can now do so at this stage.
To put the iTel android in USB Debugging mode, at the stage 4 explained above; you only have to swipe down the screen and navigate to settings.
NOTE: if developer option is not there, simply navigate to About Phone, go to Phone Build Number and tap it continuously for up to 9-times or until it says "You are now a developer".