Nokia 1200, 1202, 1208 And other Nokia's Ringing Tone Problem -Resolved

This article explains the simpler way to solve a Nokia 1200, 1208, 1202 and other similar nokia phones' ringing tone problem that does not result from a spoilt ringer, poor ringer contact or pilled panel.
nokia 1200

Identifying this Problem


1- The only sign this problem gives is that the phone no longer rings out and each time you navigate to the ringing tone settings of that phone to adjust the tone settings, the phone switches off and on by itself.

If you have ever had this kind of problem with your Nokia 1202, 1208, 1200 or any other similar Nokia phone, you will agree with me that most phone repairers you may have taken it to wouldn't have had solution to it. Within this article, you shall learn the simplest way to correct this kind of error.

Solution


You only need to reset the phone factory settings if you have to correct the ringing tone problem.

To reset the phone factory settings go to:

Menu <<>> Settings <<>> Factory Settings

Once you select the factory settings, the phone asks for your security code. Enter 12345 (default code) if you have not changed the phone's security code otherwise, enter your security and press ok.

The phone resets and restarts immediately then, your phone comes back to normal.


Share And Interact Using the Buttons Above

Nokia Asha 200, 202 SIM Card Problem -Resolved

To many that have used Nokia Asha 200 and 202, or even hose that are very familiar with the phone, it is no longer news that the phone commonly develop SIM card problem over time and to this problem, many find it difficult to tackle. Here, within this article we share a very simpler way to solve the problem.

nokia asha 200

Just in case you happen to have a Nokia Asha 200 or 202 that says "Start up phone without SIM ONE?" even though you have properly inserted the SIM one in the right slot of that phone -this is the kind of SIM card problem the phone commonly develops and it is what we discuss here.


Though, no technical reason or proves as to why or how the prooblem is being developed or solved could be given, the moment your Nokia Asha 200 or 202 begins asking you this question:

"Start up phone without SIM one"

Here is how to solve the problem


Simply replace your phone battery i.e switch off the phone, remove your battery, and insert another battery besides your own into the phone then; switch on the phone.

Pronto! Your phone is back and running well again!


In case you have any question or opinion to share, simply use the comment box below this page.


Share And Interact Using the Buttons Above

How to Update your Phone Using Phoenix Service Software

As was discussed earlier on this blog, how to flash your Nokia phone using phoenix service software, you can also update your Nokia phone using the same tool; Phoenix Service Software. And that is what this page discusses.


By updating your Nokia phone, you can uncover many hidden added features of that particular phone which are not included in the current version of that phone -this is the major reason why frequent update is advised.


What is Needed to Update Nokia Phone Using Phoenix Service Software


Before you can update your Nokia phone using phoenix service software, you need to have the following stuffs ready on your computer to ensure optimum result:


1- The latest version of Nokia PC Suite installed on your computer.

2- Phoenix Service Software installed on your computer.

3- Latest firmware update for the particular phone you wish to update

4- A compatible USB Cable for your type of phone.

5- And lastly, your phone's battery should at least, be 80% fully charged.


NOTE

Make sure that the files (firmware files) you have downloaded for the phone you wish to update is located under the appropriate folder on your computer.


E.g C:\Program Files\Nokia\Phoenix\Products\RM-504 -if you are using Windows XP.


Updating the Phone to An Earlier Version Using Phoenix


1- Launch Phoenix service software on your computer by clicking on its icon on your computer's desktop.

2- Connect your phone to the computer using the USB cable. In this case, your phone should be on and running unlike when flashing the phone whereby you would have to put off the phone.

3- Wait a little while for phoenix to detect the connected phone. Once detected, all things been equal, phoenix would display the RM number of the connected phone on the connection box area.


Phoenix connected RM

4- Click on "FLASHING" on the menu option then, scroll to "Firmware Update" and select.

5- The next box that shows up automatically loads the neccessary files needed to complete the operation as in the screenshot below. Just click on "Update Software" and the process begins immediately.


Phoenix update phone

I hope you have a use for this.


Share And Interact Using the Buttons Above

MTN Welcome Back Pack And Retrieval Now Available at Aryk Enterprises

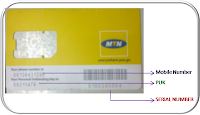
mtn cardIn response to the messages we recieve from our fans and customers from time to time regarding the difficulties and issues they have while trying to recover or retrieve their damaged, stolen or lost MTN SIM cards, we have finally decided to dive into the retrieving process and as a result of this, you can now do your MTN WELCOME BACK SIM with us either online or offline -all you have to do is reach us!


Requirment For the Retrieval


Before we can help you retrieve any of your stolen, damaged or lost MTN SIM cards, you must be able to provide us the following info about the stolen, lost or damaged MTN SIM card:
1- The damaged, lost or stolen SIM's Serial number. You can get the SIM serial number on the SIM certificate.
2- Your last recharge amount (N100, N200, N400 or any amount)
3- Five frequently called phone numbers before the SIM is/was stolen, damaged or lost.
4- The precised or assumed last day the line was used by you before it got lost, damaged or stolen. Either since one week, one month or days, just mention it.
5- The year you started using the line.
And that's all!

At What Cost?


It cost N500 if it is to be done offline however, if it is to be done online, it cost N300.
The online method mentioned above means that you don't have to come to us before we can have it done for you. You just need to buy the MTN Welcome Back SIM and send us the MTN Welcome Back SIM's serial number and PUK number so that we may have the SIM retrieval done for you from our end.

How to Make your Payment


To make your payment for the process, you can send a recharge PIN of any Nigeria network of that amount i.e N500 or N300 to either of these mobile phone numbers:
0808 599 7677, 0813 838 8656, 0807 788 8311

PLEASE NOTE THAT YOU SHOULD SEND THE STOLEN, DAMAGED OR LOST SIM DETAILS TO ANY OF THE NUMBERS ABOVE AS WELL.

For other options on how to retrieve or welcome back your lost, stolen or damaged MTN SIM, click any of the links below:
Another 3 Ways you  Can Welcome Back your Line
How to Do MTN Welcome Back By Yourself


Share And Interact Using the Buttons Above

With MNP, You Can Switch Service Provider Using One Line

MNP Nigeria
Finally, comes March 26 this year, Nigeria adopts the use of the Mobile Number Portability method -a method that's being used in the telecommunication industry of most advanced countries of the world. This is a method that makes it easier for subscribers to switch between telecom service carriers seamlessly and easily having no fear for the lost of contacts or whatever.

Just like before, the Nigerian Communication Commission introduces another method of collaboration into the Nigeria Communication Industry. The Mobile Number Portability method which was strongly discussed earlier this month is said to begin later this month.

Don't Know What MNP is?


MNP, Mobile Number Portability method is introduced to enable a subscriber of any telecom service carrier switch from one telecom service provider to another whilest still retaining his or her SIM bearing the same phone number it was before.

For example:
A subscriber that uses MTN line with the phone number 0803 333 3333 can now switch to Glo service whilest still bearing the same mobile phone number which is: 0803 333 3333.

Using this method, no fear of loosing contacts or your contacts loosing you. You can always switch to telecom service provider whose service is readily available at your area or community even, if there is change of location.


If Need be, How Do I Change My Telecom Service Provider?


In case you need to change your telecom service provider, you will have to visit the receiving service provider, also called the recipient to make your request. To do this, you will have to visit one of their authorised dealer shops, Outlets. Point of Sales or customer Care Centres.


For example:
If you wish to change from MTN to Glo. in this regard, Glo is the recipient therefore; you will have to visit any of the Gloworlds, Glo Zones, Point of Sales, or Dealer Shops to request for MNP.

Before you can do this, you must have a valid form of identity such as your ID cRADS, with a visible photograph. Also note that the line to be switched must have being registered by you, the line must be active and that you must know the line's serial number.

Having filled the MNP form which will be given to you at that point, you will be issued a new SIM Card bearing your original mobile phone number and the SIM would be registered at that point in time. You should be informed to send "PORT" in a text message to 3232.

Once you send the message to 3232, the recipient service provider would forward your request to NPC where validation is being done.

All things being equal, the SIM will be activated and you will be informed of the changes. Please note that once activated, any airtime left on your previous SIM will be wiped off and calls you make hence forth would be billed as per the default tariff plan of your new service provider.


Share And Interact Using the Buttons Above
Get Free Unlimited Browsing Plan from MTN Using MTN BIS

MTN Free Browsing
Besides the many messages that have being congesting my mail box concerning the Glo BIS direct subscription that was working with other devices including laptops, Android and Nokia phones and some other devices that connect to the internet. Since the Glo BIS stopped working, we have being working tirelessly to uncover another cheaper and affordable or even free means through which our fans can connect to the internet and finally; we found one! MTN BIS now rocks!

After days of working and nights of tireless researching, we are able to bring you this good news. MTN BIS now works similar to the way Glo BIS was working. Many thanks to one of Aryk Enterprise fans who worked to our workshop and gave us the challenging tip to work on MTN browsing plans too instead of targetting majorly on Glo.

How to Enjoy Unlimited MTN BIS Browsing Plan on Any Device


Unlike the previous MTN BIS cheat that was working via the use of some VPN and tunneling programmes, you no longer need any such before this could work. Similar to the previously working Glo BIS plan, you only need the APN, Username and Password which are given below and Pronto! Your unlimited browsing begins!

How to Set Up your Device for the MTN BIS Browsing Plan


On any device you wish to use, be it modem, mobile phone, PSP or any other device that connects to the internet, just locate the Configuration area, section or panel of the phone or device and fill in the details below as may be required on your mobile phone or device:

MTN BIS Unlimited Browsing Settings for All Device
APN: blackberry.net
Username: web
Password: web
Remember, you don't need to use this via any tunneling or VPN programme. Just save the settings above on your device and you are good to go!


Share And Interact Using the Buttons Above

What To Do: If your Blackberry Smartphone Fails Reading SIM

Sometimes, some Blackberry smartphones may fail to boot on properly whenever a SIM card is inserted. Some could boot on but fail to read the SIM card inserted into the phone. The reason for this may not be stated however, we will discuss how to painlessly solve the problem risk free.


At least, it has occurred to three (3) different Blackberry smartphones and we have being able to rectify the problem using the method to be explained within this article. If you follow strictly what is explained here, you should be able to do the same.

What is Needed to Rectify the Problem


Before you can be able to rectify the problem, you should have the following stuff:

1- A computer running windows XP (SP3), windows 7 or vista
2- Blackberry Desktop Manager installed on your computer
3- The firmware update of that particular Blackberry smartphone

You can download your Blackberry Smartphone's Firmware here
You can download Blackberry Desktop Manager here

How to Rectify the Problem


If your Blackberry smartphone does not read SIM or fails to boot-on whenever a SIM is inserted, you need to take about three steps before the problem could be resolved, at least, this should be done if you don't want to miss out anything at all.

1- You need to do a complete back up of the file on your phone.
2- You need to re-install the original phone firmware on the phone.
3- And lastly, you should restore your backed up files back to the phone. Prompto! Your phone comes back to normal again!

Now, the good news is; you don't need to take all the steps above except the number two (2) step which helps you back up the phone, update the firmware and restore your backed up files.

However, before you could do any of the above, you need to install the firmware of the Blackberry smartphone you wish to correct its errors.

Correcting the Error


If you have Blackberry Desktop Manager and your Blackberry smartphone firmware update installed on your computer, completing the phone recovery proccess would be so simple for you so much that all you have to do would be:

1- Connect an appropriate USB Cable to your Blackberry smartphone
2- Switch of the phone by pressing and hold the red button
3- Remove the battery from the phone
4- Lunch Blackberry Desktop Manager
5- Re-insert the battery on the phone and immediately when the phone starts booting on, connect the cable to the computer
6- In few minutes, an error message appears giving you an option to either repair the phone on retry. Click "Repair". If you originally use a password for the phone, a box appears prompting you to enter your password. Enter the correct password and continue.
7- The programme searches for any firmware package available for your phone on the computer.

Immediately it detects any, the programme gives you recommendations on either to install the available update or not. Opt in to install the available update by clicking on the Update option.

At this stage, all you will have to do is to watch the programme complete the process. MAKE SURE YOU DON'T DISCONNECT THE PHONE FROM THE COMPUTER UNTIL THE PROCESS IS COMPLETE.


Share And Interact Using the Buttons Above