What is the Best Way to Spend your Cross-Over Night?

For many, the cross-over night is something and to some people; it is something else entirely. But, the most important thing is that the cross-over night is something very special to all of us! Isn't it? Even if you are one of those that sees nothing special about the new year, either you believe it or not; it is still special to you at least, your date changes the section of it that rarely change that night.

Well, what is the best way to spend your cross-over night or how do you spend your cross-over; the first night of the new year?

This is one of the kind of question many don't consider. Though, no particular way could be said to be the best way to spend the cross-over night however, there is always a way you can do something in order to possibly have the best result.

Mind you, it is the cross-over night that many successful men and women around the world have chosen to be their period of mind transformation. They sit down, think and plan how to make the new year work for them. What about you? Don't you want the new year work for you? It is still not too late because you can always choose and decide what work for you!
Remember
"The earlier, the better. Though, he who comes first may come last but; rarely"

Really, it is something good to have fun by spending the cross-over night with people you love and care about but, there are always ways you do things in a proper and appropriate manner.
Remember
"The true meaning of what is not done appropriately is WASTE!"

Don't start wasting away the new year by wasting away your cross-over night. Think that you have not thought about. Do that that you have not done and make the changes that you can make!

Happy new and prosperous year, fans!

In the coming days, we shall discuss how to simplify your new year resolution and how to make the best out of your resolution note.
Meanwhile, how have you spent your cross-over night and how was the cross-over night for you? Share with us using the comment box below:


Share And Interact Using the Buttons Above

Aryk Weekly Quiz Question: On Glo BIS

Hello fans, customers, followers and readers! Aryk Weekly Quiz is back and better!.
As fantastic and engaging it has being in the past weeks, we had to stop the Weekly Quiz for some reasons which we believe are now resolved.

Participate and WIN in this week's Aryk Weekly Quiz!
This Week's Quiz Question is:

How Can you Subscribe to Glo BlackBerry Service, the BIS Monthly?


Answers
  1. A. By sending "BIS" to "777"
  2. B. By sending "CoMonth" to "777"
  3. C. By sending "BIS" to "21600"

How to Participate


To participate in this week's Quiz Contribution, just choose the correct option and put your answer in the comment box below then, publish it.
E.g
How Can you Get Etisalat GPRS Settings by SMS?
Supposing that C is the correct Answer. Just choose C and write "By Sending "SETTINGS" in an SMS to "790"
That's all!

Prizes for this Week


Cash Ad Space Downloads

As always, three participants would emerge as the prize winners.


  • The first winner wins N 500 cash. The money would be credited to his or her VoguePay account (Learn more about VoguePay or sign up here) and a link or an ad space on Aryk Enterprise blog home page for Six (6) days.
  • The second winner wins a link or an ad space on Aryk Enterprise blog home page for six (6) days.
  • The third winner wins any of these premium mobile apps:

  • Profimail  JoikuSpot
    Profi Mail App Joiku App Add

    Remember!
    The more enteries you have, the higher your chances of winning! Only one (1) entry is valid for one day i.e to have five (5) enteries, you need to contribute to this same question from Monday to Friday.

    Share this with your friends using the Share And Interract buttons. Who knows? You might win together!

    What to Do: Before Formatting Your Phone

    format phoneIn one of our earlier posts on this blog, Aryk Enterprise, we explained a Step-By-Step process on how to format your phone to correct some phone errors by using either the Hard Reset Method or the Soft Format Method. And to that, we have received lots of email messages on how to recover lost files on the phone.

    The claim was that most of the files were lost during the process of formatting the phone.
    Within this tutorial, we intend to explain how to prevent such data lost or corrupt cases while flashing or formatting your phone.

    Sometimes, formatting your phone might be necessary to make the phone free from errors and malfunctions. There are some faults that cannot be corrected until the phone is formatted or flashed using either the hard reset method or Flashing by making use of some computer programmes.

    Things to Do Before Formatting Your Phone


    1. Battery Level
      The number one thing you should do before formatting or flashing your phone is to make sure that your battery is good and that it is at at least, 50% fully charged. This must be done to ensure a successful flashing or formatting operation.
      If during flashing or formatting process, your phone went off as a result of the low battery level, the phone may never come back on and if it does, it may render the phone useless.
    2. Content Back Up
      Of course, formatting or flashing your phone would erase all the content of the phone. It is advised that you back up the phone content before you format or flash the phone.
      At least, your phone contacts should be backed up before you flash or format the phone. You may learn how to back up the phone contacts here or how to back up the entire content of the phone using Nokia PC Suite here.
    3. Back Up Notes
      A back up note should also be made before you flash or format your phone.
      For instance, you might need to make a back up note of usernames and passwords for the applications you use on that phone.

    Well, above are the three most important things we know you should do before you format or flash your phone to avoid lost of data or corrupt files. If you have any additional suggestions on what should be done before formatting or flashing a phone, you may share it with others by dropping your comment and opinions in the comment box below.


    Share And Interact Using the Buttons Above

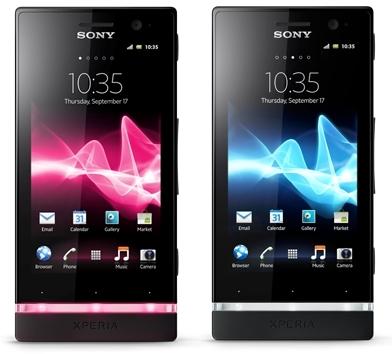
    Tutorial – Android 4.0 para Xperia U


    Quem quer ter o ICS no Xperia U, chegou a hora!!!!!
    Dia 04/12/12 a Sony lançou finalmente o 4.0 ICS para o Xperia U
    Quem tem a rom diferente da que veio no celular terá que fazer outros processo.
    Vantagens da ICS:
    • Uma experiência de mídia completamente nova da Sony com o novo aplicativo WALKMAN, o aplicativo Álbum e o aplicativo Filmes
    • Tela de bloqueio com funcionalidade aprimorada
    • Widgets redimensionáveis (personalização aprimorada)
    • Controle aprimorado do consumo de dados do seu celular
    • Botão Aplicativos recentes para uma visão geral clara de seus aplicativos
    • Modo de espera estendido, que aumenta o modo de espera em até quatro vezes (dependendo do perfil do usuário e do consumo de dados)

    O QUE VOCÊ DEVE SABER ANTES DE ATUALIZAR:
    Os requisitos de hardware do Android 4.0 são mais avançados do que os das atualizações anteriores, por isso, o desempenho do seu telefone pode ser afetado.
    Nosso compromisso de oferecer o melhor, significa que depois da atualização, você não poderá mais voltar para uma versão anterior do Android.
    Para otimizar o desempenho do telefone, alguns aplicativos foram desativados e não estarão visíveis na tela. Um novo aplicativo instalado chamado Assistente de desempenho ajudará você a habilitar esses aplicativos.
    Observe também que alguns aplicativos de terceiros podem não ser compatíveis com o Android 4.0. Visite o Google Play para conhecer aplicativos compatíveis com o Android 4.0 ou entre em contato diretamente com os desenvolvedores do aplicativo para obter suporte.
    O suporte ao Flash será desabilitado, mas isso pode ser facilmente resolvido; basta visitar o Google Play e baixar o aplicativo Adobe Flash player mais recente disponível.
    Quem tem a rom original, é só em configurações, Xperia e selecione a opção que diz: ”Inst. do PC Companion. Se você já tem no seu computador é só clicar em iniciar ( no Support Zone). Depois clique em atualizar, espere baixar e faça ps devidos procedimentos. Se não conseguir, siga os mesmos passos abaixa para quem não tem a rom original.
    Para quem tem a rom diferente da que veio no celular.
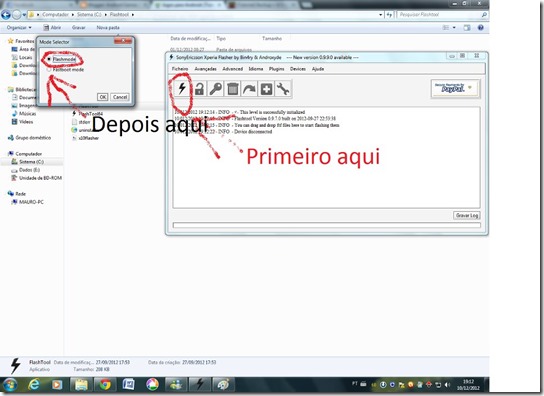
    1) Baixar e Instalar o Flashtool. Baixe e extraia a ROM  na pasta firmwares de onde você colocou o Flashtool.
    2) Conecte o Xperia U ao computador e veja se a depuração usb está ativa.
    3) Abra o Flashtool e clique em Flashmod
    577946_461722560550770_1095736876_n
    4) Selecione a opção ST25a e depois em Exclude Baseband.
    5) Espere que as instruções apareça, mas não siga ela
    6) siga essas instruções: 
    Retire o cabo usb do celular e do pc, desligue o celular, conecte o cabo usb ao computador, aperte o volume para baixo e conecte o celular no cabo. 
    Espere que a instalação seja concluída e seja feliz com o ICS do Xperia U 
    Se você tiver 3G e ele não estiver ligado, é só ir em configurações, Uso de Dados e toque em dados móveis.

    Fiquei um dia com o ICS e só tenho a dizer coisas boas, ficou bem mais leve.
    Download Flashtools

    Download do FTF:

    How to Identify your Facebook Username

    facebook usernameTo many, they think their facebook username is the name they used in registering their facebook account.
    Some think their facebook username is the email address they register with facebook.

    Although, you can log into your facebook account using the email address or the phone number you registered with facebook, none of these is still your facebook username therefore; you cannot use any of them where possible, your facebook user name is required.


    More often than not, facebook uses the combination of your first name and last name to generate your facebook username but this does not change everytime you alter any changes in your first name and last names. Thus; once created, your facebook usermame remains unchanged untill you deliberately change it.

    How to Have A Clear View of your Facebook Username


    Just in case you are not certain of what your facebook username is and you wish to know your username for one reason or another. Just by veiwing or noticing the points below, you should know what your facebook username is.

    • If you are browsing using a mobile browser (e.g Opera) that displays mobile view of facebook i:e m.facebook.com, sign into facebook using your email address or phone number (Which you used when registering with facebook). Once the sign in is successful, click on your Profile, Profile Picture or Avater. The next page that appears after clicking on your profile picture should be your Profile Page.
    Now, press Menu to display the Address Bar as in the image below:


    the highlighted word or phrase in red ink is your facebook username.
    "This means, in the case above, whatever comes after the first forward slash (/) and before the question mark (?) is your facebook username


  • If you are browsing using your desktop, laptop computer or any other device that displays facebook in a desktop view or format, simply sign into facebook using your email address or phone number (Which you used when registering with facebook). Once the sign in is successful, click on your Profile Picture or Avater. The next page that appears after clicking on your profile picture should be your Profile Page. Now, check the address bar as in the image below...


  • Also, using your mobile browser, you can also have a clear view of your username by clicking on your profile and from there, click on your info. The next page displays your info and from this info is included your facebook username.

    Usually, facebook uses your username as your facebook.com email address i.e username@facebook.com
    Also, facebook uses the username to create your profile link/page.


    In a nut shell, your facebook username is the link to a subpage of facebook created for you and your friends!"


  • Share And Interact Using the Buttons Above

    Rom Galaxy Pocket S5300B (Original) PT-BR - Pelo Odin


    Varias pessoas estão a procura dessa Rom Original. Então aqui estar a Rom Original do Galaxy Pocket S5300B.


    Tutorial instalando Rom Pelo Odin

    1 - colocando o celular em modo download

    1: Salve Tudo Que Esta Na memória Interna Do celular

    2:Desligue O celular e Remova o Chip Da Operadora e o Cartão SD

    3:Segure As Teclas Home + Volume Pra Cima + Tecla Ligar, Na tela de recovery, usando as teclas de volume, vá em "wipe data/factory reset", selecione com a tecla HOME, depois navegue até "Yes -- delete all user data" e selecione com a tecla HOME. Faça a mesma coisa para "wipe data partition". Depois selecione "reboot". O celular irá reiniciar. Deixe que ele complete a inicialização e depois o desligue novamente.

    4:Depois Segure As Teclas Home + Volume Pra Baixo + Tecla Ligar, Vai Perguntar Se Você Quer Entrar Em Modo Download Aperte Volume Pra Cima Para Aceitar

    5:Pronto Seu Celular Está Em Modo Downloa

    2 - Instalando Rom


    1: Abra O Odin Que Vem No Seu Arquivo De Rom.

    2: Conecte Seu Celular Que Esta No Modo Download Ao Computador Em ma Entrada USB.

    3: Pronto Ira Aparecer Uma Caixa amarela Com O Numero Da Porta COM Exemplo: " 0:COM10 " .

    4: Selecione Arquivos Como Mostra Na Imagem Na Mesma Ordem. 

    Clique Na Imagem Para Ampliar 


    5: Aperte Start E Espere ......

    6: Quando Seu Celular Reiniciar Podera Tirar O Cabo USB E Você Estará Com Android 2.3.6 No Seu Galaxy Pocket..


    Download


    Kung Fu Jump v1.03


    Kung Fu Jump, salto de charme jogo rápido, fácil e viciante, Enjoy!
    Pular, saltar, pular! Kungfu Jump é o melhor jogo rápido pulando e escalando ritmo!
    Neste ritmo kungfu rápida escalada jogo, objetivo do Kung Fu é menina salto a subir tão alto quanto possível, evitando qualquer inimigo.
    Você vai se surpreender com os belos gráficos, jogabilidade envolvente, rica música e da qualidade insanamente viciante deste jogo.


    Toque em tela para saltar e atacar os obstáculos em sua aventura salto KungFu! Subir ao topo e se tornar um mestre do Kung Fu no Jump KungFu.
    Regra do jogo simples, mas é surpreendentemente desafiador.
    As características incluem:
    * Jogabilidade simples toque de um único
    * Dragão irritado, Borboleta charme, Robô Dangerous, Sprint Rocket, fênix
    * Belos gráficos
    * Fundos HD e Papel de parede
    * Impressionante bônus
    * O som original e música
    * Leaderboards
    * Desafie um amigo por e-mail
    * Pontuações post no Facebook ou Twitter
    Download:
    zippyshare

    Saint Seiya Omega: Ultimate Cosmos - JNP PSP


    Kouga é o novo garoto abençoado pelo poder da constelação de Pegasus. Ele foi salvo por Seiya quando ele era criança e prometeu a sua vida à deusa Atena.


    Kouga e seus amigos tem um novo desafio! Entra em cena novamente o poderoso deus poseidon!


    Além de trazer os novos cavaleiros de bronze, ainda conta com a presença lendário cavaleiro Seiya, agora como cavaleiro de sagitário! Avante santos da esperança! Pegasus Senkouken!!!!


    Formato ISO
    Idioma: Japonês
    Tamanho: 688 MB

    Download: part1 - part2 - part3 - part4

    How to Make Certain Applications Connect to the Internet on Samsung Phones -Resolved Issue

    This is an issue originally raised by one of our fans on facebook some days ago.

    "I need a manual configuration settings for my Samsung at&t SGH-A687(MTN) and also i cant launch operamini and 2go on it"
    -that was his request on our facebook fan page timeline.

    Well, so far so good, we have being able to help him out and now, we are sharing it with others who might be experiencing similar problem.

    Truly, some Samsung phones do not support the automatic GPRS configuration settings set up. Even with some Samsung phones, you need to manually authorize, give permission to some applications before they can connect to the internet especially; 2go IM and some other handler UI applications.

    How to Authorize the Restricted Application


    Now, to authorize any of the restricted application to have access to the internet, you just need to alter little changes within your Samsung phone.

    To do this, go to Menu on the phone. From there, go to Games And Apps (On some Samsung phone, you may see Applications or MyFiles). Just go to wherever your installed applications are usally located on the phone.
    While on that particular application that does not connect to the internet, press Option then; Connection (Advance Option).

    Menu <<>> Games And Apps (App, MyFile or wherever your installed apps folder) <<>> Options <<>> Connection <<>> or Advance Option
    On the page that appears, on the internet profile section, select the working access point and click SAVE.

    Once saved, lunch the application.
    All things being equal, provided that the Access Point you have chosen is set using the correct figures, the application should now be able to connect to the internet.

    Click here for detailed info on how to manually configure your Samsung phone for GPRS Internet Access.

    Please, note that you must have an active and working internet settings on the phone before this can work out.


    Share And Interact:

    Tutorial - ROOT SAMSUNG GALAXY Y TV S5367


    Root Samsung Galaxy Y TV


    LINK DO ROOT : http://www.4shared.com/get/Od9z56sz/rootlucdrak.html

    LINK DO UNROOT:http://www.4shared.com/zip/nXMO2UKy/unrootlucdrak.html

    01-Baixe o arquivo update.zip a partir do link acima indicado.
    02-Copie o arquivo zip para a raiz do seu cartão SD.
    03-Desligue seu telefone.
    04-Agora inicie o telefone em recuperação.
    05-Para entrar no modo de recuperação Segure Volume Up, Key Home, botão Power juntos.
    06-Quando estiver em modo de recuperação navegar usando o volume para cima e para baixo teclas.
    07-Para selecionar pressione a tecla Home.
    08-Agora, com a ajuda de teclas de volume selecta uma atualização de opção SD Card.
    09-Agora selecione o arquivo presente update.zip em seu cartão SD.
    10-Aguarde o processo de enraizamento para terminar.
    11-O telefone está agora enraizado!

    Creditos: lucdrak

    How to: Make your Phone Run Or Operate Faster

    In most cases, when a phone runs or operates slowly, it is caused by the person who uses that phone and it's mostly salking to see one's phone operating or running slower than normal.

    In case your phone has slowed down considerably or isn't working properly, here, within this write-up, you might find useful tips that may help you manually correct the errors.

    Possible Causes of Phone Slow Performance


    Internal Memory: a phone's internal memory plays most role in the way the phone operates and if it is almost full, the phone might begin operating slower than normal.
    Solutions
    1. Check that the message folder for the phone is set to external (memory) storage/disk to free up more space on the phone memory.
    2. Do not install applications on the phone memory. Most of your installations should be done on the external (memory) storage disk.
    3. Dedicate only the phone in-built (Internal) memory for the major or core phone applications and programmes (e.g. firmware updates).

    External Memory
    Another reason why a phone may run slower is when the external disk or storage (Memory) on the phone is bigger than that the phone can carry.
    The phone may also run slower if the external storage disk (memory) on the phone is almost full.
    Solutions
    1. First, avoid using large external storage disk (memory) on the phone as this may be the cause of the slow performance.
    2. If you know that you have had too many files on the external storage disk (memory), you should delete some files on it.

    Installed Applications
    Some phone applications or programmes may also be the cause of the phone slow performance especially; anti-virus applications.
    Solutions
    1. Check that your anti-virus application is updated and active. If otherwise, uninstall the anti-virus application on the phone.
    2. Secondly, uninstall the last application installed on the phone. It's most likely the cause of the phone slower performance.

    And if all the above could not correct the errors, resetting the phone maybe necessary.
    The phone restore/reset will erase the phone's data and restore the phone to it's default factory settings state.

    For info on how to reset or format your Nokia phone, see: How to Reset your Nokia Phone to Correct Phone Errors


    Share And Interact:

    How to: Configure Samsung Phones for GPRS Internet Access

    Settings
    Unlike some other Samsung phones that support the OTA (Over the Air) configuration settings, there are still some that does not support it. In this case, you will have to manually set up the phone before it could browse the internet.

    Within this tutorial, you should be able to learn and understand how to set up your Samsung phone for GPRS internet access.
    To configure your Samsung phone for internet access, you only need to follow a simple step by step set up procedures.

    To start with it;

    1. Click on the menu button and navigate to the settings icon then, connectivity. From there, select Internet Profile. On the page that displays, you should see an option to add a new internet profile or, to edit an existing one.
    2. Just tap the option button to display the available options.

    3. Menu <<>> Connectivity <<>> Internet Profile <<>> Add New Internet Profile

    4. Click on Add Internet Profile and set it up as follows:

    MTN Configuration Settings for Samsung Phone
    Box TitleData to be Entered
    Title: Aryk MTN. Or any text
    Bearer: Here, select GPRS
    Authentication: Here, select Normal
    APN: web.gprs.mtnnigeria.net

    *** Be careful to enter the text above in the appropriate box to make the configuration settings work with the phone as expected.

    Please note that the GPRS settings used in the example above is for MTN users only. Click or select any of these networks Airtel, Etisalat or Glo for their specific GPRS Configuration settings.

    If you have any question, comment or an opinion to share about this tutorial, please, use the comment box below.

    Like this tutorial? Share it with your friends using the Share And Interact buttons below.


    Share And Interact:

    How to: Reset your Nokia Phone to Corrects Phone Errors

    Reset NokiaJust in case you notice that your Nokia phone suddenly starts malfunctioning or no longer works the way it used to. Maybe it start responding slowly whenever you try to initiate certain programmes on it, here are some tips that may help reset your phone back to normal.

    How to Reset Your Nokia Phone


    In most cases, when a Nokia phone goes wrong, resetting the phone might correct the erros and return the phone to its normal state. And, there are only two ways to normally reset your Nokia phone and they are;

    1. Soft Format
    2. Hard Reset

    How to Soft Format your Nokia Phone


    To soft format your Nokia phone, on the normal home screen, just dial;

    *#7780#
    the phone will prompt you to enter your security.
    If you have not changed the security code before, just enter 12345 (Nokia's Default Security Code) otherwise, enter your own security code and press "OK".

    The phone should go off for some minutes and reboot.

    Note:
    Resetting your phone using this code will only restore the default factory settings. Your installed applications, images, themes and others would still there.

    Using the Hard Reset System to Format your Nokia Phone


    Just in case the soft format system does not correct the errors, the hard reset system should correct the errors. To use the hard reset system to format your phone, on the normal home screen, just dial;

    *#7370#
    the phone will prompt you to enter your security.
    If you have not changed the security code before, just enter 12345 (Nokia's Default Security Code) otherwise, enter your own security code and press "OK".
    The phone should go off for some minutes and reboot.

    Note:
    Resetting your phone using this code will erase all the files on your phone including your installed applications, images, themes, videos amomgst others and in the process, it will restore the default factory settings on the phone. However, your memory card files will not be affected.

    If you have any question to ask or comment to make, please do so using the comment box below this tutorial

    Like this tutorial? Share it with your friends using the Share And Interact buttons below


    Share And Interact:

    Glo Introduces Glo Bolt; an Improved Glo Internet Service With Reloaded Goodies

    Following the out-bust of internet service packages from other network providers, Glo Mobile Nigeria joins the terrain and introduced yet another varieties of pace-setting internet packages with reloaded goodies and freebies you will definitely love.

    The new reloaded Glo HSI service which is hence forth known as the "Glo Bolt" is introduced in an attempt to give more value to subscribers investment thereby making the Glo internet subscribers' adventure in the internet world more fun.

    Therefore, the Glo Bolt modem is a 3G modem intended to replace the Glo Netpro modem. This new Glo Bolt modem comes with a FREE Glo SIM + 500 MB of data all at a cost of N3, 999 .

    With the new Glo Bolt modem, everytime you subscribe to a plan of N1, 000 and above, you will get FREE 200 MB extra every month for 6 months.

    In addition to all the freebies, another reason you should choose to use the Glo internet service is the Self-Care Portal accessible at this portal: http://hsi.glo.com .

    At the portal, as a Glo HSI subscriber, you can view list of all subscription plans, your subscription status, enable/cancel auto renewal of your subscriptions amongst a host of other tools.

    Added Extras


    Following the introduction of the new Glo Bolt modem, you can now do much more within the Glo HSI portal.

    Things You Can Do Within the Glo HSI Portal


  • Share Data Slots:

  • You can now share your data balance with different Glo lines either subscribed or not.


  • Data Gift:

  • You can now gift out data to friends and family within the Glo HSI portal.


  • Data Rollover:

  • At last, the much more expected extras comes on board! Glo Bolt customers would not loose their unused data from the subscribed plan. Just re- subscribe your data plan before it expires and use the balance data in the next month.


  • Free Internet access for 6 months:

  • If your purchase the new Glo Bolt modem, you get 500 MB data free of charge INSTANTLY on activation and free internet access for 6 months.
    To enjoy this additiinal internet access for the period of six (6) month, you must subscribe to at least, the N 1000 or above plan for the subsequent months.


  • Instant Bonuses:

  • This instant bonuses is available to all Glo data bundle subscribers, both existing and new subscribers. You can now receive 30% instant bonus added to every glo data plan you subscribe to.

    Glo Data Bundle And Bonuses Table
    S/N Data Volume Data Bonus Data Volume Total Plan Price Validity
    1 10MB 3MB 13MB N 100 1 Day
    2 50MB 15MB 65MB N 400 7 Days
    3 200 MB 60MB 260 MB N 1000 30 Days
    4 1GB 500 MB 1.5GB N 3000 30 Days
    5 3GB 1GB 4GB N 5000 30 Days
    6 6GB 2GB 8GB N 7500 30 Days


    Do you like this development? Or, you simply want to say something? Please, do so by dropping your comment in the comment box below.
    Share this article using the Share And Interact buttons below:


    Share And Interact:

    Glo BlackBerry Social: Details And Activation Codes

    bold9900
    Glo BlackBerry Social is just another special browsing plan for BlackBerry users; the Glo BlackBerry Internet Service, BIS.

    Glo BlackBerry Social is a special Glo BIS service plan that features quite a number of BlackBerry goodies as well though, not as much as the Glo BlackBerry Complete.

    What You Stand to Enjoy on Glo BlackBerry Social


    As a Glo BlackBerry Social subscriber, you stand to enjoy certain BlackBerry internet services and they are:

    1. BBM -Being a Glo BlackBerry Social subscriber, you have access to Glo BlackBerry Messenger; an app built in with most BlackBerry smartphones. It lets you connect and chat with almost all the BlackBerry users in as much one has another's BBM PIN.
    2. BBMail - You can create your own email with Glo sub-domain to receiving and sending email messages.
    3. BB In-Built Social Networking & IM Apps -these include the in-built GTalk, Yahoo Messanger, AOL, Facebook, MySpace amongst others.
    4. Internet Browsing -You can also browse the internet using the native BlackBerry browser.
    5. App World -Within the BlackBerry appworld, you can download varieties of applications suitable for your brand or model within this store.


    How to Subscribe to Glo BlackBerry Social
    BIS Package SMS Sub. Code Service Fee Service Span
    Glo BB Social text "SoMonth" in
    an SMS to 777
    N 1200 30 Days
    Glo BB Social text "SoWeek" in
    an SMS to 777
    N 400 7 Days
    Glo BB Social text "SoDay" in
    an SMS to 777
    N 100 1 Day

    Please, note that the Glo BlackBerry Social plan does not reward you as much data as the Glo BlackBerry Complete.

    As known, even though you are given an unlimited browsing plan for any BIS service you subscribe to, you are restricted to connect to the internet using the in-built apps on the BlackBerry.

    For instance; you can only browse using the BlackBerry in-built browser. If you should use Opera browser, you will be charged for that.
    To make your BIS Subscription work with all the application installed on your phone without any extra charges, Click Here.


    Share And Interact:

    Glo BlackBerry Complete: Details And Activation Codes

    bold9900
    Just like other GSM service operators in Nigeria, Glo Nigeria also has special browsing plan for BlackBerry users; the Glo BlackBerry Internet Service, BIS.

    And one of these Glo BIS service is Glo BlackBerry Complete.
    Glo BlackBerry Complete is a special Glo BIS service plan that features quite a number of BlackBerry goodies.

    What You Stand to Enjoy on Glo BlackBerry Complete


    As a Glo BlackBerry Complete user, you stand to enjoy certain BlackBerry internet services and they are:

    1. BBM -Being a Glo BlackBerry Complete subscriber, you have access to Glo BlackBerry Messenger; an app built in with most BlackBerry smartphones. It connects and conducts almost all BlackBerry users in as much one has another's BBM PIN.
    2. BBMail - this is another interesting part of it. You create your own email with Glo sub-domain to receiving and sending email messages.
    3. BB In-Built Social Networking & IM Apps -these include the in-built GTalk, Yahoo Messanger, AOL, Facebook, MySpace amongst others.
    4. Internet Browsing -being a Glo BlackBerry Complete user, you can also browse the internet using the native BlackBerry browser.
    5. App World -this is a BlackBerry application store. You can download varieties of applications suitable for your brand or model within this store.


  • And lastly, you have an option to integrate one (1) email address with your BlackBerry.

  • How to Subscribe to Glo BlackBerry Complete
    BIS Package SMS Sub. Code Service Fee Service Span
    Glo BB Complete text "CoMonth" in
    an SMS to 777
    N1400 30 Days
    Glo BB Complete text "CoWeek" in
    an SMS to 777
    N400 7 Days
    Glo BB Complete text "CoDay" in
    an SMS to 777
    N100 1 Day

    As known, even though you are given an unlimited browsing plan for any BIS service you subscribe to, you are restricted to connect to the internet using the in-built apps on the BlackBerry.

    For instance; you can only browse using the BlackBerry in-built browser. If you should use Opera browser, you will be charged for that.
    To make your BIS Subscription work with all the application installed on your phone without any extra charges, Click Here.


    Share And Interact:

    MTN Share "n" Sell: Transfer Airtime Between your MTN Lines

    MTN Share n SellMTN Share "n" Sell is one of the MTN value added services that enables you transfer certain amount of money from your airtime balance to another MTN line.
    For example;
    "Supposing you have N1, 400 as airtime balance in one MTN SIM, you may decide to transfer N 400 onto the other MTN SIM"

    How to Activate MTN Share "n" Sell Service on your MTN Line


    All MTN SIMs are pre-activated and configured for the MTN Share "n" Sell service. But, you may not be able to make airtime transfers from your MTN line if you have not changed your MTN Share "n" Sell default PIN which is set to 0000 .

    How to Change your MTN Share "n" Sell PIN


    To change your MTN Share "n" Sell default PIN to any other PIN you desire, send " 0000 New PIN New PIN" in a text message to 777 .
    E.g
    "If you are to change your Share "n" Sell default PIN to 1234 send;
    " 0000 1234 1234 "
    in a text message to 777 .
    The same method applies whenever you wish to change your MTN Share "n" Sell PIN again.

    Also, you can use this USSD code to change your MTN Share "n" Sell PIN;
    *601* default PIN*New PIN* New PIN#
    Dial the USSD code above and click on the green/send key.

    How to Make MTN Airtime Transfer Using Share "n" Sell


    To make airtime transfer via MTN Share "n" Sell service, you can either do so using the USSD Code or by the SMS method.

    Using the USSD Method


    As for the USSD method, simply enter *600* ANY MTN NUMBER *AMOUNT * YOUR PIN# and press the green/send key.
    E.g
    *600*0803 XXXXXXX *500*1234# and press the green/send key.

    Using the SMS Method


    To make the airtime transfer using the SMS method, send an SMS using this format:

    Transfer Recipient’s Number Amount PIN

    and send to 777 .
    Please note that you will have to send "Yes" in an SMS to 777 to confirm the Airtime transfer transaction if you are using the SMS method to transfer or share your airtime credit.


    Share And Interact:

    How to Set Bluetooth Storage Folder on China Phones

    On most China made phones like Techno, iTel amongst others, you have to specify the storage folder on which files that are sent to you from other bluetooth devices are being stored or saved. And in most cases; phone memory is set as the default storage folder.
    Since common China made phones don't have large in-built memory, you will have to change the default bluetooth storage folder and this is how to:


    How to Change Default Storage Folder for Bluetooth Files


    For you to be able to receive larger files like musics, videos, HD images and others on your China made phone from external bluetooth devices, you would need to change the storage folder to memory cards and to change it go to;

    Enter Menu <<>> Bluetooth <<>> Option <<>> Settings <<>> FTP <<>> Shared Folder (Change it to memory) <<>> Received Folder (Change it to memory)
    And that's all.
    I hope you find this short tutorial useful whenever you need it.

    Have you any opinion to share or comment to make? Please, do so using the comment box below:

    Share this tutorila with your friends using the Share And Interact Buttons below:


    Share And Interact:

    Be Alert! Phishing Fraud Warning for MTN Users

    Scam
    It was in the morning, around 9 a.m when one of our customers came into Aryk Enterprise store to ask for MTN N 1500 recharge cards. "I want only N 1500 recharge cards not multiples of card..." -he emphasized.

    Going by the way he was reacting, I knew for sure that something was up in the air. Indeed, there was something. I approached him politely to be certain of what he was happy or curious about.
    Bravo! He was to be a millionaire!
    Earlier that morning, he had received a message from a number claiming to have originated from MTN Nigeria. The content of the message was;
    "Your number have being chosen, only one more step to win! Recharge N 1500 to WIN N1,00000 . Visit..."
    He was given a web link to visit. It was on this web link that they make available a space for him to enter the recharge PIN before he could win the N1,000000 .
    "Once I enter the recharge PIN here, the amount would be credited to my account and I would be entitled to win the money..." -that was his thought
    The moment we visited the web link, I cautioned him not to enter the recharge PIN there. I told him it was a phishing webpage but he could not believe me. He entered three (3) MTN N 1500 recharge PINs into the space provided and waited for the response.
    There was no response.

    Having waited for about 5 mins, I told him to load those recharge PINs on his phone which he did.
    Guess what message he received;
    "This card has already been used by another customer!!"
    And that was how one of our customers lost N 4500 .

    Lessons


    1. Phishing web page is a kind of web page designed to delude visitors of what the real actual web page is. This kind of gimmick is being used by fraudsters to gather confidential info from victims and other internet users. Beware!
    2. Do not be moved by a promo that you are not dutifully involved in.
    3. Finally, do not entertain any message claiming that you have won anything you never participated or entitled to win.

    Inform your friends of this incidence maybe that might prevent or prepare them against such. Use the Share And Interract Buttons below.

    Have you any comment to share or similar experience to report? Use the comment box below this page.


    Share And Interact: