Google I/O 2012 - Google Play: Marketing 101 for Developers
As soon as you hit the "Publish" button on your app, you become (partly) a marketer; you might as well try to be a good one. We'll share everything we know about promoting apps on Google play: building a strategic marketing framework, making good use of media channels, taking advantage of the assets we've built for developers, and convincing the Play team to feature your app.
3D Dance Boy Android Live Wallpaper LINK REUPADO

3D Dance Boy Android Live Wallpaper Animado, divirta-se com este brincalhão, papel de parede com o Mascote Android símbolo ficando em sua tela inicial em glorioso 3D. Se o seu telefone suporta papéis de parede Animado, Baixe agora e curta com seus amigos e curta no Facebook.
Download: 4shared
Instalação:
1)Mova o arquivo .apk para seu Sd:/
2)Instale o .apk
3)Vá a escolha de papel de parede e selecione-o
4)Divirta-se! * *
Various Navigation Type provided in new Android SDK Tools, Revision 20.
In addition to the Master Detail Flow template described in last post, Android SDK Tools Revision 20 also provide various Navigation Type for Blank activity.
To use the template of Navigation Type, minimum SDK version of at least 14 is required.
Provided templates include:
- Tabs

- Tabs + Swipe

- Swipe Views + Title Strip

- Dropdown

It's a example of Swipe Views + Title Strip:

And the auto-generated code:
To use the template of Navigation Type, minimum SDK version of at least 14 is required.
Provided templates include:
- Tabs
- Tabs + Swipe
- Swipe Views + Title Strip
- Dropdown
It's a example of Swipe Views + Title Strip:

And the auto-generated code:
package com.example.androidr20a;

import android.app.ActionBar;
import android.app.FragmentTransaction;
import android.content.Context;
import android.os.Bundle;
import android.support.v4.app.Fragment;
import android.support.v4.app.FragmentActivity;
import android.support.v4.app.FragmentManager;
import android.support.v4.app.FragmentPagerAdapter;
import android.support.v4.app.NavUtils;
import android.support.v4.view.ViewPager;
import android.view.Gravity;
import android.view.LayoutInflater;
import android.view.Menu;
import android.view.MenuItem;
import android.view.View;
import android.view.ViewGroup;
import android.widget.TextView;

public class MainActivity extends FragmentActivity {

    /**
     * The {@link android.support.v4.view.PagerAdapter} that will provide fragments for each of the
     * sections. We use a {@link android.support.v4.app.FragmentPagerAdapter} derivative, which will
     * keep every loaded fragment in memory. If this becomes too memory intensive, it may be best
     * to switch to a {@link android.support.v4.app.FragmentStatePagerAdapter}.
     */
    SectionsPagerAdapter mSectionsPagerAdapter;

    /**
     * The {@link ViewPager} that will host the section contents.
     */
    ViewPager mViewPager;

    @Override
    public void onCreate(Bundle savedInstanceState) {
        super.onCreate(savedInstanceState);
        setContentView(R.layout.activity_main);
        // Create the adapter that will return a fragment for each of the three primary sections
        // of the app.
        mSectionsPagerAdapter = new SectionsPagerAdapter(getSupportFragmentManager());


        // Set up the ViewPager with the sections adapter.
        mViewPager = (ViewPager) findViewById(R.id.pager);
        mViewPager.setAdapter(mSectionsPagerAdapter);

    }

    @Override
    public boolean onCreateOptionsMenu(Menu menu) {
        getMenuInflater().inflate(R.menu.activity_main, menu);
        return true;
    }


    /**
     * A {@link FragmentPagerAdapter} that returns a fragment corresponding to one of the primary
     * sections of the app.
     */
    public class SectionsPagerAdapter extends FragmentPagerAdapter {

        public SectionsPagerAdapter(FragmentManager fm) {
            super(fm);
        }

        @Override
        public Fragment getItem(int i) {
            Fragment fragment = new DummySectionFragment();
            Bundle args = new Bundle();
            args.putInt(DummySectionFragment.ARG_SECTION_NUMBER, i + 1);
            fragment.setArguments(args);
            return fragment;
        }

        @Override
        public int getCount() {
            return 3;
        }

        @Override
        public CharSequence getPageTitle(int position) {
            switch (position) {
                case 0: return getString(R.string.title_section1).toUpperCase();
                case 1: return getString(R.string.title_section2).toUpperCase();
                case 2: return getString(R.string.title_section3).toUpperCase();
            }
            return null;
        }
    }

    /**
     * A dummy fragment representing a section of the app, but that simply displays dummy text.
     */
    public static class DummySectionFragment extends Fragment {
        public DummySectionFragment() {
        }

        public static final String ARG_SECTION_NUMBER = "section_number";

        @Override
        public View onCreateView(LayoutInflater inflater, ViewGroup container,
                Bundle savedInstanceState) {
            TextView textView = new TextView(getActivity());
            textView.setGravity(Gravity.CENTER);
            Bundle args = getArguments();
            textView.setText(Integer.toString(args.getInt(ARG_SECTION_NUMBER)));
            return textView;
        }
    }
}
<android.support.v4.view.ViewPager xmlns:android="http://schemas.android.com/apk/res/android"
    xmlns:tools="http://schemas.android.com/tools"
    android:id="@+id/pager"
    android:layout_width="match_parent"
    android:layout_height="match_parent"
    tools:context=".MainActivity">

    <!--
    This title strip will display the currently visible page title, as well as the page
    titles for adjacent pages.
    -->
    <android.support.v4.view.PagerTitleStrip android:id="@+id/pager_title_strip"
        android:layout_width="match_parent"
        android:layout_height="wrap_content"
        android:layout_gravity="top"
        android:background="#33b5e5"
        android:textColor="#fff"
        android:paddingTop="4dp"
        android:paddingBottom="4dp" />

</android.support.v4.view.ViewPager>
GO Launcher EX Windows 8 Theme - v.1.0

Tema com múltiplos substituíveis impressionante Windows 8 wallpapers temáticos, várias formas substituíveis, e papéis de parede de presente substituíveis app.
"Instruções abaixo".
Características:
Soberbamente bonita e limpa Go Launcher EX Windows 8 Theme decorados com toneladas de opções de personalização.
Completamente novo e redesenhado para a mais recente GO Launcher EX 3.0 e Ice Cream Sandwich Google OS.
* XO únicos personalizados de design impressionantes interfaces de grandes e imagens de alta resolução HD
* Substituíveis Windows 8 papéis de parede temáticos para o fundo principal
* Substituíveis Windows 8 Tema gaveta fundos app
* Substituíveis docas e os ícones correspondentes
* 100% temático fora do Windows 8 fundos tema principal, gavetas app, docas, pastas, ícones e interfaces ..
* Suporta ícones grandes e Re-consideráveis ícones
* Ferramenta de gerenciamento de memória e ferramentas de limpeza app para fazer o telefone mais rápido.
Dicas:
Para aplicar tema:
Abra GO LAUNCHER EX> Pressione Menu> Temas> Aplicar
Para alterar Wallpaper:
Pressione Menu> Wallpaper> Go Wallpaper direito> Vá e escolha wallpapers disponíveis
Para alterar Bar Dock:
Pressione Menu> Pref> Visual configurações> Fundos> Fundo> Dock fundo Tema GO
Para mudar o fundo da gaveta App:
Pressione Menu> Pref> Visual configurações> Fundos> Fundo da gaveta App> fundo Tema GO
Para criar efeitos ícone:
Primeiro, defina o deslocamento para horizontal ou vertical:
Pressione Menu> Pref> configurações de gavetas App> orientação Scrolling> Horizontal / Vertical
Em seguida, escolha um efeito ícone:
Pressione Menu> Pref> Effects> Configurações efeito efeito de rolagem horizontal ou vertical de rolagem
Para alterar o tamanho do ícone:
Pressione Menu> Pref> Visual configurações> Ícones TAMANHO ICON>
Para alterar a fonte:
Pressione Menu> Pref> Visual configurações> Fonte> Scan font font> Select
Download "GO Launcher Windows 8 Theme"(Apk): 4Shared
Download "GO Launcher EX v3.00"(Apk): 4Shared
Instalação:
1)Mova os 2 arquivos .apk para seu Sd:/
2)Instale o .apk "GO Launcher EX" e em seguida instale o .apk "GO Launcher EX Windows 8 Theme"
3)Em seguida faça os seguintes passos.
Abra o app Go Launcher EX. Depois escolha a opção menu ela ficara conforme esta a imagem abaixo.

Pressione o icone Temas.

Após pressione para o lado onde tem escrito "Installed"

E por ultimo, pressione o tema a escolha que no caso é o Windows 8...

Android SDK Tools, Revision 20 now support Application templates
Lets walk through the new project wizard of Android SDK Tools Revision 20 to create a Master Detail Flow Hello World.
- As normal, click File - > New to create a new project
- Select Android Application Project under Android, and click Next>.

- Setup a new project, include select Build SDK and Minimum Required SDK, click Next>.

- Configure Launcher Icon.

- New Android ADT now supports new application templates for creating new application:

- Accept the default setting of the New Master/Detail Flow at this moment, click Finish.

Lets run the new Hello World generated.
- Now you can select how monitor logcat.

- Run on Android Phone Galaxy Nexus, still running 4.0.2!


- Run on Android Tablet HTC Flyer, running 3.2.1.

Related:
- Various Navigation Type provided in new Android SDK Tools, Revision 20.
- Life cycle of MasterDetailFlow HelloWorld
- As normal, click File - > New to create a new project
- Select Android Application Project under Android, and click Next>.

- Setup a new project, include select Build SDK and Minimum Required SDK, click Next>.

- Configure Launcher Icon.

- New Android ADT now supports new application templates for creating new application:
- Blank activity: Creates a new blank activity, with optional inner navigation.
- Master Detail Flow: Creates a new master/detail flow, which is two columns on tablets, and one column on smaller screens. This creates a master fragment, detail fragment, and two activities.

- Accept the default setting of the New Master/Detail Flow at this moment, click Finish.

Lets run the new Hello World generated.
- Now you can select how monitor logcat.

- Run on Android Phone Galaxy Nexus, still running 4.0.2!


- Run on Android Tablet HTC Flyer, running 3.2.1.

Related:
- Various Navigation Type provided in new Android SDK Tools, Revision 20.
- Life cycle of MasterDetailFlow HelloWorld


Jelly Bean will be rolling out to Galaxy Nexus, Nexus S and Xoom devices in mid July
According to engadget, Jelly Bean will be rolling out to Galaxy Nexus, Nexus S and Xoom devices in mid July, along with the open source code. Developers though, can start playing with the SDK today.
Source: http://www.engadget.com/2012/06/27/jelly-bean-android-4-1-revealed-by-google/
Source: http://www.engadget.com/2012/06/27/jelly-bean-android-4-1-revealed-by-google/
Android 4.1 (Jelly Bean) preview platform announced

At Google I/O, the latest version of the Android platform, Android 4.1 (Jelly Bean), was announced. With Jelly Bean, we’ve made the great things about Android even better with improved system performance and enhanced user features.
Android 4.1 is the fastest and smoothest version of Android yet. Google have made improvements throughout the platform and added great new features for users and developers. This document, Android 4.1 for Developers, provides a glimpse of what's new for developers.
See the Android 4.1 APIs document for a detailed look at the new developer APIs.
Source: Android Developers Blog - Introducing Android 4.1 (Jelly Bean) preview platform, and more
java.lang.NoClassDefFoundError: com.google.ads.AdView
If you have Android Apps with admob, and you update admob API with current ADT (may be ADT-17 or later), may be your code can be compiled without error, but fail in run-time, caused by java.lang.NoClassDefFoundError: com.google.ads.AdView!
It seem to be problem in ADT with external jars. To solve it:
- Create a libs folder in your project.
- Copy AdMob jar, GoogleAdMobAdsSdk-6.0.1.jar, in the libs folder.
- Update Java Build Path by selecting "Add JARs..." (NOT "Add External JARs...") to add the jar in libs.
It seem to be problem in ADT with external jars. To solve it:
- Create a libs folder in your project.
- Copy AdMob jar, GoogleAdMobAdsSdk-6.0.1.jar, in the libs folder.
- Update Java Build Path by selecting "Add JARs..." (NOT "Add External JARs...") to add the jar in libs.
Qualcomm announce Snapdragon SDK for Android, now available for Public Preview.

The Snapdragon SDK for Android has what you’d expect in any SDK: new APIs implemented using Android extensions, grouped in software packages by function, along with the docs and sample code you need to start writing to them.
The Snapdragon SDK for Android is a collection of software components that can be downloaded to enhance your app – especially when it's running on Snapdragon Processor powered devices. It is designed to make it easy for developers and device makers to take advantage of a host of next-gen technologies – from low power, always-on geo-fencing, to complex facial recognition and superfast computer vision, to dual mic stereo audio recording.
Visit Snapdragon SDK for Android Public Preview in QDeveNet
Android ICS Emulator for Mac OS with Intel® Hardware Accelerated Execution Manager
Eric Adams, a Software Engineer at Intel, will show you step-by-step how to download and install on Mac the latest Android ICS emulator for x86.
Android ICS Emulator for Ubuntu with KVM acceleration supported by Intel VT-x
Eric Adams, a Software Engineer at Intel, will show you step-by-step how to download and install on Ubuntu the latest Android ICS emulator for x86.
Android ICS Emulator for Microsoft Windows with Intel® Hardware Accelerated Execution Manager
Eric Adams, a Software Engineer at Intel, will show you step-by-step how to download and install on Windows the latest Android ICS emulator for x86.
Developing Android Apps with the Intel® Hardware Accelerated Execution Manager
The Benefits of Developing Android Apps with the Intel® Hardware Accelerated Execution Manager
This video shows how any Android developer using an Intel® Architecture (IA) based host PC with Windows, Mac or Linux can greatly speed up Android emulation by leveraging Intel® Virtualization Technology. Side by side comparisons show the performance gains of using the free Intel® HAXM driver with the Intel® x86 Atom™ System Image to deliver much faster boot times, game play, and app execution. Whether you’re coding in Dalvik Java or C/C++ (for NDK apps), and regardless of whether you’re targeting ARM or IA-based smartphones or tablets, this solution will deliver a far superior Android emulation experience for faster testing and debug of your Android apps.
This video shows how any Android developer using an Intel® Architecture (IA) based host PC with Windows, Mac or Linux can greatly speed up Android emulation by leveraging Intel® Virtualization Technology. Side by side comparisons show the performance gains of using the free Intel® HAXM driver with the Intel® x86 Atom™ System Image to deliver much faster boot times, game play, and app execution. Whether you’re coding in Dalvik Java or C/C++ (for NDK apps), and regardless of whether you’re targeting ARM or IA-based smartphones or tablets, this solution will deliver a far superior Android emulation experience for faster testing and debug of your Android apps.
NullPointerException of ViewPager when change orientation
In my last exercise of "ViewPager", when change orientation, NullPointerException will be thrown in onSaveInstanceState()!
May be it's a bug in ViewPager. Note the class ViewPager is currently under early design and development. May be it will be fixed in later updates.
At this moment, my solution is to comment the statement to call super.onSaveInstanceState(outState).
Next:
- Communication between Fragments in ViewPager
May be it's a bug in ViewPager. Note the class ViewPager is currently under early design and development. May be it will be fixed in later updates.
At this moment, my solution is to comment the statement to call super.onSaveInstanceState(outState).
 @Override
 protected void onSaveInstanceState(Bundle outState) {
  //super.onSaveInstanceState(outState);
  outState.putInt("tab", getActionBar().getSelectedNavigationIndex());
 }
Next:
- Communication between Fragments in ViewPager
Add Android Support Package
I have a old post "Install and setup Compatibility Package" describe how to include Android Support Package in Java Build Path. I try again it recently, it seem that the method no longer work! When work with android.support.v4.app.FragmentActivity, java.lang.ClassNotFoundException will be thrown.
It can be solved by Add Support Library in Eclipse menu.
- New a Android project target Android 3.0 (API Level 11).
- Modify AndroidManifest.xml to specify minSdkVersion and targetSdkVersion:
<uses-sdk android:minSdkVersion="7" android:targetSdkVersion="11"/>
- Add Android Support Library.
Right click on the project in Eclipse, select Android Tools, Add Support Library...

Accept to install Android Support.

- Test it
Modify your activity extends FragmentActivity instead Activity, and import android.support.v4.app.FragmentActivity.
Now you can run it without error.

How to NFC
Google I/O 2011: How to NFC
Gingerbread brings a comprehensive NFC reader/writer API, and some modest but surprisingly powerful P2P support. Come hear why you should care about NFC technology, what kinds of applications are possible right now, and best practices for deployment.
Near Field Communication (NFC) is a set of short-range wireless technologies, typically requiring a distance of 4cm or less to initiate a connection. NFC allows you to share small payloads of data between an NFC tag and an Android-powered device, or between two Android-powered devices.
Split Action Bar for Android 4
The old article demonstrate how to "Create ActionBar using XML" for Android 3.
When your application is running on Android 4.0 (API level 14) and higher, there's an extra mode available for the action bar called "split action bar." When you enable split action bar, a separate bar appears at the bottom of the screen to display all action items when the activity is running on a narrow screen (such as a portrait-oriented handset). Splitting the action bar to separate the action items ensures that a reasonable amount of space is available to display all your action items on a narrow screen, while leaving room for navigation and title elements at the top.
To enable split action bar, simply add uiOptions="splitActionBarWhenNarrow" to your <activity> or <application> manifest element.
Split Action Bar:

Normal Action Bar:

- Add android:uiOptions="splitActionBarWhenNarrow" in AndroidManifest.xml.
- /res/menu/menu.xml define the items in Action Bar.
- Override onCreateOptionsMenu() method to inflate menu.
When your application is running on Android 4.0 (API level 14) and higher, there's an extra mode available for the action bar called "split action bar." When you enable split action bar, a separate bar appears at the bottom of the screen to display all action items when the activity is running on a narrow screen (such as a portrait-oriented handset). Splitting the action bar to separate the action items ensures that a reasonable amount of space is available to display all your action items on a narrow screen, while leaving room for navigation and title elements at the top.
To enable split action bar, simply add uiOptions="splitActionBarWhenNarrow" to your <activity> or <application> manifest element.
Split Action Bar:

Normal Action Bar:

- Add android:uiOptions="splitActionBarWhenNarrow" in AndroidManifest.xml.
<?xml version="1.0" encoding="utf-8"?>
<manifest xmlns:android="http://schemas.android.com/apk/res/android"
    package="com.exercise.AndroidSplitActionBar"
    android:versionCode="1"
    android:versionName="1.0" >

    <uses-sdk android:minSdkVersion="14" />

    <application

        android:icon="@drawable/ic_launcher"
        android:label="@string/app_name" >
        <activity
            android:uiOptions="splitActionBarWhenNarrow"
            android:name=".AndroidSplitActionBarActivity"
            android:label="@string/app_name" >
            <intent-filter>
                <action android:name="android.intent.action.MAIN" />

                <category android:name="android.intent.category.LAUNCHER" />
            </intent-filter>
        </activity>
    </application>

</manifest>
- /res/menu/menu.xml define the items in Action Bar.
<menu xmlns:android="http://schemas.android.com/apk/res/android">
    <item android:id="@+id/itemid_0"
        android:title="Action Item 0"
        android:icon="@drawable/ic_launcher"
        android:orderInCategory="0"
        android:showAsAction="ifRoom|withText" />
    <item android:id="@+id/itemid_1"
        android:title="Action Item 1"
        android:orderInCategory="0"
        android:showAsAction="ifRoom|withText" />
    <item android:id="@+id/itemid_2"
        android:title="Action Item 2"
        android:orderInCategory="0"
        android:showAsAction="ifRoom|withText" />

</menu>
- Override onCreateOptionsMenu() method to inflate menu.
package com.exercise.AndroidSplitActionBar;

import android.app.Activity;
import android.os.Bundle;
import android.view.Menu;
import android.view.MenuInflater;

public class AndroidSplitActionBarActivity extends Activity {
    /** Called when the activity is first created. */
    @Override
    public void onCreate(Bundle savedInstanceState) {
        super.onCreate(savedInstanceState);
        setContentView(R.layout.main);
    }

 @Override
 public boolean onCreateOptionsMenu(Menu menu) {
  MenuInflater menuInflater = getMenuInflater();
        menuInflater.inflate(R.menu.menu, menu);

        return super.onCreateOptionsMenu(menu);
 }
}
Programmatically create layout and view, with ID assigned by setId().
This example demonstrate how to create layout and view at run time using Java code, instead of XML code. We can assign IDs for the layouts/views by calling setId() mdthod.
.")
In order to call setId() with named id, create /res/values/ids.xml to define out ID resources.
Main code.
.")
In order to call setId() with named id, create /res/values/ids.xml to define out ID resources.
<?xml version="1.0" encoding="utf-8"?>
<resources>
    <item type="id" name="layout_id"/>
    <item type="id" name="image_id" />
</resources>
Main code.
package com.exercise.AndroidSetId;

import android.app.Activity;
import android.os.Bundle;
import android.view.View;
import android.view.View.OnClickListener;
import android.view.ViewGroup.LayoutParams;
import android.widget.ImageView;
import android.widget.LinearLayout;
import android.widget.Toast;

public class AndroidSetIdActivity extends Activity {
    /** Called when the activity is first created. */
    @Override
    public void onCreate(Bundle savedInstanceState) {
        super.onCreate(savedInstanceState);

        LinearLayout layout = new LinearLayout(AndroidSetIdActivity.this);
        layout.setId(R.id.layout_id);
        LayoutParams layoutParams
         = new LayoutParams(LayoutParams.MATCH_PARENT, LayoutParams.MATCH_PARENT);
        layout.setLayoutParams(layoutParams);
        layout.setOrientation(LinearLayout.VERTICAL);

        ImageView imageView = new ImageView(AndroidSetIdActivity.this);
        imageView.setId(R.id.image_id);
        imageView.setImageResource(R.drawable.ic_launcher);
        LayoutParams imageViewLayoutParams
         = new LayoutParams(LayoutParams.WRAP_CONTENT, LayoutParams.WRAP_CONTENT);
        imageView.setLayoutParams(imageViewLayoutParams);

        layout.addView(imageView);

        setContentView(layout);

        layout.setOnClickListener(viewOnClickListener);
        imageView.setOnClickListener(viewOnClickListener);
    }

    OnClickListener viewOnClickListener
    = new OnClickListener(){

  @Override
  public void onClick(View v) {

   int myId = v.getId();

   Toast.makeText(AndroidSetIdActivity.this,
     "ID: " + String.valueOf(myId) + " clicked",
     Toast.LENGTH_LONG).show();
  }};
}
Schedule of Android Sessions in Google IO 2012
Be among the first to see the latest demos and developments from Android. Watch the keynote and over 40 sessions live streamed from Google I/O! It all begins June 27, at 9am.
Check the Android sessions schedule.

Check the Android sessions schedule.

Improve Android Emulator performance with Intel Atom x86 System Image
Back to the releasing of Android SDK r17, Intel Atom x86 System Image was included. AVD with Intel Atom x86 System Image can access the host CPU natively and offer significantly faster execution.

To install Intel Atom x86 System Image, click Window from Eclipse menu, select Android SDK Manager. Check to install package of Intel Atom x86 System Image, it's available on Android 4.0.3(API 15) and 2.3.3(API 10) currently.

Create emulator using Intel Atom x86 System Image
- Window -> AVD Manager. New a AVD.

- Select CPU/ABI of Intel Atom (x86). Enter others as needed. Click Create AVD.

OpenSense SDK Update Available for Download Now

HTC announce new updates to the HTC OpenSense Software Development Kit (SDK) at htcdev.com! Now you can download the update and begin implementing your own innovative new apps that plug into features like the Sound Enhancer, Lock Screen, new Common Controls or Media Link HD (coming soon).
Source: HTC Blog
RED BULL X-FIGHTERS 2012

Descrição:
Resumo: RED BULL X-FIGHTERS 2012 - Um jogo altamente viciante de freestyle motocross!
Experimente a emoção de o melhor evento de Motocross Freestyle lá fora! Inicie sua moto, acelerar e Jump! Impressionar o júri e platéia, puxando de cair o queixo truques e lutar contra seu caminho até o topo!
CONTROLES:
- Execute truques desenhando gestos na tela
- Verifique o Trikipedia para uma grande lista de gestos
- Acelere sua moto, premindo o botão do crânio
- Aumente o arrastando para baixo o crânio (cuidado - seu impulso é limitado)
CARACTERÍSTICAS
- 4 modos de jogo repletos de acção
- Vença o World Tour 2012 um jogo todos os 6 pontos oficiais
- Enviar seus amigos do Facebook no jogo desafios
- Desbloquear ternos de driver, bicicletas e dezenas de truques
- Jogue como Red Bull X-Fighter campeão mundial Dany Torres
- Combine Truques FMX e criar seu próprio estilo
- A realização integral e sistema de ranking incluindo Game Center e
global / nacional rankings
- Música Oficial, por TWIN ATLÂNTICO (Registros Red Bull)
Jogue o Tournament Mode e mostrar o que você tem em todos Tour oficial Pára do Red Bull X-Fighters Mundial de Turismo 2012. Ganhe créditos e desbloquear novos truques, eventos, motos e pilotos!
Instalação:
1)Mova o arquivo .apk para seu Sd:/
2)Extraia o data para Sd:/android/data/
3)Instale o Apk
4)Inicie o jogo...
5)Divirta-se!
2)Extraia o data para Sd:/android/data/
3)Instale o Apk
4)Inicie o jogo...
5)Divirta-se!
ROM 2.3.6 OFFICIAL AMÉRICA LATINA PARA GALAXY ACE S5830B/L


Descrição Do Autor (Equipe Do Android)
BEM GALERA HOJE VENHO TRAZER A VOCÊS ESSA ROM QUE COLOQUEI ONTEM NO MEU GALAXY ACE . ESTAVA USANDO A ROM ENTEL DO CHILE E PERCEBI QUE MEU SINAL DA VIVO ESTAVA MUITO BAIXO EM TODO LUGAR QUE EU IA. AI PENSEI SÓ PODER SER A ROM !!! ENTÃO FUI NO SAMFIRWARE E VI UMA ROM DO CHILE TAMBÉM ESCRITO TELEFÔNICA E PROCUREI NA NET SE ALGUÉM TINHA TESTADO E NÃO ACHEI NADA :( . ENTÃO RESOLVI ME ARRISCAR E TESTAR ESSA ROM . E PARA MINHA SURPRESA É MELHOR DO QUE DA ENTEL , É MAIS LEVE E MAIS RÁPIDA APESAR DE MARCAR QUE É DA TELEFÔNICA NO SITE SAMFIRWARE NA VERDADE É DA MOVISTAR. ELE TEM UM LOGO DA MOVISTAR QUANDO INICIA E UNS WIDGES BEM BACANAS . BEM QUEM ESTIVER INTERESSADO VAI AI O TUTORIAL :)
FAÇA POR SUA CONTA E RISCO NEM O ANDROID X E NEM O EQUIPE DO ANDROID SE RESPONSABILIZAM POR QUALQUER DANO NO SEU APARELHO
OBS: TUDO ESTA FUNCIONANDO PERFEITAMENTE :)
PARA INSTALAR VAMOS PRECISAR
ROM 2.3.6 AMÉRICA LATINA CLICK AQUI
DRIVES DA SAMSUNG CASO NÃO TENHA CLICK AQUI PARA SEU PC RECONHECER SEU CELULAR
ODIM + COOPER OPS CLICK AQUI
ROOT PARA GALAXY ACE S5830B/C/L CLICK AQUI
EXTRAI TUDO NO SEU PC MENOS O ROOT E VAMOS COMEÇAR
1° PRIMEIRO DESLIGUE SEU CELULAR E LIGUE EM MODO DOWNLOAD SEGURANDO O BOTÃO POWER + HOMER E DEPOIS YES DELETE ALL USER

2° AGORA COM AS TECLAS VOLUME + E - SELECIONE A OPÇÃO WIPE DATA/FACTORY RESET E APERTE A TECLA HOMER


3° AINDA NO SYSTEM RECOVERY VÁ EM WIPE CACHE PARTICION APERTE A TECLA HOME E VÁ EM YES DELETE ALL USER NOVAMENTE
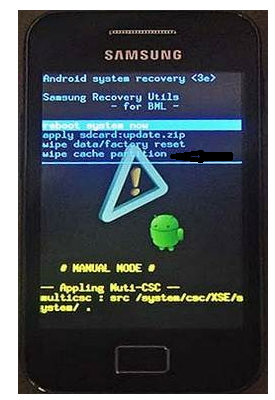

5° AGORA DESLIGUE SEU CELULAR E LIGUE EM MODO DOWNLOAD SEGURANDO O POWER+VOLUME PARA BAIXO + HOME E CONECT AO PC .

6° ABRA O ODIM E CLICK EM OPS E PROCURE PELO COOPER OPS QUE VC BAIXOU JUNTO COM O ODIM


07° AGORA SELECIONE A OPÇÃO ONE PACKAGE DO LADO ESQUERDO DO ODIM E VÁ NO OUTRO ONE PACKAGE QUE ESTA NA PARTE INFERIOR DIREITA DO ODIM E PROCURE PELA ROM QUE VOCÊ BAIXOU


08° SE ESTIVER TUDO CERTO O ODIM JÁ RECONHECEU SEU APARELHO E ESTARÁ COMO NA IMAGEM ABAIXO

07° AGORA CLICK EM START E AGUARDE . QUANDO VOLTAR ESTARÁ COM A NOVA
ROM :)
ACESSO ROOT
COPIE O ZIP ACEGINGER PARA RAIZ DO SEU CARTÃO DE MEMORIA AGORA DESLIGUE E LIGUE SEU CELULAR EM MODO DOWNLOAD. AGORA CLICK EM APP SDCARD UPDATE ZIP E PROCURE PELA ACEGINGER QUE VOCÊ COPIU PARA CARTÃO AGORA APLIQUE E DEPOIS REBOOT SYSTEM NOW. SEU CELULAR ESTA ROOTEADO
*NÃO TESTEI A ROM PORQUE NÃO POSSUO O APARELHO APENAS A POSTEI POR SER OFICIAL
CRÉDITOS TOTAIS AO: http://www.aplicativos-para-android.com
Subscribe to:
Posts (Atom)