Tutorial – Xperia Play R800a / R800i – ROM Android 2.3.3 Gingerbread 4.0.A.2.368

A Sony disponibilizou uma nova rom para o  Xperia Play uma atualização nova versão 4.0.A.2.368 Gingerbread, pelo sinal muito boa logo abaixo irei citar os benefícios que essa  Rom traz.

Obs: não precisa desbloquear bootloader. porque a rom é original basta seguir o tutorial.  , lembrando a todos você que funciona tanto no R800a quanto no R800i então não tenham medo.
Vantagens que a rom traz abaixo:
1º Based on 4.0.2.A.368
2º Rom mais rapida, em jogos e aplicativos em Geral.
3º Facil de Rotear através do método zergrush..
 LEMBRANDO QUE NEM O ANDROID X E NEM O EU SOU ANDROID SÃO RESPONSAVEIS POR QUALQUER DANO EM SEU APARELHO FAÇA POR SUA CONTA E RISCO E SIGA O TUTORIAL A RISCA!!!


Instalando Android 2.3.3 Xperia Play R800a ou R800i

Primeiramente Baixe os seguintes arquivos:
Rom Oficial Android 2.3.3 versão 4.0.A.2.368
Flash Tools 0.6.8.0
Caso você ja tenha o Flash Tools instalado no pc não precisa.
1º Carregar a bateria no minimo 50% recomendo 100%.
Instale o Flash Tools 0.6.8.0  e um outro arquivo que vem junto que são os drivers, depois de instalado va no diretório aonde ele foi instalado você verá uma pasta chamadaFirmwares abra ela e coloque o arquivo da rom que você baixou chamadoR800i_4.0.A.2.368_World.ftf dentro dela.
3º Abra o Flash Tools Clique no desenho de um raio, depois selecione
flashmode e aperte ok. Selecione o arquivo da rom chamado R800i_4.0.A.2.368_World.ftf que esta dentro da pastaFirmwares.
4º Marque as opções ao lado
Wiper User Data e Wipe Cache, se já estiver marcado pule para proxima etapa.
5º Clique em
OK.
image
Irão aparecer as seguintes Imgens:

image
image
1º Desconecte o cabo USB, caso ele esteja conectado no PC 
2º Desligue o Celular
3º Clique e mantenha pressionado o botão voltar
4º Conecte o cabo usb novamente e aguarde o programa reconhecer o celular
Obs: Caso apareça a mensagem "Please install or reinstall device drivers from drivers folder" vá na pasta drivers que fica dentro da pasta do programa flashtool e instale os drivers clicando no programa Flashtool-drivers.exe e depois tente reconectar o Xperia Play. O processo de instalação demora poucos minutos.
quando vocês virem a mensagem
Now unplug the device and power is on vocês devem desconectar o cabo USB e ligar o aparelho, o primeiro boot pode demorar um pouco, não precisa ficar assustado pois é normal. Depois é só correr para o Abraço com a nova atualização do Xperia Play…

NÃO POSSUO O APARELHO PARA TESTAR SÓ A POSTEI POR SER OFICIAL DA SONY E POR TER OTIMOS COMENTARIOS SOBRE ELA NO EU SOU ANDROID!!!

CRÉDITOS TOTAIS AO: http://eusouandroid.com/ 
Snapdragon S4 Thermal Comparison and Butter Benchmark


Today's high-end smartphones and tablets are capable of doing many intensive computing tasks, such as 3D gaming, shooting HD video, and editing photos. The more demanding these tasks, the harder the powerful processor works. That can result in excessive heat, which can result in lower performance and reliability issues. Over time, excessive heat can also be damaging to components, especially the battery. The hotter a device gets, the more it degrades battery capacity. To combat this, Snapdragon S4 processors are specially designed to keep their cool. Watch this video to see a Snapdragon thermal comparison and our new Butter Benchmark.

Learn more at http://www.qualcomm.com/snapdragon. To see more videos from Qualcomm go to www.youtube.com/qualcomm

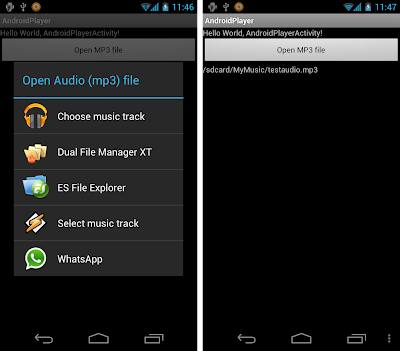
Start Intent to choice "audio/mp3" using installed app

By starting Intent with action of "Intent.ACTION_GET_CONTENT" and type of "audio/mp3", we can open installed app on Android devices to choice mp3 file.

Choice mp3 file with installed app


package com.exercise.AndroidPlayer;

import android.app.Activity;
import android.content.Intent;
import android.net.Uri;
import android.os.Bundle;
import android.view.View;
import android.view.View.OnClickListener;
import android.widget.Button;
import android.widget.TextView;

public class AndroidPlayerActivity extends Activity {

TextView info;
Button buttonOpen;

final static int RQS_OPEN_AUDIO_MP3 = 1;

/** Called when the activity is first created. */
@Override
public void onCreate(Bundle savedInstanceState) {
super.onCreate(savedInstanceState);
setContentView(R.layout.main);
buttonOpen = (Button)findViewById(R.id.open);
buttonOpen.setOnClickListener(buttonOpenOnClickListener);

info = (TextView)findViewById(R.id.info);
}

OnClickListener buttonOpenOnClickListener
= new OnClickListener(){

@Override
public void onClick(View arg0) {
Intent intent = new Intent();
intent.setType("audio/mp3");
intent.setAction(Intent.ACTION_GET_CONTENT);
startActivityForResult(Intent.createChooser(
intent, "Open Audio (mp3) file"), RQS_OPEN_AUDIO_MP3);

}};

@Override
protected void onActivityResult(int requestCode, int resultCode, Intent data) {
if (resultCode == RESULT_OK) {
if (requestCode == RQS_OPEN_AUDIO_MP3) {
Uri audioFileUri = data.getData();

info.setText(audioFileUri.getPath());
}
}
}

}


<?xml version="1.0" encoding="utf-8"?>
<LinearLayout xmlns:android="http://schemas.android.com/apk/res/android"
android:layout_width="fill_parent"
android:layout_height="fill_parent"
android:orientation="vertical" >

<TextView
android:layout_width="fill_parent"
android:layout_height="wrap_content"
android:text="@string/hello" />
<Button
android:id="@+id/open"
android:layout_width="fill_parent"
android:layout_height="wrap_content"
android:text="Open MP3 file" />
<TextView
android:id="@+id/info"
android:layout_width="fill_parent"
android:layout_height="wrap_content" />

</LinearLayout>


Next:
- Play "audio/mp3" with MediaPlayer


XDA Developers' Android Hacker's Toolkit: The Complete Guide to Rooting, ROMs and Theming


Make your Android device truly your own
Are you eager to make your Android device your own but you're not sure where to start? Then this is the book for you. XDA is the world's most popular resource for Android hacking enthusiasts, and a huge community has grown around customizing Android devices with XDA. XDA's Android Hacker's Toolkit gives you the tools you need to customize your devices by hacking or rooting the android operating system.
Providing a solid understanding of the internal workings of the Android operating system, this book walks you through the terminology and functions of the android operating system from the major nodes of the file system to basic OS operations. As you learn the fundamentals of Android hacking that can be used regardless of any new releases, you'll discover exciting ways to take complete control over your device.
  • Teaches theory, preparation and practice, and understanding of the OS
  • Explains the distinction between ROMing and theming
  • Provides step-by-step instructions for Droid, Xoom, Galaxy Tab, LG Optimus, and more
  • Identifies the right tools for various jobs
  • Contains new models enabling you to root and customize your phone
  • Offers incomparable information that has been tried and tested by the amazing XDA community of hackers, gadgeteers, and technicians
XDA's Android Hacker's Toolkit is a simple, one-stop resource on hacking techniques for beginners.


O'Reilly Android Cookbook, A Crowd-sourced Cookbook on Writing Great Android Apps

The web site http://androidcookbook.com/ is a community-written web site which has also been used to create an O'Reilly Cookbook, both about how to build great Android applications.

It is full of how-to information along with code snippets that illustrate the ideas presented. It features both how-to's that overlap with the official documentation, and material that goes beyond this to be more tutorial, more in-depth, or explaining "lessons from the trenches": what actually works to get the application functioning well. Unlike most books written by one, two or a few individuals, this one has input from dozens of contributors, who were all able to view and comment on each others' recipes before the book was published. The published version(s) include printed books, eBooks, and other uses. And long after the book was first published in 2012, this site will continue to exist - with a larger collection of recipes than will fit in the published book - and serve as an Android developer resource site long after.


Google USB Driver for Windows

I have just updated Windows 8 Release Preview. When I connect Galaxy Nexus, it can be recognized with Internal Storage, but cannot be recognized by ADB.

In order to use Galaxy Nexus to develop Android on Windows (also Windows 8), Google USB Driver for Windows is needed.

The Google USB driver is a downloadable component for the Android SDK, available from the SDK Manager. The driver is for Windows only and provides the necessary drivers for the following devices:
  • ADP1 / T-Mobile G1*
  • ADP2 / Google Ion / T-Mobile myTouch 3G*
  • Verizon Droid*
  • Nexus One
  • Nexus S
* Or similar hardware on other carriers
All other devices require Windows drivers provided by the hardware manufacturer, as listed in the OEM USB Drivers document. The Galaxy Nexus driver is also distributed by Samsung (listed as model SCH-I515).
Details: Google USB Driver from Android Document.


Remark:
M.S. Lubis. provide a solution to Install USB driver Galaxy Nexus on Windows8.


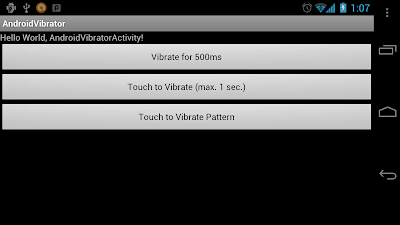
Vibrate with a given pattern

Last exercise demonstrate basic of android.os.Vibrator. The method vibrate (long[] pattern, int repeat) of Vibrator cause vibrate with a given pattern.

Vibrate with a given pattern


package com.exercise.AndroidVibrator;

import android.app.Activity;
import android.os.Bundle;
import android.os.Vibrator;
import android.view.MotionEvent;
import android.view.View;
import android.view.View.OnClickListener;
import android.view.View.OnTouchListener;
import android.widget.Button;

public class AndroidVibratorActivity extends Activity {

Button buttonVibrate1, buttonVibrate2, buttonVibrate3;

Vibrator myVibrator;

/** Called when the activity is first created. */
@Override
public void onCreate(Bundle savedInstanceState) {
super.onCreate(savedInstanceState);
setContentView(R.layout.main);
buttonVibrate1 = (Button)findViewById(R.id.buttonVibrate1);
buttonVibrate2 = (Button)findViewById(R.id.buttonVibrate2);
buttonVibrate3 = (Button)findViewById(R.id.buttonVibrate3);

myVibrator = (Vibrator)getSystemService(AndroidVibratorActivity.VIBRATOR_SERVICE);

buttonVibrate1.setOnClickListener(new OnClickListener(){

@Override
public void onClick(View v) {
// TODO Auto-generated method stub
myVibrator.vibrate(500);
}});

buttonVibrate2.setOnTouchListener(new OnTouchListener(){

@Override
public boolean onTouch(View v, MotionEvent event) {
int action = event.getAction();

if(action == MotionEvent.ACTION_DOWN){
myVibrator.vibrate(1000);
}else if(action == MotionEvent.ACTION_UP){
myVibrator.cancel();
}

return true;
}});

buttonVibrate3.setOnTouchListener(new OnTouchListener(){

@Override
public boolean onTouch(View v, MotionEvent event) {
int action = event.getAction();

if(action == MotionEvent.ACTION_DOWN){

long[] pattern = {
50, //Off before vibration
100, 100, //on-off
100, 1000, //on-off
};

myVibrator.vibrate(pattern, 0); //repeat from pattern[0]
}else if(action == MotionEvent.ACTION_UP){
myVibrator.cancel();
}

return true;
}});

}
}


main.xml
<?xml version="1.0" encoding="utf-8"?>
<LinearLayout xmlns:android="http://schemas.android.com/apk/res/android"
android:layout_width="fill_parent"
android:layout_height="fill_parent"
android:orientation="vertical" >

<TextView
android:layout_width="fill_parent"
android:layout_height="wrap_content"
android:text="@string/hello" />

<Button
android:id="@+id/buttonVibrate1"
android:layout_width="fill_parent"
android:layout_height="wrap_content"
android:text="Vibrate for 500ms" />
<Button
android:id="@+id/buttonVibrate2"
android:layout_width="fill_parent"
android:layout_height="wrap_content"
android:text="Touch to Vibrate (max. 1 sec.)" />
<Button
android:id="@+id/buttonVibrate3"
android:layout_width="fill_parent"
android:layout_height="wrap_content"
android:text="Touch to Vibrate Pattern" />

</LinearLayout>


"android.permission.VIBRATE" is needed.