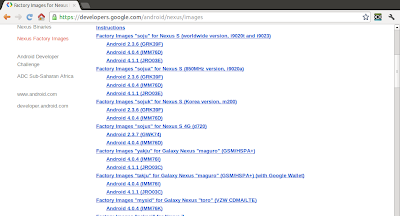
Factory Images for Nexus Devices updated with Factory images of Jelly Bean for Galaxy Nexus and Nexus S.
You will find these files useful if you have used the Android Open-Source Project, flashed custom builds on your device, and wish to return that device to its factory state.
Gallery-like single column GridView
by changing android:numColumns="1", the last exercise of "GridView" can be modified to a Gallery-like single column GridView.
<LinearLayout xmlns:android="http://schemas.android.com/apk/res/android"
    xmlns:tools="http://schemas.android.com/tools"
    android:layout_width="match_parent"
    android:layout_height="match_parent"
    android:orientation="horizontal">
    <GridView
        android:id="@+id/gridview"
        android:layout_width="130dp"
        android:layout_height="fill_parent"
        android:columnWidth="90dp"
        android:numColumns="1"
        android:verticalSpacing="10dp"
        android:horizontalSpacing="10dp"
        android:stretchMode="columnWidth"
        android:gravity="center"
        android:background="@android:color/background_dark"/>
    <LinearLayout
        android:layout_width="match_parent"
        android:layout_height="match_parent"
        android:orientation="vertical"
        android:background="@android:color/background_light">
 </LinearLayout>
</LinearLayout>
Vertical Gallery-like ScrollView
With the custom LinearLayout (MyHorizontalLayout.java) in last exercise "Implement custom LinearLayout for Gallery-like HorizontalScrollView", it can be implement vertical Gallery-like ScrollView also.
Keep both MainActivity.java and MyHorizontalLayout.java of last exercise no change.
Modify the layout.
Related:
- GridView loading photos from SD Card
Keep both MainActivity.java and MyHorizontalLayout.java of last exercise no change.
Modify the layout.
<LinearLayout xmlns:android="http://schemas.android.com/apk/res/android"
    xmlns:tools="http://schemas.android.com/tools"
    android:layout_width="match_parent"
    android:layout_height="match_parent"
    android:orientation="vertical">

    <ScrollView
        android:layout_width="wrap_content"
        android:layout_height="fill_parent" >
        <com.example.androidhorizontalscrollviewgallery.MyHorizontalLayout
            android:id="@+id/mygallery"
            android:layout_width="wrap_content"
            android:layout_height="wrap_content"
            android:orientation="vertical"
            />
    </ScrollView>

</LinearLayout>
Related:
- GridView loading photos from SD Card
Android SDK Tools Revision 20.0.1, NDK revision 8b, and ADT 20.0.1 released
Android SDK Tools Revision 20.0.1, full SDK for Android 4.1, released. You can now develop and publish applications against API level 16 using new Jelly Bean APIs. The new update can be downloaded through SDK Manager. Also updated are NDK revision 8b and ADT Plugin 20.0.1.
Update SDK on Eclipse:
Please note that note that the SDK Tools r20.0.1 is designed for use with ADT 20.0.1 and later. To update ADT in Eclipse, click Help -> Check for updates, to update ADT.
After updated ADT, click Window -> Android SDK Manager to install updated components.
Update SDK on Eclipse:
Please note that note that the SDK Tools r20.0.1 is designed for use with ADT 20.0.1 and later. To update ADT in Eclipse, click Help -> Check for updates, to update ADT.
After updated ADT, click Window -> Android SDK Manager to install updated components.
Error of getLocationInWindow() and getLocationOnScreen()
The View class provide the methods to computes the coordinates:
In my experience, the returned x location is correct, but the y location is always error with a fixed offset. The offset various depends on devices and configuration.
To correct it, we can get the offset using the code, after view displayed:
DisplayMetrics displayMetrics = new DisplayMetrics();
getWindowManager().getDefaultDisplay().getMetrics(displayMetrics);
int offsetY = displayMetrics.heightPixels - mainScreen.getMeasuredHeight();
- getLocationInWindow (int[] location): Computes the coordinates of the view in its window.
- getLocationOnScreen (int[] location): Computes the coordinates of the view on the screen.
In my experience, the returned x location is correct, but the y location is always error with a fixed offset. The offset various depends on devices and configuration.
To correct it, we can get the offset using the code, after view displayed:
DisplayMetrics displayMetrics = new DisplayMetrics();
getWindowManager().getDefaultDisplay().getMetrics(displayMetrics);
int offsetY = displayMetrics.heightPixels - mainScreen.getMeasuredHeight();
package com.example.androidoffsetgetlocation;

import android.os.Bundle;
import android.app.Activity;
import android.util.DisplayMetrics;
import android.widget.ImageView;
import android.widget.LinearLayout;
import android.widget.TextView;

public class MainActivity extends Activity {

 LinearLayout mainScreen;
 ImageView object;
 TextView textOnCreate, textOnWindowFocusChanged;

    @Override
    public void onCreate(Bundle savedInstanceState) {
        super.onCreate(savedInstanceState);
        setContentView(R.layout.activity_main);

        mainScreen = (LinearLayout)findViewById(R.id.mainscreen);
        object = (ImageView)findViewById(R.id.object);
        textOnCreate = (TextView)findViewById(R.id.textview1);
        textOnWindowFocusChanged = (TextView)findViewById(R.id.textview2);

  readLocation(textOnCreate, "onCreate()");
    }

 @Override
 public void onWindowFocusChanged(boolean hasFocus) {
  // TODO Auto-generated method stub
  super.onWindowFocusChanged(hasFocus);

  readLocation(textOnWindowFocusChanged, "onWindowFocusChanged()");
 }

 private void readLocation(TextView tv, String status){
  DisplayMetrics displayMetrics = new DisplayMetrics();
  getWindowManager().getDefaultDisplay().getMetrics(displayMetrics);
  int offsetX = displayMetrics.widthPixels - mainScreen.getMeasuredWidth();
  int offsetY = displayMetrics.heightPixels - mainScreen.getMeasuredHeight();

        int[] locationInWindow = new int[2];
  object.getLocationInWindow(locationInWindow);
  int[] locationOnScreen = new int[2];
  object.getLocationOnScreen(locationOnScreen);

  tv.setText(
    "\n" + status +"\n"
    + "getLocationInWindow() - " + locationInWindow[0] + " : " + locationInWindow[1] + "\n"
    + "getLocationOnScreen() - " + locationOnScreen[0] + " : " + locationOnScreen[1] + "\n"
    + "Offset x: y - " + offsetX + " : " + offsetY);

 }

}
<LinearLayout xmlns:android="http://schemas.android.com/apk/res/android"
    xmlns:tools="http://schemas.android.com/tools"
    android:layout_width="match_parent"
    android:layout_height="match_parent"
    android:orientation="vertical"
    android:id="@+id/mainscreen">

    <ImageView
        android:id="@+id/object"
        android:layout_width="wrap_content"
        android:layout_height="wrap_content"
        android:src="@drawable/ic_launcher"/>
    <TextView
        android:id="@+id/textview1"
        android:layout_width="wrap_content"
        android:layout_height="wrap_content"/>
    <TextView
        android:id="@+id/textview2"
        android:layout_width="wrap_content"
        android:layout_height="wrap_content"/>

</LinearLayout>
Complete list of all new features of Android 4.1 Jelly Bean
Android 4.1, Jelly Bean, is the fastest and smoothest version of Android yet. Jelly Bean improves on the simplicity and beauty of Android 4.0, and introduces a new Google search experience on Android.
To read what's new in Android 4.1 Jelly Bean, visit: http://www.android.com/about/jelly-bean/.
- Everything in Jelly Bean feels fast, fluid, and smooth. Moving between home screens and switching between apps is effortless, like turning pages in a book.
- Jelly Bean features improved performance throughout the system, including faster orientation changes, faster responses when switching between recent apps, and smoother and more consistent rendering across the system through vsync and triple buffering.
- Jelly Bean has more reactive and uniform touch responses, and makes your device even more responsive by boosting your device's CPU instantly when you touch the screen, and turns it down when you don't need it to improve battery life.
To read what's new in Android 4.1 Jelly Bean, visit: http://www.android.com/about/jelly-bean/.
Implement grouped CheckBox on Action Menu
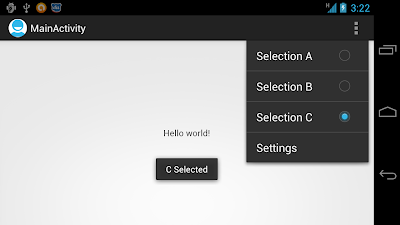
Example of Action Menu with grouped CheckBox.
Create /res/menu/activity_main.xml to define action menu.
The checked status will not be updated automatically. We can change it in onOptionsItemSelected() callback method.
Create /res/menu/activity_main.xml to define action menu.
<menu xmlns:android="http://schemas.android.com/apk/res/android">
    <item android:id="@+id/menu_settings"
        android:title="@string/menu_settings"
        android:orderInCategory="100"
        android:showAsAction="never" />
    <group android:checkableBehavior="single">
        <item android:id="@+id/selecta"
              android:title="Selection A" android:checked="true"/>
        <item android:id="@+id/selectb"
              android:title="Selection B" />
        <item android:id="@+id/selectc"
              android:title="Selection C" />
    </group>
</menu>
The checked status will not be updated automatically. We can change it in onOptionsItemSelected() callback method.
package com.example.androidactionbar;

import android.os.Bundle;
import android.app.Activity;
import android.view.Menu;
import android.view.MenuItem;
import android.widget.Toast;

public class MainActivity extends Activity {

    @Override
    public void onCreate(Bundle savedInstanceState) {
        super.onCreate(savedInstanceState);
        setContentView(R.layout.activity_main);
    }

    @Override
    public boolean onCreateOptionsMenu(Menu menu) {
        getMenuInflater().inflate(R.menu.activity_main, menu);
        return true;
    }

 @Override
 public boolean onOptionsItemSelected(MenuItem item) {
  switch (item.getItemId()) {
        case R.id.selecta:
         item.setChecked(true);
         Toast.makeText(getApplicationContext(),
           "A Selected",
           Toast.LENGTH_LONG).show();
         return true;
        case R.id.selectb:
         item.setChecked(true);
         Toast.makeText(getApplicationContext(),
           "B Selected",
           Toast.LENGTH_LONG).show();
         return true;
        case R.id.selectc:
         item.setChecked(true);
         Toast.makeText(getApplicationContext(),
           "C Selected",
           Toast.LENGTH_LONG).show();
         return true;
        default:
            return super.onOptionsItemSelected(item);
  }
 }

}
Subscribe to:
Posts (Atom)


