Solution: Infinix x600 Note 2 Totally Dead Due to Wrong Firmware Flash

This tutorial provides solution to Infinix Note 2 x600 totally dead due to wrong firmware DLoad or flashing.


As you may have known that Infinix Note 2 x600 has about 3 or 4 different variants and of which each of them uses different firmware.


So, in the case that your Infinix Note 2 x600 needs to be flashed and you flash it using a wrong firmware, the device becomes dead, not booting and SP Flash or PC will not be able to detect it anymore.


So, if you're in a situation such as this, here is what to do to bring your dead Infinix Note 2 x600 back to live.

Caution:

Do it at your own risk, I'm not responsible for any further bricks or damages you may incurred.


How to Bring Dead Infinix Note 2 x600 Back to Live

If your Infinix Note 2 x600 becomes dead due to wrong firmware Dload or flashing, here is the step by step guide to reflash it and bring it back to live.


Requirements:

  • Mobile Phone Hardware Repair Skill
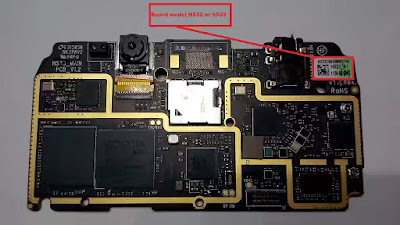
  • The Right Firmware for your phone -you can do this by observing the 532 or 533 board

You may download the appropriate firmware below here:

NOTE: you may check for the device exact board number on the board. Observe the pictures contained carefully.


Needed Tools:

How to Flash Dead Infinix Note 2 x600 Back to Live:

1. Install the drivers


2. Identify your board number (can be seen on the board).


x600 Note 2 Board

3. Download the right firmware for the device. Links are above.


4. Lunch Xflash tool and load the scatter file then, click Start.


5. Connect the socket as seen in the picture below and after that, connect the usb cable.


NOTE: the PC may not detect the phone at this point.


6. Make a jumper between the ground and the force boot pinout.


NOTE: The Jumper connection should be just one touch. Do Not keep them connected


7. Once that's done, you should here a connection sound from your PC and XFlash Tool should now begin to flash the device.


Now, you only have to wait until the flashing operations are completed then, disconnect the phone from the PC, couple your phone and turn it on.


Credit to Hovatek for the pictures.


How to Hard Reset LG Ray

Hard Reset Method for LG Ray: How to

1. Switch off your LG Ray either by holding the Power key for a short while, or by removing the battery; whichever is possible.


2. Press and hold the Volume Down and Power button together for some seconds.


3. When the LG logo is displayed, release the Power key and keep pressing the Volume Down.


4. While still holding the Volume Down key, tap the Power Key one more time.


5. Now, you should see the factory reset menu on your LG Ray screen.

Confirm the whole process by choosing appropriate options.

Use Volume rockers to scroll and Power button to confirm.

6. Wait few minutes until your LG Ray completes the wiping operation!


And by that, you have just hard reset your LG Ray.


LG Ray

Factory Reset Guide for LG Ray : How to

1. If your LG Ray is turned off, turn on the device by Pressing the Power Key until it comes on.


2. From the phone's Main Menu go to Settings, General then Backup & Reset.


3. From the screen, tap Factory Data Reset and then, Reset Phone.

Choose Delete All if you are sure you want to clear all your data.

Then select OK to confirm the whole operation.


Good. You have just performed a Factory Reset on your LG Ray.


NOTE:

Hard Reset is the process of reverting your phone's settings to its factory defaults using some key combinations without going through the phone settings before doing so. While Factory Reset is the process of resetting your phone to its factory default settings while the phone is on Android Mode.


The end result of both method is to clear or wipe off your phone contents, in this case, your LG Ray.


If this piece of info was useful to you, please share to help others.

Also, follow us on Facebook here, Twitter here and Google+ here.


How to Hard Reset LG K4

Hard Reset Method for LG K4: How to

1. Switch off your LG K4 either by holding the Power key for a short while, or by removing the battery; whichever is possible.


2. Press and hold the Volume Down and Power button together for some seconds.


3. When the LG logo is displayed, release the Power key and keep pressing the Volume Down.


4. While still holding the Volume Down key, tap the Power Key one more time.


5. Now, you should see the factory reset menu on your LG K4 screen.

Confirm the whole process by choosing appropriate options.

Use Volume rockers to scroll and Power button to confirm.

6. Wait few minutes until your LG K4 completes the wiping operation!


And by that, you have just hard reset your LG K4.


LG K4

Factory Reset Guide for LG K4 : How to

1. If your LG K4 is turned off, turn on the device by Pressing the Power Key until it comes on.


2. From the phone's Main Menu go to Settings, General then Backup & Reset.


3. From the screen, tap Factory Data Reset and then, Reset Phone.

Choose Delete All if you are sure you want to clear all your data.

Then select OK to confirm the whole operation.


Good. You have just performed a Factory Reset on your LG K4.


NOTE:

Hard Reset is the process of reverting your phone's settings to its factory defaults using some key combinations without going through the phone settings before doing so. While Factory Reset is the process of resetting your phone to its factory default settings while the phone is on Android Mode.


The end result of both method is to clear or wipe off your phone contents, in this case, your LG K4.


If this piece of info was useful to you, please share to help others.

Also, follow us on Facebook here, Twitter here and Google+ here.


How to Root Infinix Hot Note 2 x600 On Android 6.0 Marshmallow Firmware

This tutorial gives detailed insights on how to root Infinix Hot Note 2 X600 running on android 6.0 marshmallow. To root Infinix Hot Note 2 running on Android 6.0 marshmallow, you need to use a slightly different approach since it has been upgraded to android 6.0 Marshmallow.


android root

Here, you have all the tools and files needed to root your Infinix Hot Note 2 X600 on marshmallow firmware, meanwhile, you should make a complete backup of your ROM and other important files before you proceed.

Disclaimer:

This update is provided As Is.

ArykTECH, TeamWIN Recovery or any other parties relating to the development of the Recovery.img and other files that are used in this tutorial are not responsible for your actions, thus; if your device is damaged, got bricked or any other loss you may suffer as a result of this upgrade. Upgrade at your own discretion and endeavor to follow the instructions for rooting your Infinix Hot Note 2 X600 carefully.


Since the method discussed here is a little lengthy, you might want to try the latest Kingroot version which can be downloaded from here: All Kingroot Versions Download Link


Kingroot is a one-click root application for most android devices. Its procedures are simple. You only have to install the app and then, lunch it on the phone. Follow the on-screen commands from Kingroot until your phone is rooted.


In case Kingeoot fails to root your Infinix Hot Note 2 X600, you may follow the guides given below;


How to Root Infinix Hot Note 2 On Android 6.0 Marshmallow

If Kingroot could not root your Hot Note 2 X600 because of the firmware, your next available option is to flash SU Script via the recovery. I mean custom recovery.


Below here is the step by step guide on how to do that.


1. Download and Install VCOM drivers on your PC. See here: How to Install VCOM Drivers

2. Download flashable SuperSU script zip from here.


3. Copy SuperSU.zip you have downloaded to the phone’s SD card or internal storage. Better yet, you may copy it on both storage.


4. Download and flash CWM recovery for Infinix Hot Note 2 on your phone. See here: CWM Recovery for Hot Note 2 x600.


5. Boot the phone into recovery mode by pressing Volume up + Power buttons.

On CWM recovery, if you get a prompt asking you to allow CWM modify the system partition select No.

6. From CWM recovery, tap Install (ZIP from SD Card) then, Navigate to the location of the SuperSU.zip you downloaded and select it.

Navigate to Yes to confirm flashing of the SuperSU.zip and wait till flashing is complete.


7. Reboot your Hot Note 2 X600. Wait few seconds for the phone to initialize.

By now, SuperSU should be visible on your App Drawer and you can also confirm that your Hot Note 2 X600 is rooted using Root checker from the Play Store.


If this piece of info was useful to you, please share to help others.

Also, follow us on Facebook here, Twitter here and Google+ here.


Must Read:

How to Hard Reset LG K7

Hard Reset Method for LG K7: How to

1. Switch off your LG K7 either by holding the Power key for a short while, or by removing the battery; whichever is possible.


2. Press and hold the Volume Down and Power button together for some seconds.


3. When the LG logo is displayed, release the Power key and keep pressing the Volume Down.


4. While still holding the Volume Down key, tap the Power Key one more time.


5. Now, you should see the factory reset menu on your LG K7 screen.

Confirm the whole process by choosing appropriate options.

Use Volume rockers to scroll and Power button to confirm.

6. Wait few minutes until your LG K7 completes the wiping operation!


And by that, you have just hard reset your LG K7.


LG K7

Factory Reset Guide for LG K7 : How to

1. If your LG K7 is turned off, turn on the device by Pressing the Power Key until it comes on.


2. From the phone's Main Menu go to Settings, General then Backup & Reset.


3. From the screen, tap Factory Data Reset and then, Reset Phone.

Choose Delete All if you are sure you want to clear all your data.

Then select OK to confirm the whole operation.


Good. You have just performed a Factory Reset on your LG K7.


NOTE:

Hard Reset is the process of reverting your phone's settings to its factory defaults using some key combinations without going through the phone settings before doing so. While Factory Reset is the process of resetting your phone to its factory default settings while the phone is on Android Mode.


The end result of both method is to clear or wipe off your phone contents, in this case, your LG K7.


If this piece of info was useful to you, please share to help others.

Also, follow us on Facebook here, Twitter here and Google+ here.


CWM Recovery for Infinix Hot Note 2 x600

Here is a CWM recovery for Infinix Hot Note 2 x600. You can either flash this recovery image on your Hot Note 2 x600 using SP Flash Tool, Mobile Uncle or recovery manager and RashR.


hot note 2 x600

What's ClockWorkMOD (CWM) Recovery?

Following TeamWIN Recovery which is also known as TWRP Recovery, CWM is one of the most commonly used custom recovery available for Android devices.

Especially common with MTK android devices which the Infinix Hot Note 2 x600 belongs, CWM recovery is a simple yet sophisticated custom recovery compare to most other custom recovery; most people will agree.


CWM Recovery

Features of the CWM Recovery for Hot Note 2 X600

    * Support for NVram backup.

    * MTP Support.

    * Boot.img backup.

    * Recovery.img backup.

    * Uboot backup.

    * Emmc repair.

    * Recovery.img and boot.img install/flash.

    * More features working.

*Disclaimer:

This update is provided As Is.

ArykTECH CWM Recovery or any other parties relating to the development of this Recovery.img are not responsible for your actions, thus; if your device is damaged, got bricked or any other loss you may suffer as a result of this upgrade. Upgrade at your own discretion and endeavor to follow the instructions for flashing this recovery on your Infinix Hot Note 2 x600 carefully.

How to Flash this Recovery.img On your Hot Note 2 x600


First, decompress the downloaded recovery to obtain the img file of the TWRP Recovery in the folder and then, use any of the methods listed below to Flash the Recovery on your Infinix Hot Note 2 x600.


1. For SP Flash Tool method, see here: How to Flash Recovery.img On MTK Android Using SP Flash.


2. For Mobile Uncle Method, see here: How to Flash Recovery.img On MTK Android Using Mobile Uncle.


3. For RashR Method, see here: How to Flash Recovery.img On Android Devices Using Rashr.


Download Section:

Download CWM Recovery for Infinix Hot Note X600 here


How to Root Tecno W4 All Firmwares

This tutorial gives detail insights on how to root Tecno W4. To root Tecno W4, you need to use a slightly different approach since it is shipped with android 6.0 Marshmallow.


android root

Here, you have all the tools and files needed to root your Tecno W4, meanwhile, you should make a complete backup of your ROM and other important files before you proceed.

Disclaimer:

This update is provided As Is.

ArykTECH, TeamWIN Recovery or any other parties relating to the development of the Recovery.img and other files that are used in this tutorial are not responsible for your actions, thus; if your device is damaged, got bricked or any other loss you may suffer as a result of this upgrade. Upgrade at your own discretion and endeavor to follow the instructions for rooting your Tecno W4 carefully.


Since the method discussed here is a little lengthy, you might want to try the latest Kingroot version which can be download from here: All Kingroot Versions Download Link


Kingroot is a one-click root application for most android devices. Its procedures are simple. You only have to install the app and then, lunch it on the phone. Follow the on-screen commands from Kingroot until your phone is rooted.


In case Kingeoot fails to root your Tecno W4, you may follow the guides given below;


How to Root Tecno W4

If Kingroot could not root your Tecno W4 because of the firmware, your next available option is to flash SU Script via the recovery. I mean custom recovery.


Below here is the step by step guide on how to do that.


1. Download and Install VCOM drivers on your PC. See here: How to Install VCOM Drivers

2. Download flashable SuperSU script zip from here.


3. Copy SuperSU.zip you have downloaded to the phone’s SD card or internal storage. Better yet, you may copy it on both storage.


4. Download and flash TWRP for Tecno W4 on your phone. See here: TWRP for Tecno W4.


5. Boot the phone into recovery mode by presaing Volume up + Power buttons.

From TWRP, if you get a prompt asking you to swipe to allow TWRP modify the system partition then go ahead and swipe.

6. From TWRP recovery, tap Install then, Navigate to the location of the SuperSU.zip you downloaded and select it.

Swipe to confirm flashing of the SuperSU.zip and wait till flashing is complete.


7. Reboot your Tecno W4. Wait few seconds for the phone to initialize.

By now, SuperSU should be visible on your App Drawer and you can also confirm that your Tecno W4 is rooted using Root checker from the Play Store.


If this piece of info was useful to you, please share to help others.

Also, follow us on Facebook here, Twitter here and Google+ here.