Generate BlackBerry IMEI Using your Android Device: How-to

Few months ago, a tutorial was published ArykTECH. The tutorial discussed how to generating BlackBerry IMEI using a Windows program.

As simple as it was, some people could still not generate valid BlackBerry IMEI using that program. Some don't have PC to be used for generating the IMEI and therefore would either Whatsapp or email me for BlackBerry IMEI.

Well, I think I can now rest a bit more, at least; on generating IMEI for you guys since you can now generate thousands of BlackBerry IMEI on your own using your Android device.

How to Generate BlackBerry IMEI on Android Devices

Generating BlackBerry IMEI on your Android device is as simple as just tapping your Android device's app drawer.
To start generating BlackBerry IMEI on your Android device, all you have to do is to download and install the BlackBerry IMEI Generator apk from this link here and install it on your Android device.

To generate IMEI, simply open the application, click Generate BB IMEI. And valid BlackBerry IMEI will begin to displaying right above.

NOTE: you may tap Generate BB IMEI as many times as you want to generate different IMEI, or as many BlackBerry IMEI as you may want.

If you have any questions or concerns, use the comment box below.
Don't forget to share this info with your friends

Change LG Android IMEI, Write A New IMEI on LG Androids

For one reason or another, you might need to change your LG Android device IMEI which I believe is a fragile and tactical task.
Why? Most LG Android devices are Qualcom powered and the partition in which the IMEI is written is of system partition thus; any errors encountered during the process might render the phone useless.

In this tutorial, I discuss a more straight forward and simpler method of changing all Qualcom powered LG Android devices' IMEI.

NOTE: using this method, I have ONLY successfully changed some Qualcom powered LG Android devices. I have not used this method for any MTK LG Android devices.
If you have any, you may use this method to change MTK LG Android though, there is no guarantee that it will work for it.
Disclaimer:
Changing of IMEI is illegal in some countries and this publication is ONLY for tutorials purposes therefore; you are solely responsible for your actions.

Requirements for Changing LG Android IMEI

1. ROOT Access: the intended LG Android device must be rooted to successfully change the IMEI using the guides explained here.

2. Xposed installer: you need to have Xposed Installer installed on your LG android device. You may download Xposed Installer here.

3. IMEI Changer: you may download the IMEI changer from Play Store here.
The IMEI Changer linked above is the specific IMEI Changer needed for this method to work because it is an Xposed module.

Guides for Changing your LG Android IMEI

1. Install Xposed installer and launch it.

2. Click on Framework, then click on install/update.

3. When it is successfully updated, reboot your device.

4. Install IMEI changer.

5- Open Xposed Installer and click on modules. From the list, select and tick IMEI changer then, click on the IMEI Changer from within the Xposed Installer to lunch IMEI changer.

7. Generate your blackberry IMEI and input it in the space provided and click Apply.

8. Reboot your device and dial *#06# to confirm that your IMEI was successfully changed.

NOTE:
Please be informed that Xposed Installer bricks some android devices. I advised you not to proceed with this guide if you DO NOT have custom recovery flashed on your LG android device.

Good luck.
If you have any questions, use the comment box below. Also, don't forget to comment if this method works for you.

Tutorial – Como desativar TalkBack


Algum amigo ou você mesmo ativou essa maldita opcão que deixa os comandos de toque na tela do seu aparelho quase que impossívelis?! Aprenda a como desfazer!
A ferramenta TalkBack é de grande utilidade para pessoas portadoras de deficiencia visual, porém quando ativamos essa opção, tudo o que conhecemos sobre toque na tela muda! Vamos aprender a desfazer isso de uma vez por todas?!

Primeiramente temos que aprender a como comandar os toques na tela…
Um toque sobre o ítem = Selecionar
Dois toques sobre o ítem após selecionar = Abrir
Para arrastar a janela para baixo ou cima utilize dois dedos simultaneamente paralelos entre si na tela, arraste os dois juntos para cima ou para baixo

Para desativar, abra seu menu, tocando uma vez sobre o ícone para selecionar e depois duas vezes para abrir.
Screenshot_2015-05-19-10-50-09
Vá em Configurações do mesmo jeito que abriu o Menu (tocando uma vez sobre o ícone para selecionar e depois duas vezes para abrir).
Screenshot_2015-05-19-10-50-21
Utilize dois dedos na tela simultaneamente, paralelos e orizontalmente; arraste-os para cima ou para baixo para rolar sobre as configurações. (como mostrado a baixo)
Screenshot_2015-05-19-10-51-17Screenshot_2015-05-19-10-51-09
Abra a aba Acessibilidade e dopois TalkBack (tocando uma vez sobre a aba para selecionar e depois duas vezes para abrir)
Screenshot_2015-05-19-10-52-14
Selecione a opção e desative.(tocando uma vez sobre o a aba para selecionar e depois duas vezes para abrir). Seja feliz novamente =D
Screenshot_2015-05-19-10-52-28Screenshot_2015-05-19-10-52-22


How to Flash Recovery File On Android Devices Using Mobile Uncle

Mobile Uncle is one of the commonest MTK android devices applications but besides the many functionalities and wonders the app can perform on the MTK androids, it can also be used to carry out certain operations on other android devices other than the MTK androids.

Such operations include tweaking android devices signal strength and details, resetting the EDGE, GPRS, H/H+ services, checking the complete status of the phone, flashing custom recovery among others.

In this tutorial, I discuss how to flash any recovery.img file on any android device using the Mobile Uncle application.
Please note that this process ONLY works with rooted android devices.
Requirements for this Procedure
1- Mobile Uncle Application installed on the android device. Mobile Uncle can be downloaded from the Play Store.
2- The android device must be rooted. Visit this page for root solutions for android devices.
3- Recovery.img file you wish to flash on the android device.

How to Flash Any Recovery On Android Device Using Mobile Uncle Application

1- Install Mobile Uncle Application: if not already installed, download the Mobile Uncle application from the Play Store and install it on your phone.

2- Lunch Mobile Uncle: lunch the Mobile Uncle application (grant it root access, if it requests) and wait a few seconds for Mobile Uncle to setup on your phone for the first time.

3- Move Recovery.img File: if you have already downloaded the recovery.img file on your phone, move it to the root folder of your SD Card or Phone (Mass/Internal) storage.

4- Flash the Recovery.img: on Mobile Uncle, locate the Recovery Update option and Click It. The next page shows you Recovery File In SDCard and other recovery files which are usally fetched across various sites by Mobile Uncle.

Simply select the one you wish to flash on the phone, confirm it and wait for the flashing operation to complete.

NOTE:
You should ONLY select the recovery file for your exact phone which is already downloaded on the phone. You can identify it by its name.
5- Reboot Recovery: when the flashing operation is complete, Mobile Uncle asks you "Reboot Recovery?", you should click "yes" to confirm that your new recovery has been flashed.
NOTE:
Mobile Uncle might not be able to boot some phones to recovery. In cases as such, you should manually boot the phone to recovery via any method known to you.
Good luck.

Custom Recovery for Lenovo S960s, Vibe X: Download Here

Recovery is an essential partition of an android device. It is the partition where maintenance of Android devices such factory resetting of the phone, flashing of the ROM and some other tweaks, advanced customized apps among others are being done.

The use for the Android recovery partition lists as much as can be remembered. However, having custom Recovery flashed on every Android devices is more useful and relaxing as compared to the stock recovery.
The Stock Recovery is the recovery partition that comes pre-built with most Android devices.
While the Custom Recovery is the modified recovery partition created and modified for advance uses on the Android system by some individuals or a group of people. 
The Stock Recovery has limited functionalities by build meanwhile, the Custom Recovery functionalities is endless.

In this article, I have attached a Custom Recovery (ClockworkMod) for use on Lenovo S960s.

The Lenovo S960s is one of the most recent Lenovo smartphones with beautiful designs and features.
To further add beauty to my Lenovo S960s, I created and flashed a ClockworkMod custom Recovery for it and by that, I am able to flash custom ROM on it, modify several other things; making it look just the way I like it.

Where to Download the Custom Recovery for Lenovo S960s

You may download the ClockWorkMod recovery for the Lenovo S960s here.

Learn how to flash the ClockWorkMod recovery on your Lenovo S960s here.

NOTE:
This custom ClockWorkMod recovery is made and being used ONLY on Lenovo S960s. I cannot say if it will work for or on Lenovo S960.
You may try it on Lenovo S960 though, it won't have any negative effect on your phone provided that you follow the right procedure.

If you have any questions, use the comment box below. And don't forget to share this with friends if it works for you.

Preferred Alternative for IDM, Internet Download Manager

The need for internet download manager and booster for Windows PC is on the high side since downloading on most browsers on the Windows PC are really slow and boring. Although, UC Browser for Windows PC is really doing its part, proven to have been the number 1 Windows PC browser with the best download manager.

IDM is probably the most known download manager for the Windows PC and it is really good however, IDM is not completely FREE for use though, IDM crack versions are available for use.

But, instead of using the cracked version of the IDM which subsequently fails and have high risks of infesting your PC with virus of all sorts, why not seek for an alternative for the IDM which is completely FREE for use.

Well, if you seek to download an alternative download manager and download booster for use on your Windows PC, here is one for you.

DAP, Download Accelerator Plus is such a program that can serve as alternative for IDM, if not even better.

DAP has virtually all the features you enjoy on IDM and downloads as fast as Intert Download Manager as well.

DAP, Download Accelerator Plus Features

1- Simultenous Download:
Similar to most other download accelerators, DAP supports simultaneous downloads which means, you can download multiple files at a time and at almost the same speed.

2- Pause And Resume:
Using DAP, you can easily pause your current downloads and resume your downloads later. Although this feature is not supported on some servers, DAP automatically identifies supported servers and warns you either to proceed or not.

3- Automatic Mirror Speed:
DAP can automatically switch your ongoing downloads from one server to another if it finds out that your current mirror is slower without losing the already downloaded files.

4- Easy Integration:
DAP automatically integrates with your browsers such that whichever file to be downloaded from the browsers are grabbed automatically by DAP, making downloads easier for you.

CAUTION:
DAP is known to have contained malware. While installing DAP on your PC, be sure that you choose the custom installation so that you may install ONLY DAP on your PC.
If you mistakenly choose "the Complete" installation, DAP will install malware on your PC and they will make your browsers almost USABLE.

You may download DAP from here.

Clipper Lets you See All Copied Texts On Android Device

Android OS is a magnificent OS loaded with lots of functionalities and to even make it better, there are bunch of applications ready to complement its beauty.

In this article, I am going to reveal one of the beauties of the Android OS you probably didn't know of yet and that is the Android OS Clipboard.

On most OS, Operating System, the Clipboard is the specific memory made available for copied texts. Thus, any text files or document you copied within any program on the system are saved on the Clipboard.

In Android, the Clipboard saves up to 100 last copied text files or documents before they are overwritten by another - this is beautiful. Isn't it?

But ordinarily, you only have access to the last copied text whenever you need to paste your copied text back. Though, some applications like UC Browser lets you see and paste/copy your previously copied texts from the Clipboard but they are not widely available.

Meanwhile, to complement this beauty, you need applications like Clipper.

Clipper is an android application designed to work on any android devices and purposely for the management of the Android system Clipboard. With Clipper application installed on your Android device, you can view, copy, paste and even segment or re-arrange your copied text documents on the Clipboard.

Clipper lets you see up to the last 20 copied text files and documents (on Free version) and up to the last 50 or 100 copied texts on paid version.

Where to Download Clipper App

The Clipper application is available for download on the Google Play Store precisely from the link here.

How to Use the Clipper App

Using the Clipper App is as simple as copying texts on your Android Devices.

1- Download and Install Clipper: just download and install the Clipper App on your Android device.

2- Start Copying Text: any text you copy are automatically saved on the Clipper App.

3- Manage Copied Texts On Clipper: to re-copy, paste, re-arrange or permanently save some or all of your copied texts, simply open your Clipper App from App Drawer or anywhere to access your copied text documents.

It's as simple as that.

Improve your HTC Androids' Battery Span By 100%: Simplified Guides

If you are here, it means you either have an HTC android device whose battery gives you concerns, you wish to purchase an HTC android device and wonder if you could elongate its battery life or that, you have someone whose HTC android device's battery drains faster.

No doubt. HTC produces one of the best android devices. Talking of the camera, the performance, the premium feel or the speed in all regards; HTC android devices have got it all.

However, there is always "one but" on most HTC android devices and that's their battery span per fully-charged.

Here in this article, I reveal how to elongate your HTC android device battery span by up to %100. By this, I mean if your HTC android device ordinarily last for 3 hours when fully charged, it would last for 8 hours when fully charged if you put these tips to use.

7 Tips And Practices to Elongate HTC Devices Battery Span

1- Root Access:
It has been proven that most android devices with root access consumes lesser power compare to those with NO root access. Reason being that most rooted android devices distributes power across the android system better than those with no root access.

Afraid of security breach? Yes. It's necessary but you may use the normal and appropriate procedure to gain the root access on your HTC android phone and stay put. If you desist from installing suspicious applications on your android device, no harm will ever come and no security would ever be breached.

2- NFC (Near Field Communication):
NFC is a more recent communication system. The NFC can be used in the transfer of files and data.
It is being used by some mobile phone users but not at all times meanwhile, the NFC is always ON by default.
More often, the NFC behaves more like Infra-red. It interacts with nearby devices though you did not initiate the communication.

Turning OFF the NFC would evidently improve your HTC android device battery span.

3- Display Brightness:
Following the Android System (in un-rooted android device), the Luncher, the DISPLAY is the next thing that consumes battery the most. You may confirm this by viewing your HTC android device battery usage.
To conserve the battery of your HTC android device, it is best to set your HTC android device brightness to MEDIUM. The medium stage is good for every environments and ventilations.

In some HTC android devices especially; the ones with custom ROMs flashed, you have the option to set the Display Brightness to Automatic which is OK.

4- Unused-Opened Apps:
On android devices, opened but unused apps consume a quota of battery as well. It is a good practice to always close unused apps to conserve battery.
This is no doubt another way to elongating your HTC android device battery span.

5- Data Service Status:
This affects all android devices but it is more evident on HTC android devices.
When the Data, 3G/4G/H/H+ service is not so good and stable at a particular time and the data service on the phone is ON of course, most apps especially; the background apps would be connecting to the internet which will eventually result in snap battery drain and put the device in abnormal temperature state.

In situations like these, when the data service is not so good, it is better to turn off the data service for that time.
Doing so would conserve your battery and improve its life span.

6- Battery Conservator:
Most recent HTC android devices come with native battery saver. This battery saver does a very good work.
It at least, adds up 45% more time to the span of my HTC One.

7- Charging Habits:
Another thing that kills most HTC android devices battery is poor charging habits.
When your HTC android device battery is fully charged, desist from charging until it goes below 20%.
This helps your HTC android device battery retain its power longer than usual.

Keep close to these tips and you will come back saying "Thank You" to me for helping you maximize the use of your HTC android device.

SavefromNET Downloads YouTube Videos Faster On Windows PC UC Browser

SavefromNET is one of the few Windows PC programs that can be used to download videos from YouTube and some other websites however, SavefromNET has compatibility issues and does not work well with some browsers.

SavefromNET works like extensions that's installed on browsers on your computer. It automatically integrates with the browsers on the PC. On some browsers like Firefox and IE, SavefromNET does not require additional add-ons while for some browsers like Google Chrome, it does require another third party add-on to function properly.

Recently, I used the SavefromNET on UCWeb Windows PC browser and it worked fine though, with the third party add-on installed on the browser.

Because the UCWeb Windows PC version is built on the same source as Google Chrome, it behaves more similar to the Google Chrome in the areas like plug-ins, add-on and extensions management.

I attempted downloading YouTube videos using the SavefromNET on the UC Browser installed on my Laptop and I was amazed by the download speed.

It does not crash not even for once and the download speed was about 8X faster compare to when downloading using other browsers in the same or similar service conditions and on the same laptop.

In case you are having difficulties installing SavefromNET on your UC Browser for Windows PC, you should follow the instructions here.

The instructions given above is specifically for how to install SavefromNET on Google Chrome, it does work for how to Install SavefromNET on UC Browser for Windows PC as well since they are built on the same source.

If you have any questions or comments, simply use the comment box below.

Remove iPhone Activation Lock

Remove iCloud Activation lock from your iPhone, iPad and iPod or simply bypass the iCloud unlock on the iPhone or iPad from ArykTECH.

What is Activation Lock on iPhone, iPad or iPod? 

On most Apple products, activation is required at first use.
This Activation credentials are subsequently required usually; the email and the password that was used when the iPhone, iPad or iPod was being set up at first use, to activate the iPhone, iPad or iPod whenever a factory reset is done on the iPhone, iPad or iPod.
The activation credentials are also required whenever the iPhone, iPad or iPod is upgraded or downgraded.

The activation credentials could be your iCloud Account details or any email credentials that was connected to the iPhone, iPad or iPod at first use.

My iPhone Just Locked. I Didn't Upgrade, Factory Reset or Downgrade it
If that's the case, it means Find My iPhone is activated on your iPhone, iPad or iPod and has been triggered to lock your device by the original user from iCloud.
If you're sure you purchased the device, you can bring it to ArykTECH. We will unlock the device and deactivate the Find My iPhone on it.

What is Find My iPhone?
Find My iPhone is a security measure that when enabled on iPhone, iPad or iPod, it allows the user to have remote access to the iPhone, iPad or iPod regardless of the location and time of the day.
Learn more about Find My iPhone here and how to check the Find My iPhone status.

Supported Apple Devices
Currently, we remove Activation Lock on all Apple products including iPhone 6, iPhone 6+, iPhone 5, 5s, 5c, iPhone 4 and 4s, and others. All iPads and iPod are also supported.

How Much Does the Service Costs? 
Device List: Price/Activation Unlock: Required Days (Working Days)
iPhone 4 ₦4,000 4 Days
iPhone 4s ₦9,000 14 Days
Other iPhones ₦15,000 14 Days
iPad1 (Original) ₦5,000 4 Days
Other iPads ₦20,000 14 Days
All iPods ₦15,000 14 Days


Please note that the price tag above for each Apple device does not include SIM/Network unlocks.
Learn more about iPhone, iPad SIM or Network Unlocks here.

Can you Remove the Activation Lock Remotely?
No. iCloud Unlock or Activation Lock remover on Apple devices cannot be done remotely, at least, we do not yet know of any means to remove the activation lock remotely.
In view of this, you either bring your iPhone, iPad or iPod to our office or send it over to us via courier or public transit.

Glo Infinito Social Introduces Better Call Rates, Dethrones Glo Bounce

Until recently, Glo Bounce was the best Glo tariff plan and the second best tariff plans of all the Nigerian networks following the MTN SuperSAVER.

Glo Infinito Social is now the best tariff plan of all the Nigerian networks' tariff plans.
Glo Infinito was first introduced sometimes 2011 and was discontinued later in the year. For one reason or another, Glo has now re-introduced the Glo Infinito social with loads of benefits.

What Can I Benefit By Migrating to Glo Infinito?

1- Free 15MB of Data On Recharges Above N200
Each time you recharge N200 and above, you are rewarded with 15MB of free data which can be used to browse the internet on any devices and at any time of the day.

2- Free Glo to Glo SMS, to Other Networks
Glo subscribers on the Glo Infinito Social also receive 1 SMS that can be used for any networks every time you send an SMS and also; free Glo to Glo SMS on recharges.

3- Access to Overload
As a Glo Infinito subscriber, you receive 200% bonus every time you recharge your Glo Infinito line with N200 recharge and above.

4- 10 Family And Friends Lines to be Called at Discounted Rates
Being on the Glo Infinito Social Plan, you can register up to 10 Glo lines as your Friends And Family.
Calls made to these lines would be charged at 11kobo/sec or about N7/min.

How to Migrate to Glo Infinito Social

To migrate to Glo Infinito Social dial;
*100*9*2#
NOTE:
Migration to the Glo Infinito Social is free provided that it was your first migration for the month otherwise, N100 will be charged.
How to Register Glo Friends And Family
To register Glo Friends And Family on the Glo Infinito social plan simply dial;
*100*1*the Glo Number#

To Modify Existing Number
If you wish to replace a Glo line with another Glo line in your Friends And Family list, dial;
*101 *2 *Existing Mobile Number*New Mobile Number#

To Remove A Line
If you wish to remove a Glo line permanently from your Glo Friends And Family list dial;
*101 *3 *Mobile Number#

If you have any more question, use the comment box below.

UC Browser for PC Now Available :Download Here

Back in the days, when Symbian and Java used to be the winning smartphones in the market and UC Browser was the one and only browser, I mean, the winning browser as at then, I used to wonder if there was a PC version of UC Browser.


It was as if the incorperation were listening to me, few months ago, the Windows PC version of UC Browser is introduced and was still in the beta stage until recently.

The UC Browser for Windows PC is now fully available and ready for download.

Features of the UC Browser for Windows PC

As always, the UC Browser for Windows PC features all the goodies that are loaded on other versions of the UC Browser especially, the android version of the Windows PC.

Below here, I have listed few of the features you are expected to enjoy while using the Windows PC version of the UC Browser.

1- Light Weight:
Although, UC Browser is usually loaded with superb features, it is always light-weight and smoother than most other browsers. This is one of the reasons why the UC Browser loads faster and consumes lesser application memory space on your PC.

2- Better Download Manager:
Another feature of the UC Browsers (all other versions) is also featured in the Windows PC version of the UC Browser.
The Download Manager that comes with the Windows PC version of the UC Browser can download faster than other PC browsers with pause and resume functionalities; making it better for downloads compare to other PC browsers.

3- Chrome Extension:
Because UC Browser for Windows PC is built on the same source as the Google Chrome, it supports the same and as much extension as the Google Chrome.

4- Sync And Cloud Download :
With the sync feature of the UC Browsers, you can always syncronise all your bookmarks and saved pages across your UC Browsers both on Windows PC version, android, symbian, java and iPhone and iPad versions.

5- Multi-Tabbed:
This feature lets you browse each website at a go in different Windows.
Although, this is no longer a new feature expected of any modern browsers, it is a good thing that this featured in the Windows PC version of the UC Browser.

The Windows PC version of the UC Browser is loaded with many features, you just have to download it and enjoy the goodness of browsing and downloading at the fastest speed.

To download the Windows PC version of the UC Browser, simply go here: PC UC Browser Download

Airtel's Special Data Bundle Plans for Android

If truth be told, Airtel is one of the most attentive GSM service providers in Nigeria when it comes to listening to their customers.
For some months now, Airtel introduced a special internet bundles specially designed for android devices, it is called Android Internet Service; AIS.

Besides the fact that Airtel is first to introduce the Android Internet Bundle plan, Airtel makes the plan in such a way that it is similar to the BlackBerry Internet Service and has similar features and usefulness.

Features of the Airtel Android Internet Bundle Plan

1- Customized Social Media Experience:
The Airtel Internet Bundle plan customizes your social media experience such that when you post on fecebook, twitter and other social media sites, it will append something like "posted via Android Internet Service" below your status updates.

2- Excess Data Allocation:
The Airtel Android Internet Service gives you more data compare to the usual plans.
E.g
2GB for N2,000,
3GB for N,2,500 (Night)
4.5GB for N3,500
3- Uncaped Internet Access:
With these plans, you can access the internet anywhere any time so long as the Airtel data service covers your area.

How to Subscribe for the Airtel Android Bundle Plan

To subscribe for any of the Airtel Android Internet Service, you just have to follow the simple step by step guides given below;

1-  Dial *141*1# on your phone. Wait few seconds for the response.
2- From the options, you will see the android option, simply select it.
3- The next screen shows you the available android data plans from Airtel thus; monthly, weekly and night plans.
Select your desired option and proceed.

This bundle plans works on any android devices and with any Airtel lines. Meanwhile, you should check to confirm if your Airtle line is compatible with this 9GB of data valid for 2 months at just N3,500 if you don't like this Android Internet Bundle plan that much.

Get 9GB for N3,500 And 4GB for N2,500: Airtel Users

Since the introduction of the android devices and other smartphones, most of the Nigeria networks have been listening to the plea of their customers and they have started pushing the various android data plans into the market.

Airtel Nigeria is one of the first to introduce their android data plan into the market, the Airtel 1 + 1 Android Data Plan.

This Airtel Android Data plan was once discontinued for some reasons best known to Airtel.

The good news is, the nice android data plan from Airtel Nigeria has recently been re-introduced and you can now continue enjoying the surplus data bundle from Airtel.

Although, there are series of working cheats for various android devices but most of them do always have shortcomings except for the Glo BIS cheat for androids. This Airtel Android Data plan is preferably better in case you can't keep up the struggles for finding android browsing cheats.

What to Know About the Airtel 1 + 1 Data Plan

1- Not All Airtel SIM is Eligible
It is not fair that not all Airtel SIMs will be able to use this Airtel 1+1 Android plan therefore, to use this plan, you need to varify that your line is eligible for the plan.
To verify that your line is qualified to use this Airtel 1 + 1 data plan for android, just follow the simple instructions below:
Dial *437*1# for the Android bundle of 4GB for N2,000or
Dial *438*1# for the Android bundle of 9GB for N3,500
If your line is eligible for the plan, you will receive a message similar to this;
Dear customer, you do not have sufficient balance for this plan
Congratulations. You may proceed to load your SIM with the amount and subscribe for the plan.

Meanwhile, if you receive the message quoted below;
“Dear customer, you do not qualify for this plan”,
You are not eligible for the plan. Don't subscribe for the plan because it will not work for your SIM.
However, you may use the alternative Airtel subscriptions.

Subscription Code for the Airtel Data Plan

If your line is eligible for the plan, below here is how to subscribe to either of the subscriptions;

1- Dial *437*1# to get 4GB at N2,000 valid for 2 months.
2- Dial *438*1# to get 9GB at N3,500 valid for 2 months.

NOTE:
1- To check your data balance, dial *223#
2- This Android data plan, 1+1 offer works on all devices, including iPhone/iPad, Windows phone, Symbian/Java phone, modem and others. All you need is just an eligible Airtel SIM card.

Secure Windows PC Folders And Files with Password: How-to

As common with most humans, we sometimes want to protect our privacy especially; if you are the type that relates with so many people, protecting your privacy might be a little difficult but with this simple Windows PC program, you can secure certain folder on your Windows PC by hiding them away from common users.


Why Should I Secure Any Folder or File On My Windows PC?
Well, there certainly is individual's differences but below here, I pointed out just tow (2) of the many reasons why you may have to secure some Windows PC folders or files with passwords or finally hide them away thereby preventing unauthorized access to your crucial documents.

1- Privacy Protection:
You may feel like protecting certain personal and private documents such as your CVs, Bank details, some projects document amongst others.
You can just pack them all in a folder and secure them with password or better still, hide them away that which I believe is safest.

2- Quarantine Purpose:
Ideally, most people delete some files only to discover in few days later that they still have need for those files.
If you see certain files on your PC which you feel you yet have needs for them, you just create a new folder, move all those files in it and hide them.
That way, you will feel safer and your PC will look better and free of junks as well.

So, How Do I Secure or Hide Certain Folders On Windows PC?

Although, by default, it is possible to hide certain folders on Windows PC but you cannot secure them with password and as a matter of fact; you can search for those hidden files.

Meanwhile, to complement these shortcomings, there are loads of programs out there that can be used to hide and secure your Windows PC files and folders.
Here, I am going to discuss Folder Hidden as one of the best and completely free programs good for securing and protecting your Windows PC files and folders.

How to Use Folder Hidden to Hide And Secure Windows PC Folders

1- Download And Install Folder Hidden:
Download Folder Hidden from www.winmend.com/folder-hidden/ and install it on your Windows PC.

2– Setup Folder Hidden:
Now, you will need to setup the program following a successful installation of the program on your PC.
Simply Open the Folder Hidden program by double-clicking its short cut icon on your desktop. The first time you use it, you’ll be asked to enter a password.
This password would be used to accessing your secured files and folders so, use a password you cannot forget or lose.

3– Wait for the Programto Load:
This may take a moment but you need to wait a bit for the program to load. Once the program is loaded, click on the Hide Folder button.

4– Hiding Any Folder or File:
To hide any file or folder, simply navigate to the folder you wish to protect, select it with your mouse, then click OK. That folder is now hidden from within Windows Explorer and it cannot be seen by any programs on the PC.
If you wish to hide more files and folders, you may repeat this process as many times as you want.

And by that, you are done.

How to Access My Hidden Files And Folders:
To access your hidden folders, simply run the Folder Hidden program again.
From within Folder Hidden program, all your hidden programs are viewable and from there, you can simply Right-click on the folder you wish to access and click Unhide.

That's all.

How to Check Find My iPhone Status On Apple Products

Few days ago, a guy brought an iPhone 6 with Find My iPhone on it to me. He wanted to unlock the iPhone 6.
Mostly, I treat such services with extra care because most that demand for such services either stole the iPhone or bought it on the street. But in this guy's case, the iPhone 6 was purchased legitimately because he was able to provide me all the document I demanded for.

Just in case you ever wish to purchase an iPhone from someone or want to swap, it is always advisable for you to check if the iPhone, iPad or iPod is having Find My iPhone Service enabled.

What is Find My iPhone?

Find My iPhone is a security measure that when enabled on iPhones, iPads and some other Apple products, helps the user of that particular Apple product to have remote access on the iPhone, iPad or any Apple product on which the Find My iPhone service is activated.

Why Do I Have to Check the Find My iPhone Status?

For many reasons, it is necessary for you to check the Find My iPhone status of any iPhone, iPad or iPod you are to buy. Below here, I list few reasons why you should check the Find My iPhone service status on most Apple product you wish to buy or swap.

1- For Ownership Claims:
Even if you have purchased the Apple product directly from the original owner with Find My iPhone service enabled on the device, if you don't know the Find My iPhone details usually; the Username and the Password the original owner used, you are still not the owner of the iPhone, iPad or iPod because you won't have full access on it.

2- Upgrade/Restore Possibility Reasons:
If Find My iPhone service is enabled on your iPhone, iPad or iPod and for one reason or another; you could not remember the Find My iPhone service details, you may not be able to factory reset, restore or upgrade the iPhone, iPad or iPod. This is because if you do, the iPhone, iPad or iPod will first request for your Find My iPhone service details before it boots on to your app drawer.

Besides that, you won't be able to access anything on the device. It will simply be as good as dead gadget on your hand.

3- Avoid Extra Costs:
If for any reason, the device eventually requests for the Find My iPhone service details in the future, you will be forced to remove the Find My iPhone service on the device -and that's done for N25,000 at ArykTECH at the moment and we do it ONLY if you are able to prove that you are the real owner of it supported with police report and affidavit.

How to Check Find My iPhone Status

Now, checking the Find My iPhone service status of any Apple products is really simple an only takes few seconds.
To check the find my iPhone status of any Apple products, simple follow the guides below;

1- Write down the IMEI of the iPhone, iPad or iPod. If you don't know how to check the IMEI, simply dial *#06# on the phone.

2- Visit the Apple Activation Lock page here.

3- Enter the IMEI or Serial number of the device on the space provided as in the image below.

4- Enter the capcha code in the space provided as in the image below.

5- Click Continue. The next page shows you either Find My iPhone is enabled on the device or not.

How to Install SavefromNET On Chrome Browser

SavefromNET is an add-on basically used for downloading videos from YouTube, Dailymotion and a host of other websites however; due to the Google strict policy to protecting users' privacy, SavefromNET is mostly difficult to install on Chrome browser.

In this tutorial, I walk you through the step by step guides to install the SavefromNET on your Windows PC so that you may enjoy flawless uninterrupted video downloads from YouTube and other websites compatible with SavefromNET.
NOTE:
Google does not allow the installation of SavefromNET probably because they feel it's not safe to be installed on your browser. If you proceed to install SavefromNET on your PC, you do so at your own risk.
ArykTECH, Aryk Enterprise or me may not be held responsible for any damage(s) or loss of any kind you suffer as a result from your use of the program, SavefromNET.

1- Goto Chrome Webstore:
Open Google Chrome on your PC and go to the Chrome Webstore. You may click the link here to take you straight to the Chrome Webstore.

2- Download Tampermonkey from Chrome Webstore:
From the Chrome webstore, search for Tampermonkey or go here to visit the Tampermonkey download page on the Chrome Webstore.

3- Install Tampermonkey On Chrome:
Once the download is complete, click install to install the Tampermonkey on Chrome.

Once the installation of the TamperMonkey is successful, you have completed the first phase of installing the SavefromNET on Chrome browser.

Phase 2:

1- Download SavefromNET:
Now, you may visit the link here to download the SavefromNET on to your PC.

2- Install the SavefromNET:
Double-click the SavefromNET.exe file you just download to install it on the PC.
NOTE:i- Chrome has to be closed before you install SavefromNET on your PC.
ii- You need an active internet connection to install the SavefromNET on your PC.
3- Open Chrome:
On successful installation of the SavefromNET, you should open Google Chrome. For the first time, SavefromNET would be set up on Chrome and pop up message confirming the successful installation would be displayed.

Congratulations! You have just successfully installed the SavefromNET on Google Chrome. You can now proceed to downloading videos from YouTube and other websites on which the SavefromNET can download from.

If you don't know how to download videos from YouTube using SavefromNET, you may check here for instruction on how to download YouTube Videos using SavefromNET.

How to Download Videos from YouTube On PC

Due to the YouTube strict policy, it has been quiet difficult to download videos from YouTube. Do I have to say this...? Many developers and softwares respect the YouTube policy.

However, most people don't want to always go on YouTube whenever there is need to see videos on YouTube especially; in areas where the network signals are mostly poor, where buffering takes more time than the video you are to see.

Anyways, there are many programs that claim that they can download videos from YouTube but when installed on your PC, you will find out that they are either not doing the work at all or that they are junks of viruses threatning your PC.

3 Best YouTube Vide Downloaders for Windows PC

Here, I reveal 3 best Windows PC programs you can use to download videos of any lenght from YouTube at preferrably high speed.

1- ClipGrab
ClipGrab is a Windows program that does the work just the way you want it. It is a stand-alone application unlike most other programs that integrate with your PC browsers like an add on or extension.

How to Download YouTube Videos from ClipGrab

1- Download ClipGrab from the link here.
Visit the link above to download the ClipGrab application on your PC.

2- Install ClipGrab following the Installer's setup guide.
Navigate to the folder where you have downloaded the ClipGrab .exe file, double-click it to install the ClipGrab program on your PC.

3- Lunch ClipGrab from your PC
Locate the ClipGrab application on your PC either from your Desktop or wherever you can find its shortcut. Lunch the ClipGrap application.

4- Search for the Video you Wish to Download
In the field provided, type the name of the Video you wish to download from YouTube E.g Aryk Enterprise.

By that search string, it will bring all the videos from Aryk Enterprise and from there you can choose the video you want.

5- Select the Video
Choose the video of your choice from the list the search brings you.

6- Select the Format/Bit
Choose the format and size of the video you wish to download and proceed.

7- Click "Grab this Clip!"
Click "Grab this Clip!". And by this, you will be prompted to select the folder in which you wish to download the video and by that, you are done.
Just relax and watch while your videos are being downloaded.
NOTE:
ClipGrab ONLY downloads videos from YouTube.
2- SavefromNET
SavefromNET is the second Windows PC program I would recomment for you to use for downloading videos from YouTube.
SavefromNET can actually download videos from about 40 websites including YouTube, Dailymotion and the rest of it.

SavefromNET actually work like an Add-On. With Firefoxs and other browsers, SavefromNET works fine except for Chrome.
For instructions on how to install SavefromNET on Chrome Browser, click here.

How to Download Videos from YouTube Using SafefromNET

1- Download SavefromNET from the link here.
Download SavefromNET from the link above.

2- Install SavefromNET on your PC
Navigate to the folder where the SavefromNET.exe file is downloaded, double-click it to install the file on your Windows PC.

3- Lunch/Open Any of your Browsers
Open/lunch any of your browsers on your PC to see if the SavefromNET program has been installed.

4- Visit either of the Supported Websites
SavefromNET supports about 40 websites including YouTube, Dailymotion, Facebook and the rest. Just visit any of them and navigate to the video you wish to download.

5- Locate SavefromNET Link Below Each Video
Below the video, you should notice the SavefromNET icon, simply click on it to see your options.

6- Select the Video Format/Bit
From the options you see when you click on the SavefromNET icon, select the video format/size you wish to download and proceed.

7- Begin Download
NOTE:
While installing the SavefromNET program on your PC, make sure that you choose the recommended option and from there, choose to install ONLY the SavefromNET program to avaoid viruses.
See the image below;


3- IDM -Internet Download Manager
I would have recommended IDM as the first and best Windows PC program for downloading videos from YouTube but it comes as a trial which means you have to purchase it after a period of 30 days to continue enjoying the full service.

I don't know why but majority hate paying for worthy service. Some even wish that everything in life be made free. I like free stuff, too. I can't deny it but I pay for services that are well worth it.

If truth be told, IDM is really good. I mean, it can download videos from any website. Just any website for as long as it is a recognised video format.

How to Download Videos from YouTube Using IDM
1- Download IDM on to your PC from here.
Download IDM from the link above on to a folder on your PC.

2- Install IDM on your PC
Navigate to the folder wherein you have downloaded the IDM.exe file. Double-click the file to install it on your PC.

3- Lunch Any of your Browsers
When installed, IDM automatically integrates with your browsers. Simply lunch any of your browsers for IDM to configure itself. This is done only once following a successful installation of IDM on your PC.

4- Visit the Website from which you wish to download the Video
Now, open the website from which you wish to download the video, navigate to the video you wish to download.

5- Play the Video
Now, before the IDM icon can be visible on the page, you need to play the video.
Simply click on the video to play it or click anywhere where you see the "Play" icon to play the video.

6- Locate the IDM icon
Once the video starts playing, the IDM icon becomes visible on the page. Click the icon to view the video option.

7- Select your Video Format/Bit
From the options, select the video format and the size you wish to download and proceed.

8- Begin Download

How to Root LG G4

LG G4 is one of the most recent additions into the android market from LG. Going by both the features and beautiful design, the LG G4 surpasses its predecessor, the LG G3; that's as expected though.

Ordinarily, you would enjoy using every single feature of the LG G4 but to further enjoy it, you should consider rooting your LG G4.

In case you have attempted rooting the phone and having some difficulties at that rooting it, here is a simple tutorial that walks you through the step by step procedures on how to root the LG G4.

Rooting LG G4, What Does it Mean?

All untampered android devices come with some secured/protected partitions. This protected partitions prevent some applications from gaining access to the crucial aspects/parts of the android devices' system.

Meanwhile, rooting android device is the process of removing the locks on the protected partitions of the android device system.

Why Root Android Device?
Rooting your android device makes it possible for you to perform a lot of activities you might not be able to perform ordinarily, giving more controls over the activities of the phone.

Activities like changing the phone's fonts, tweaking the IMEI, using some VPN apps, changing or hiding your IPs among others.

Although, the LG G4 already comes with some fonts and can be changed at will, rooting the LG G4 makes it possible for you add additional fonts.

Any Side Effects Rooting your Android Device?
Sure. There are some side effects. However, almost all the side effects can be over-ridden or avoided if you desist from going beyond your limits.

The simple rule to avoid all the side effects is "Do not do what you are not sure of and do not install apps you can't handle"

How to Root your LG G4

1- Download StumpROOT App from here or the Latest Kingroot from here:
StumpRoot is a trusted application you can rely on in rooting your LG G4 since most other rooting applications tends to either brick the phone or fail in rooting most LG phones. You may try Kingroot as well.
NOTE:
To use Kingroot, you need to have active swift internet access.
2- Install StumpRoot On your LG G4:
Once the download is complete, proceed to installing the application on your phone.
Remember to enable "Install Non-market App" option on your android device.

3- Run/Lunch the stumproot application on your phone:
Now, locate the stumproot application icon on your LG G4 app drawer, open the application. Run it and wait patiently until it complete the processes.

4- Download SU Manager from PlayStore or Install it:
All things being equal, if stumproot is able to successful compile and install the necessary scripts, it would instruct you to install SU Manager (SuperSU or Super User) from the PlayStore.

At this point, you may download either of them from the PlayStore or install either of them straight away (if you have the .apk file on your phone).
And by this, you have successfully rooted your LG G3.

You can test the root access by installing Rootchecker on the phone from PlayStore or running an application that requires root access on the phone.

Things to NOTE:
i- For a successful rooting operation, you should factory reset your LG G4 before you attempt rooting it with Stumproot.

ii- You should make sure that you backup your files before you proceed as rooting of android devices are not mostly determinative.

How to Root LG G3

Having some difficulties in rooting your LG G3? Here is a simple tutorial that walks you through the step by step procedures on how to root your LG G3.

LG G3 is one of the most beautiful android phones ever made by LG prior to its introduction. LG G3 was first introduced to the market in June, 2014 and comes with android 4.4.2 Kitkat bundled with many other stunning features.

Rooting Android, What Does it Mean?
All untampered android devices come with some secured/protected partitions. This protected partitions prevent some applications from gaining access to the crucial aspects/parts of the android devices' system.

Meanwhile, rooting android device is the process of removing the locks on the protected partitions of the android device system.

Why Root Android Device?
Rooting your android device makes it possible for you to perform a lot of activities you might not be able to perform ordinarily on the phone.

Activities like changing the phone's fonts, tweaking the IMEI, using some VPN apps, changing or hiding your IPs among others.

Any Side Effects Rooting your Android Device?
Sure. There are some side effects. However, almost all the side effects can be over-ridden or avoided if you desist from going beyond your limits.

The simple rule to avoid all the side effects is "Do not do what you are not sure of and do not install apps you can't handle"

How to Root your LG G3, Now

1- Download StumpROOT App from here:
StumpRoot is a trusted application you can rely on in rooting your LG G3 since most other rooting applications tends to either brick the phone or fail in rooting.

2- Install StumpRoot On your LG G3:
Once the download is complete, proceed to installing the application on your phone.
Remember to enable "Install Non-market App" option on your android device.

3- Run/Lunch the stumproot application on your phone:
Now, locate the stumproot application icon on your phone, open the application. Run it and wait patiently until it complete the processes.

4- Download SU Manager from PlayStore or Install it:
All things being equal, if stumproot is able to successful compile and install the necessary script, it would instruct you to install SU Manager (SuperSU or Super User) from the PlayStore.

At this point, you may download either of them from the PlayStore or install either of them straight away (if you the .apk file on your phone).
And by this, you have successfully rooted your LG G3.

Things to NOTE:
i- For a successful rooting operation, you should factory reset your LG G3 before you attempt rooting it with Stumproot.

ii- You should make sure that you backup your files before you proceed as rooting of android devices are not mostly determinative.

ADB Sideload Command: How to Use it to Revive Android

The ADB sideload Command comes with android devices starting from the android 4.2.2 (if I can still remember well). This command is very useful in reviving most android devices especially; when you mistakenly wipe the android system files of android device while trying to flash a new ROM on the android device or; in a process whereby an android device file system got corrupted.

What is ADB Sideload?

ADB Sideload is an android device ADB command line that can be used to push files into an android device.
The command can be used with both custom and stock recoveries however, you can pretty do much less with the command when you are having stock recovery on your android device.

To fully utilize the usefulness of the ADB Sideload command, you need to have to custom recovery flashed on the phone.

You may refer to this page on how to flash custom recovery on most rooted android devices (Qualcomm Powered). How to flash custom recovery on MTK android device here or the specific instruction for flashing custom recovery on Samsung android devices here.

When Can I Use ADB Sideload?
Because the ADB Sideload command is being used to pushing files like ROM, recovery.img files among others on android devices while in recovery, you can ONLY use the ADB Sideload command when you are in recovery mode and that the sysem could identify your device in recovery mode.

In What Situation Can the ADB Sideload Command Help Me?

Although, this command line is useful in reviving most android devices, it would still be useless if your android device does meet any or some of the situations narrated below:

1- For HTC android devices;
i- Your HTC android device must be S-Off. More information on S-Off here.
ii- If your HTC android is not S-Off, you should have custom recovery flashed on the phone prior to using ADB Sideload command.
iii- If your HTC android is not S-Off and do not have custom recovery flashed on it, you must be using an HTC signed ROM, Recovery or any other files for the phone.

2- For Samsung Androids;
i- You must have custom recovery flashed on the phone otherwise, ADB Sideload might not work for you.

3- For MTK Androids such as; Tecno, Infinix, Oppson, etc.
i- You must have custom recovery flashed on the phone.
ii- You must be using the phone's specific file. If your phone has a working custom ROM, you can use it for it or find another type of that phone, extract its ROM or other file(s) you might need on it and flash it.
Learn how to extract MTK android ROM here.

How Do I Use the ADB Sideload Command?

Please, note that you must first setup ADB Tools on your PC.
For info on how to setup ADB Tools, go here.

1- Install Specific Android Drivers for your Phone:
If you do not have android drivers installed on your PC, simply download and install it. PDanet, Moborobo and Mobogenie are known to be very good universal android drivers.
NOTE:
I don't think any of them work well for iTel. iTel android users should look for specific android drivers for their phones.
2- Boot the Phone to Recovery:
Once you have installed the necessary drivers, boot the phone to recovery using the right key combination for booting the phone to recovery or; by any means you see fit. Just boot it to recovery.

3- Connect the Phone to your PC:
Now, you should connect the phone to your PC using the compatible USB Cable, wait few seconds for the PC to install the necessary drivers then; proceed.

4- Lunch Command Prompt on your PC:
Lunch command prompt on your PC and navigate to the folder where your ADB Tools are packed by typing;
i- cd c:/the-name-of-the-folder e.g cd c:/adb and press "enter" button
ii- On your phone, enable the sideload option.
TWRP recovery user should tap Advance >> ADB Sideload.
Mark Wipe Delvik Cache and Wipe Cache then; Swipe to Start Sideload
iii- On Command Prompt, type adb sideload the-name-of-file-you-want-to-push-on-the-phone then, press "enter".
NOTE:
You may also drag the file to Command Prompt and press enter.

5- Wait Until the File is Successfully Transfered:
Here, you have to be patient until the transfer process is completed. Once completed, the phone will attempt to flash the ROM straight away -this is the reason you have to make sure that you are pushing the exact file for the phone on it.

Although, if it's a wrong file, the phone maynot flash it meanwhile; some phones will flash it and that could worsen the phone's situation.

Still don't understand the process? Below I have attached a video that displays a live ADB Sideload illustration.

How to Put your Android Device In Safe Mode

Just like it is used on Windows Computers, Safe Mode is used to correct certain errors in android devices or to troubleshoot certain malfunctions either in the phone inbuilt applications or installed applications.

Safe Mode in android device is very useful, especially when the error is just beginning to manifest.

How Does Android Safe Mode Works?

In Safe Mode, android devices are being run with less features and functionalities meanwhile, not all applications features are available in Safe Mode because certain shells have been disabled (In Safe Mode) by the android system.

As a result, you can fully manage most application on android devices when in safe mode.

In What Circumstances Can I Use Android Safe-Mode?
Although, this depends on the kind of error or malfunctions you experience on the device, I enlist few of the things that may warrant putting your android device in safe mode.

1- Un-installable Applications: if you recently installed certain application on your android device and notice certain malfunctions on the phone, you might have to uninstall that particular application.

However, if such application fails to uninstall, you may boot your phone to safe mode and uninstall the app from there.

2- Proper SuperSU Clear: certain devices like the HTC One M9 do display some funny behaviours when they are not rooted either using the right app or following the right procedures. In such cases, you may need to boot the phone in safe mode, uninstall the app you used in rooting the phone, clear SU Script and restart the phone to restore its proper functions.

Generally, Safe Mode is useful for putting your android devices back into its normal shap and form whenever you noticed any abnormalities that cannot be solved in normal android mode.

How Do I Turn On Safe Mode In Android?

Although, it is not the same for all android devices, the method discussed here works for most androids.

To put your android device in safe mode, simply follow the guides below;

1- Press and hold the power button of the android until the screen that lists;
i- Power Off
ii- Airplane Mode
iii- Restart
shows up as in the image below;

2- Release the Power-Button
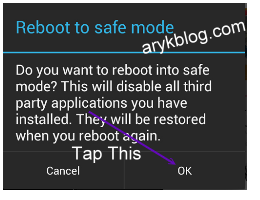
3- Press and hold the Power Off option until it asks;
"Do you want to reboot to safe mode...."
as in the image below;

4- Tap OK and your phone will reboot to safe mode.

You can do whatever you wish to do in safe mode and restart the phone back.